技术笔记——Django+Nginx+uwsgi搭建自己的博客(六)
这篇应该是2017年的最后一篇博客了,在这里首先祝大家元旦快乐!
从这篇博客开始,将会介绍Blogs App的功能实现,包括数据模型的建立、相关功能的视图函数的实现、前端页面的设计等,这意味着我们即将可以书写真正的博客了。
首先来建立我们的Blogs App,方法同建立Users App,即在manage.py目录下输入以下命令:
python3 manage.py startapp blogs在建立了Blogs App后,我们首先要建立它的数据模型。Blogs App包括三张表:Blog、Comment和Category。Blog表包括博客的标题、作者等主要信息;Comment存储博客的评论内容,而Category是博客的分类。Blog表的model如下:
# blogs/models.py
# -*- coding=utf-8 -*-
from django.db import models
from users.models import Users
from ckeditor_uploader.fields import RichTextUploadingField
from django.utils import timezone

class Blog(models.Model):
    title = models.CharField(max_length=32,verbose_name=u'标题')
    auther = models.ForeignKey(Users,default='')
    category = models.ForeignKey(Category,null=True)
    content = RichTextUploadingField(verbose_name=u'内容')
    createdate = models.DateTimeField('Create time',default=timezone.now())
    modifydate = models.DateTimeField('Modify time',default=timezone.now())
    readcount = models.IntegerField(default=0)
    # Add comment count
    commentcount = models.IntegerField(default=0,null=True,blank=True)
    draft = models.BooleanField(default=True)

    @classmethod
    def create(cls,title,authername,category,content,createdate,modifydate):
        blog = cls(title=title,auther=authername,category=category,content=content,createdate=createdate,modifydate=modifydate)
        return blog

    def __unicode__(self):
return self.titletitle: 博客标题,最长32
auther: 作者,是Users的外键
category: 类别,是Category的外键
content: 博客的正文。这里使用了CKeditor编辑器提供的富文本域来存储博客的正文,以便之后的图文混排操作。CKeditor的部分将在后面介绍。
createdate: 博客的发表时间,这里的时间用的是timezone.now(),即使用settings.py中定义的时区来决定当前的时间。
modifydate: 博客的修改时间
readcount: 博客的阅读数
commentcount: 博客拥有的评论数
draft: 草稿标记,当为True时表示博客为草稿状态,将不会在主页出现;当为False时博客为正文状态,将在正文出现。
下面是Category model和Comment model:
# blogs/models.py
# ...
class Category(models.Model):
    categoryname = models.CharField(max_length=8,unique=True)
    blogcount = models.IntegerField()

    def __unicode__(self):
        return self.categoryname


class Comment(models.Model):
    attachedblog = models.ForeignKey(Blog)
    content = models.TextField()
    auther = models.ForeignKey(Users,default='')
    createtime = models.DateTimeField('Comment Create time')

    @classmethod
    def create(cls,attachedblog,content,authername,createtime):
        comment = cls(attachedblog=attachedblog,auther=authername,content=content,createtime=createtime)
        return comment

    def __unicode__(self):
        return self.content
Category model比较简单,只有两个字段:categoryname类别名和blogcount博客数量。
Comment model相对复杂一些:
attachedblog:每篇评论都要属于一篇博客,该字段表明评论属于哪篇博客
content:评论内容
auther:评论的作者
createtime:评论的发表时间
在建立好这些model后,和Users App一样,我们来做一些基本的配置工作:在blogs/apps.py和blogs/admin.py中注册这些model和App,并将Blogs App加入到myblog/settings.py中。
# blogs/apps.py
from django.apps import AppConfig
class BlogsConfig(AppConfig):
    name = 'blogs'
# blogs/admin.py
from django.contrib import admin
from .models import Blog,Category
# Register your models here.
admin.site.register(Blog)
admin.site.register(Category)# myblog/settings.py
# ...
INSTALLED_APPS = [
'blogs.apps.BlogsConfig',
'users.apps.UsersConfig',
# ...
]
# ...首先来看浏览功能的实现。浏览功能,即根据Blog的id得到其相关内容并显示在页面上,相对比较简单,代码如下:
# blogs/views.py
def content(request,blogId):
    blog = Blog.objects.get(id=blogId)
    comment = Comment.objects.filter(attachedblog=blog)
    request.session['currblogId'] = blogId
    blog_title = blog.title
    blog_content = blog.content
    blogContent = {
                   'blog_title':blog_title,
                   'content':blog_content,
                   'comment_list':comment
                   }
    blog.readcount+=1
    blog.save()
    return render(request,'blogs/content.html',blogContent)
# blogs/urls.py
from django.conf.urls import url
from . import views
from django.conf.urls import include
from users import urls as userurls
app_name='blogs'
urlpatterns = [
url(r'^(?P[0-9]*)$', views.content, name='content'),
# ...
] 在前端部分,同Users App一样,我们需要在blogs/templates中建立模板,并在其中建立blogs目录存放我们的页面。由于和Users App模板大同小异,因此这里不再放模板的代码;content页面代码如下:
{% extends "blogTemplate.html" %}
{% block content %}
{% endblock %}
{% block comment %}
{% if comment_list %}
{% for comment in comment_list %}
-
{% if comment.auther.username == "anony" %}
匿名用户 {{ comment.createtime|date:"Y-m-d H:i:s" }}
{% else %}

{{ comment.auther }} {{ comment.createtime|date:"Y-m-d H:i:s" }}
{% endif %}
- {{ comment.content|safe }}
{% endfor %}
{% else %}
还没有人发表评论
{% endif %}
评论
{% endblock %}在显示评论的部分,我们会逐条显示评论的内容以及发布时间,并且如果是非匿名评论,我们会显示评论者的用户名和头像,如下所示:
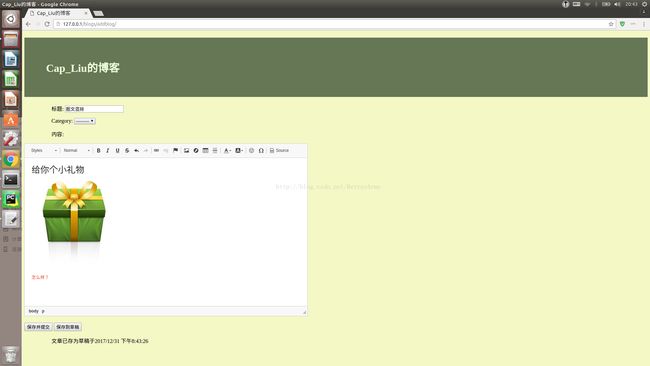
下面来让我们看一下如何发布博客。为了实现博客的图文混排,我们选用CKeditor这一款编辑器作为博客的编辑器。这款编辑器是一种免费的富文本编辑器,体积小巧,并且配置方便,支持可见即所得的图文混排,如图所示:
此外,CKeditor还支持多种配置,以实现更强大的功能。在这里我选用了默认的配置。
为了使用CKeditor,我们需要到官网上下载CKeditor,然后把解压后得到的ckeditor目录拷贝到我们在myblog目录下建立的static目录下。此外,我们还要安装Django的ckeditor库django-ckeditor,这样我们就可以在工程中使用ckeditor了(static的部分见本系列第三篇)。需要注意的是,ckeditor需要python的pillow库作为处理图像的后端,因此我们还需要安装pillow。
为了使用ckeditor,我们需要在myblog/settings.py中添加一些配置,如下所示:
# myblog/settings.py
# ...
INSTALLED_APPS = [
    'ckeditor',
    'ckeditor_uploader',
    # ...
]
# ...
CKEDITOR_JQUERY_URL = '/static/js/jquery-3.2.1.min.js'
CKEDITOR_UPLOAD_PATH = 'blogimage/'
CKEDITOR_IMAGE_BACKEND = 'pillow'
# ...
我们需要把ckeditor和它的上传器加入到INSTALLED_APPS中,此外我们还要将ckeditor的上传图片路径和依赖的jquery库路径写在settings.py中。
在配置好CKeditor后,我们就可以开始编写发布博客以及存储草稿的view函数了。我们需要一个ModelForm来发布博客,因此我们建立blogForm.py文件,并建好我们的BlogForm表单:
# blogs/blogForm.py
#-*- coding=utf-8 -*-
from django import forms
from django.forms import ModelForm
from .models import Blog


class BlogForm(ModelForm):
    class Meta:
        model = Blog
        fields = ['title','category','content']
在定义好BlogForm表单后,我们就可以写发布博客的相关函数了:
# blogs/views.py
def addBlog(request):
    if request.method == 'POST':
        if request.session.has_key('currentblogId'):
            tmpBlog = Blog.objects.get(id=request.session['currentblogId'])
            if tmpBlog:
                form = BlogForm(request.POST,instance=tmpBlog)
                tmpBlog = form.save(commit=False)
                tmpBlog.draft = False
                tmpBlog.save()
                result_info = 'Success'
            else:
                form = BlogForm(request.POST)
                if form.is_valid():
                    newBlog = form.save(commit=False)
                    newBlog.auther = Users.objects.get(username=request.session['username'])
                    newBlog.draft = False
                    category = Category.objects.get(categoryname=newBlog.category)
                    category.blogcount = category.blogcount+1
                    category.save()
                    newBlog.save()
                    result_info = 'Success'
            del request.session['currentblogId']
        else:
            form = BlogForm(request.POST)
            if form.is_valid():
                newBlog = form.save(commit=False)
                newBlog.auther = Users.objects.get(username=request.session['username'])
                newBlog.draft = False
                category = Category.objects.get(categoryname=newBlog.category)
                category.blogcount = category.blogcount + 1
                category.save()
                newBlog.save()
                result_info = 'Success'
        return HttpResponseRedirect(reverse('blogs:addblogResult', kwargs={'info': result_info}))
    else:
        form = BlogForm()
    return render(request, 'blogs/addblog.html', {'form':form})


def addBlogResult(request,info):
    tipMessage=''
    if info == 'Success':
        tipMessage = '博文已成功发表!'
    else:
        tipMessage = info
    parameters = {'info':tipMessage}
    return render(request, 'blogs/addblogResult.html', parameters)


def saveDraft(request):
    if request.method == 'POST':
        blogId = request.session.get('currentblogId','-1')
        if blogId!='-1':
            try:
                tmpBlog = Blog.objects.get(id=blogId)
                form = BlogForm(request.POST, instance=tmpBlog)
                tmpBlog = form.save(commit=False)
                tmpBlog.draft = True
                tmpBlog.save()
                result_info = u'文章已保存于草稿箱中。'
                return HttpResponse(result_info)
            except Blog.DoesNotExist:
                form = BlogForm(request.POST)
                if form.is_valid():
                    newBlog = form.save(commit=False)
                    newBlog.auther = Users.objects.get(username=request.session['username'])
                    category = Category.objects.get(categoryname=newBlog.category)
                    category.blogcount = category.blogcount+1
                    category.save()
                    newBlog.save()
                    request.session['currentblogId'] = newBlog.id
                    result_info = u'文章已保存于草稿箱中。'
                    return HttpResponse(result_info)
                return HttpResponse('test')
        else:
            form = BlogForm(request.POST)
            if form.is_valid():
                newBlog = form.save(commit=False)
                newBlog.auther = Users.objects.get(username=request.session['username'])
                category = Category.objects.get(categoryname=newBlog.category)
                category.blogcount = category.blogcount + 1
                category.save()
                newBlog.save()
                request.session['currentblogId'] = newBlog.id
                result_info = u'文章已保存于草稿箱中。'
                return HttpResponse(result_info)
            else:
                return HttpResponse('test')
    else:
return HttpResponse('test')首先来看saveDraft函数的实现。该函数要考虑到两种情况:1、博客的第一次保存;2、博客已存为草稿下的再次保存。对于博客的第一次保存,我们可以直接调用BlogForm的方法进行保存,并且在保存之后将该篇博客的id存储在session['currentblogId']中,以便情况2的使用;对于已经存储为草稿的博客,我们只需根据session['currentblogId']的值得到当前博客,并再次调用save方法保存即可。在这个函数中,我们使用了一种新的方法来初始化BlogForm:form = BlogForm(request.POST,instance=tmpBlog),这是因为我们可以用一个已存在的对象来初始化一个ModelForm。另外,由于我们稍后在前端会以Ajax的方式来调用这个函数,因此我们没有使用render函数来渲染某个页面,而只是简单地返回了一个HttpResponse对象。
再来看addBlog函数的实现。该函数也要考虑两种情况:1、博客已存为草稿后发布;2、博客没有存储为草稿直接发布。对于第一种情况,我们可以直接从session['currentblogId']中得到当前博客的id值,再将其draft的值改为False后调用save方法保存。注意这里的第一次save函数的调用,我们传入了commit=False的选项,这表示此次save并不会真正加载到数据库中,在之后我们还可以对对象的字段值进行修改后再真正commit到数据库中。另外一个需要注意的地方是,我们不仅要在Blog表里插入数据,也要更新category model的blogcount值,使之+1。
addBlogResult函数没什么可说的,就是根据addBlog的结果进行的跳转页面。
以上三个函数的url配置如下:
# blog/urls.py
urlpatterns = [
    # ...
    url(r'^addblog/$', views.addBlog, name='addblog'),
    url(r'^addblogResult/(?P.*)$', views.addBlogResult, name='addblogResult'),
    url(r'^saveDraft/$',views.saveDraft,name='saveDraft'),
    # ...
] 
