遗传算法优化神经网络小车自动寻路走出迷宫(1)基于OpenGL的基本框架
之前简单地学习了神经网络相关的知识,回想起了之前在B站上看到的小车自动在迷宫寻路的视频(还有用类似方法解决flappy bird的视频:https://www.bilibili.com/video/av13940007/?from=search&seid=8284022935044659565),就寻思着利用神经网络的知识自己也写一个出来。
其实其结构并不用非常复杂,可以先考虑小车上有几个传感器,可以计算小车在不同方向上距离边界的距离。而寻路的算法就是确定一个函数,将这几个距离作为输入,输出一个0到1的数字即可,大于0.5为左转,否则为右转。并且神经网络用一个隐藏层即可,这样就可以近似出一个确定左转还是右转的函数(神经网络的本质就是对一个分类函数的近似)。
接下来让我不知所措的是这个问题的训练集到底是什么,因为不同于之前我博客写过的很简单的平面点分类问题,这个函数我们事先并不知道,而作为当前输入的唯一可评价的输出就是小车是否到达了终点,仅凭这些是无法训练神经网络的。
后来我逐渐明白了,这其实是一种无监督学习,因为我们并没有事先标记好的样例来供神经网络来学习。之后我突然想起了遗传算法这个东西,所以去学习了一下,发现其思想和结构都十分适合这种模型。接下来的文章就是通过具体的代码实现这样一个学习程序以及其可视化的动画。
动画的话我只在学校学过opengl所以就现学现用了。
首先需要安装python上的OpenGL,这个在百度查就可以了。由于OpenGL的实现都有单独的函数,所以在python上的语法跟C语言几乎没有区别。在这里我利用python建立了Lines和Rectangles两个类分别用于画出边界和小车。
这是需要引用的库
import OpenGL.GL
import OpenGL.GLU
import OpenGL.GLUT

from math import tan
from math import atan
from math import pi
from math import sqrt
from math import sin
from math import cos
from math import hypot

from OpenGL.GL import *

from OpenGL.GLU import *
from OpenGL.GLUT import *

import time
这是Lines的代码
class Lines:
    startx=0
    starty=0
    endx=0
    endy=0
    def __init__(self, sx, sy, ex, ey, r, g, b):
        self.startx=sx
        self.starty=sy
        self.endx=ex
        self.endy=ey
        self.r=r
        self.g=g
        self.b=b

    def Display(self):
        glColor3f(self.r, self.g, self.b)
        glBegin(GL_LINE_STRIP)
        glVertex2f(self.startx,self.starty)
        glVertex2f(self.endx,self.endy)
        glEnd()
对于我来说,画出迷宫边界最简单的方式就是利用多条的折线,这样方便于自定义迷宫的形状。
这是Rectangles的代码
class Rectangles:
    centerx=0
    centery=0
    length=0
    width=0
    angle=0
    startcenterx=0
    startcentery=0
    startangle=0
    starttime=0
    def __init__(self,cx,cy,l,w,a,r,g,b):
        self.centerx=cx
        self.centery=cy
        self.startcenterx=cx
        self.startcentery=cy
        self.length=l
        self.width=w
        self.angle=a
        self.startangle=a
        self.r=r
        self.g=g
        self.b=b
        self.starttime=time.time()

    def Display(self):
        glColor3f(self.r, self.g, self.b)
        glBegin(GL_QUADS);
        glVertex2f(self.centerx+self.length*cos(self.angle)/2-self.width*sin(self.angle)/2,self.centery+self.length*sin(self.angle)/2+self.width*cos(self.angle)/2);
        glVertex2f(self.centerx-self.length*cos(self.angle)/2-self.width*sin(self.angle)/2,self.centery-self.length*sin(self.angle)/2+self.width*cos(self.angle)/2);
        glVertex2f(self.centerx-self.length*cos(self.angle)/2+self.width*sin(self.angle)/2,self.centery-self.length*sin(self.angle)/2-self.width*cos(self.angle)/2);
        glVertex2f(self.centerx+self.length*cos(self.angle)/2+self.width*sin(self.angle)/2,self.centery+self.length*sin(self.angle)/2-self.width*cos(self.angle)/2);
        glEnd();

    def Move(self,movex,movey):
        self.centerx+=movex
        self.centery+=movey

    def Rotate(self,direc,a):
        leftanchorvx=self.centerx-4*self.width*sin(self.angle)
        leftanchorvy=self.centery+4*self.width*cos(self.angle)
        rightanchorvx=self.centerx+4*self.width*sin(self.angle)
        rightanchorvy=self.centery-4*self.width*cos(self.angle)
        if direc==1:  #向左
            newx=(self.centerx-leftanchorvx)*cos(a)-(self.centery-leftanchorvy)*sin(a)+leftanchorvx;
            newy=(self.centerx-leftanchorvx)*sin(a)+(self.centery-leftanchorvy)*cos(a)+leftanchorvy;
        else: #向右
            newx=(self.centerx-rightanchorvx)*cos(a)-(self.centery-rightanchorvy)*sin(a)+rightanchorvx;
            newy=(self.centerx-rightanchorvx)*sin(a)+(self.centery-rightanchorvy)*cos(a)+rightanchorvy;
        self.angle+=a
        self.centerx=newx
        self.centery=newy

    def Reset(self):
        self.centerx=self.startcenterx
        self.centery=self.startcentery
        self.angle=self.startangle
        self.starttime=time.time()

    def fitevalue(self):
#        res=sqrt(self.centerx*self.centerx+self.centery*self.centery)
#        if self.centerx>0 and self.centery>0:
#            return res
#        return -1*res
        return time.time()-self.starttime
对于一个长方形,初始化的总共八个参数,中心点横纵坐标,长度(x轴上),宽度(y轴上),倾斜角度(用于记录车头的朝向),三个参数调整rgb值。
Move()用来平移。
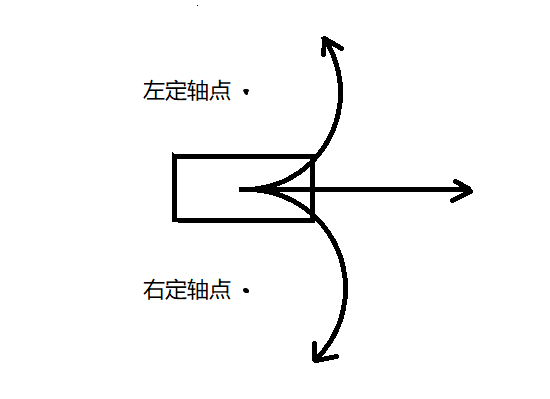
Rotate()用来模拟车的左转和右转。大家都知道车的转向实际上可以模拟为车绕一定点做某个角度的圆周运动,而这个定点一般为车横向上的一点,如图:
Reset()用于重置当前代的种群中已经判定为死去的个体(即撞上墙的小车),回到原来的出发位置
fitevalue()是该小车的适应度值,这里用了一个较为简单的判定方法,即小车从开始到撞墙的时间,因为小车一般走的都是曲线,暂不考虑其他问题,走的时间越长,走的距离就越长,离终点就越近。注释掉的部分是个更简单的判定,是我把迷宫设置为一个经过原点的直线用来调试用的。
以上的文件为了显示方便让我弄成了一个库放在site-packages中,在主程序中直接引用Lines和Rectangles即可。
接下来是整个主程序。
需要引用的头文件:
from OpenGL.GL import *
from OpenGL.GLU import *
from OpenGL.GLUT import *

from OpenGLshape import Lines
from OpenGLshape import Rectangles

from math import tan
from math import atan
from math import pi
from math import sqrt
from math import sin
from math import cos
from math import hypot

import numpy as np
import matplotlib.pyplot as plt

import sys
可能会用到的参数定义,这里我们取一个种群里十个小车,小车有三个传感器。
#基本构成定义
generation=1
timer=0
rotate_speed=0.1
#分别是地图下边和上边(从初始位置看)
Mapside1x=[-0.9,0.9]
Mapside1y=[0.15,0.15]
Mapside2x=[-0.95,0.9]
#Mapside2y=[0,0]
#地图终点
Mapendx=[Mapside1x[len(Mapside1x)-1],Mapside2x[len(Mapside2x)-1]]
Mapendy=[Mapside1y[len(Mapside1y)-1],Mapside2y[len(Mapside2y)-1]]

#种群中的五个汽车
Car1=Rectangles(-0.95,0.1,0.1,0.04,0.4,1.0,0.0,0.0)
Car2=Rectangles(-0.95,0.1,0.1,0.04,0.4,1.0,0.0,0.0)
Car3=Rectangles(-0.95,0.1,0.1,0.04,0.4,1.0,0.0,0.0)
Car4=Rectangles(-0.95,0.1,0.1,0.04,0.4,1.0,0.0,0.0)
Car5=Rectangles(-0.95,0.1,0.1,0.04,0.4,1.0,0.0,0.0)
Car6=Rectangles(-0.95,0.1,0.1,0.04,0.4,1.0,0.0,0.0)
Car7=Rectangles(-0.95,0.1,0.1,0.04,0.4,1.0,0.0,0.0)
Car8=Rectangles(-0.95,0.1,0.1,0.04,0.4,1.0,0.0,0.0)
Car9=Rectangles(-0.95,0.1,0.1,0.04,0.4,1.0,0.0,0.0)
Car0=Rectangles(-0.95,0.1,0.1,0.04,0.4,1.0,0.0,0.0)
#种群的基因信息和神经网络结构
iter_num=100  #终止的迭代数
indv_num=10  #每一代个体数量
indv_acc=13  #编码的长度,二进制的位数
hid_num=10  #隐藏层的神经元数量
input_num=3  #输入层的神经元数量
indv_info=((input_num+2)*hid_num+1)*indv_acc  #每个个体的基因长度,包含两层神经网络所需的权重和偏差

individuals=getfirstgeneration(indv_num,indv_info)
parents_num=2  #选择父母的对数,小于总数一半
cross_prob=0.9  #交叉概率
mute_prob=0.2  #变异概率
fit_func=[0,0,0,0,0,0,0,0,0,0]  #十个小车的适应度
stay_stat=[True,True,True,True,True,True,True,True,True,True]  #判定小车是否已经撞墙
其中getfirstgeneration是遗传算法中的初始化函数,会在下下个章节提及。
显示地图的函数:
def MapDisplay():
    for i in range(len(Mapside1x)-1):
        glColor3f(1.0,1.0,1.0)
        glBegin(GL_LINE_STRIP)
        glVertex2f(Mapside1x[i],Mapside1y[i])
        glVertex2f(Mapside1x[i+1],Mapside1y[i+1])
        glEnd()
    for i in range(len(Mapside2x)-1):
        glColor3f(1.0,1.0,1.0)
        glBegin(GL_LINE_STRIP)
        glVertex2f(Mapside2x[i],Mapside2y[i])
        glVertex2f(Mapside2x[i+1],Mapside2y[i+1])
        glEnd()
    glColor3f(0.7,0.8,0.7)
    glBegin(GL_LINE_STRIP)
    glVertex2f(Mapendx[0],Mapendy[0])
    glVertex2f(Mapendx[1],Mapendy[1])
glEnd()即射线与迷宫边界形成交点和小车中心构成的线段长度。
def Sensor1(Carr):  #记录与地图下边的距离2
    x0=Carr.centerx
    y0=Carr.centery
    kt=tan(Carr.angle+atan(Carr.width/Carr.length))
    for i in range(len(Mapside2x)-1):
        if Mapside2x[i]==Mapside2x[i+1]:
            disy=kt*(Mapside2x[i]-x0)+y0
            if disy>=min(Mapside2y[i],Mapside2y[i+1]) and disy<=max(Mapside2y[i],Mapside2y[i+1]):
                return hypot(Mapside2x[i]-x0,disy-y0)
        else:
            kk=(Mapside2y[i]-Mapside2y[i+1])/(Mapside2x[i]-Mapside2x[i+1])
            bb=(Mapside2x[i]*Mapside2y[i+1]-Mapside2x[i+1]*Mapside2y[i])/(Mapside2x[i]-Mapside2x[i+1])
            disx=(y0-kt*x0-bb)/(kk-kt)
            if disx>=min(Mapside2x[i],Mapside2x[i+1]) and disx<=max(Mapside2x[i],Mapside2x[i+1]):
                return hypot(disx-x0,kk*disx+bb-y0)
    return 2*sqrt(2)

def Sensor2(Carr):  #记录与地图下边的距离1
    x0=Carr.centerx
    y0=Carr.centery
    kt=tan(Carr.angle-atan(Carr.width/Carr.length))
    for i in range(len(Mapside1x)-1):
        if Mapside1x[i]==Mapside1x[i+1]:
            disy=kt*(Mapside1x[i]-x0)+y0
            if disy>=min(Mapside1y[i],Mapside1y[i+1]) and disy<=max(Mapside1y[i],Mapside1y[i+1]):
                return hypot(Mapside1x[i]-x0,disy-y0)
        else:
            kk=(Mapside1y[i]-Mapside1y[i+1])/(Mapside1x[i]-Mapside1x[i+1])
            bb=(Mapside1x[i]*Mapside1y[i+1]-Mapside1x[i+1]*Mapside1y[i])/(Mapside1x[i]-Mapside1x[i+1])
            disx=(y0-kt*x0-bb)/(kk-kt)
            if disx>=min(Mapside1x[i],Mapside1x[i+1]) and disx<=max(Mapside1x[i],Mapside1x[i+1]):
                return hypot(disx-x0,kk*disx+bb-y0)
    return 2*sqrt(2)

def Sensor3(Carr):  #记录与地图前边的距离1
    x0=Carr.centerx
    y0=Carr.centery
    kt=tan(Carr.angle)
    for i in range(len(Mapside1x)-1):
        if Mapside1x[i]==Mapside1x[i+1]:
            disy=kt*(Mapside1x[i]-x0)+y0
            if disy>=min(Mapside1y[i],Mapside1y[i+1]) and disy<=max(Mapside1y[i],Mapside1y[i+1]):
                return hypot(Mapside1x[i]-x0,disy-y0)
        else:
            kk=(Mapside1y[i]-Mapside1y[i+1])/(Mapside1x[i]-Mapside1x[i+1])
            bb=(Mapside1x[i]*Mapside1y[i+1]-Mapside1x[i+1]*Mapside1y[i])/(Mapside1x[i]-Mapside1x[i+1])
            disx=(y0-kt*x0-bb)/(kk-kt)
            if disx>=min(Mapside1x[i],Mapside1x[i+1]) and disx<=max(Mapside1x[i],Mapside1x[i+1]):
                return hypot(disx-x0,kk*disx+bb-y0)
    for i in range(len(Mapside2x)-1):
        if Mapside2x[i]==Mapside2x[i+1]:
            disy=kt*(Mapside2x[i]-x0)+y0
            if disy>=min(Mapside2y[i],Mapside2y[i+1]) and disy<=max(Mapside2y[i],Mapside2y[i+1]):
                return hypot(Mapside2x[i]-x0,disy-y0)
        else:
            kk=(Mapside2y[i]-Mapside2y[i+1])/(Mapside2x[i]-Mapside2x[i+1])
            bb=(Mapside2x[i]*Mapside2y[i+1]-Mapside2x[i+1]*Mapside2y[i])/(Mapside2x[i]-Mapside2x[i+1])
            disx=(y0-kt*x0-bb)/(kk-kt)
            if disx>=min(Mapside2x[i],Mapside2x[i+1]) and disx<=max(Mapside2x[i],Mapside2x[i+1]):
                return hypot(disx-x0,kk*disx+bb-y0)
    return 2*sqrt(2)
对于Sensor1()和Sensor2()我们忽略小车会转圈的可能性(实际上跟迷宫宽度和小车旋转半径有关,适当选取参数可以避免这种情况),所以只对上边或者下边进行搜索,Sensor3()是小车正前方,必须要对上边和下边都进行计算。
接下来是判定小车是否撞墙的函数,即小车的长方形与地图边界是否有交点。这个的算式很麻烦。
def alive_judge(Carr):
    x=[0,0,0,0]
    y=[0,0,0,0]
    x[0]=Carr.centerx+Carr.length*cos(Carr.angle)/2-Carr.width*sin(Carr.angle)/2
    y[0]=Carr.centery+Carr.length*sin(Carr.angle)/2+Carr.width*cos(Carr.angle)/2
    x[1]=Carr.centerx-Carr.length*cos(Carr.angle)/2-Carr.width*sin(Carr.angle)/2
    y[1]=Carr.centery-Carr.length*sin(Carr.angle)/2+Carr.width*cos(Carr.angle)/2
    x[2]=Carr.centerx-Carr.length*cos(Carr.angle)/2+Carr.width*sin(Carr.angle)/2
    y[2]=Carr.centery-Carr.length*sin(Carr.angle)/2-Carr.width*cos(Carr.angle)/2
    x[3]=Carr.centerx+Carr.length*cos(Carr.angle)/2+Carr.width*sin(Carr.angle)/2
    y[3]=Carr.centery+Carr.length*sin(Carr.angle)/2-Carr.width*cos(Carr.angle)/2
    ox=Carr.centerx
    oy=Carr.centery
    for i in range(4):
        for j in range(len(Mapside1x)-1):
if min(y[i],oy)min(Mapside1y[j],Mapside1y[j+1]) and max(x[i],ox)>min(Mapside1x[j],Mapside1x[j+1]) and min(x[i],ox)min(Mapside2y[j],Mapside2y[j+1]) and max(x[i],ox)>min(Mapside2x[j],Mapside2x[j+1]) and min(x[i],ox) def end_judge(Carr):
x=[0,0,0,0]
y=[0,0,0,0]
x[0]=Carr.centerx+Carr.length*cos(Carr.angle)/2-Carr.width*sin(Carr.angle)/2
y[0]=Carr.centery+Carr.length*sin(Carr.angle)/2+Carr.width*cos(Carr.angle)/2
x[1]=Carr.centerx-Carr.length*cos(Carr.angle)/2-Carr.width*sin(Carr.angle)/2
y[1]=Carr.centery-Carr.length*sin(Carr.angle)/2+Carr.width*cos(Carr.angle)/2
x[2]=Carr.centerx-Carr.length*cos(Carr.angle)/2+Carr.width*sin(Carr.angle)/2
y[2]=Carr.centery-Carr.length*sin(Carr.angle)/2-Carr.width*cos(Carr.angle)/2
x[3]=Carr.centerx+Carr.length*cos(Carr.angle)/2+Carr.width*sin(Carr.angle)/2
y[3]=Carr.centery+Carr.length*sin(Carr.angle)/2-Carr.width*cos(Carr.angle)/2
ox=Carr.centerx
oy=Carr.centery
for i in range(4):
for j in range(len(Mapendx)-1):
if min(y[i],oy)min(Mapendy[j],Mapendy[j+1]) and max(x[i],ox)>min(Mapendx[j],Mapendx[j+1]) and min(x[i],ox) 所以我们所有需要的基本框架都已完成,画出动画的主函数(未加入神经网络和遗传算法的)如下:
def drawFunc():
    #清除之前画面
    glClear(GL_COLOR_BUFFER_BIT)
    #画地图
    MapDisplay()
    #画十个小车
    Car1.Display()
    ......

    #判定小车是否还有存活,否则结束当前一代,应用遗传算法计算下一代
    if any(stay_stat)==False:
        #十个小车归位
        Car1.Reset()
        ......
        stay_stat=[True,True,True,True,True,True,True,True,True,True]
        #这一代中获得的最大适应度
        score=max(fit_func)

        #应用遗传算法计算下一代
        ......

    #依次判断是否有人到达终点
    if end_judge(Car1)==True:
        print('Car1 find the way out !')
    ......
    #否则对所有车进行移动的操作
    else:
        if stay_stat[0]==True:
            if alive_judge(Car1)==True:
                if nn_layers(Car1,1)>=0.5:
                    #左转
                    Car1.Rotate(1,rotate_speed)
                else:
                    #右转
                    Car1.Rotate(-1,-1*rotate_speed)
            else:
                fit_func[0]=Car1.fitevalue()
                stay_stat[0]=False

    #刷新图像
    glFlush()

#使用glut初始化OpenGL
glutInit()
#显示模式:GLUT_SINGLE无缓冲直接显示|GLUT_RGBA采用RGB(A非alpha)
glutInitDisplayMode(GLUT_SINGLE | GLUT_RGBA)
#窗口位置及大小-生成
glutInitWindowPosition(0,0)
glutInitWindowSize(810,640)
glutCreateWindow(b"try")
#调用函数绘制图像
glutDisplayFunc(drawFunc)
glutIdleFunc(drawFunc)
#主循环显示
glutMainLoop()
其中nn_layers()是用神经网络计算输出的函数,在下一章会提及。
至此所有基本的框架已经确定好了,下面我们要做的是如何将遗传算法,神经网络模型与这个问题相结合。

