手把手教你玩转Struts2
前面讲了一下关于Hibernate框架的知识点(没有看过的朋友可以看看前面的内容哦!),下面就讲一下另外一个非常重要的框架struts2的知识点。
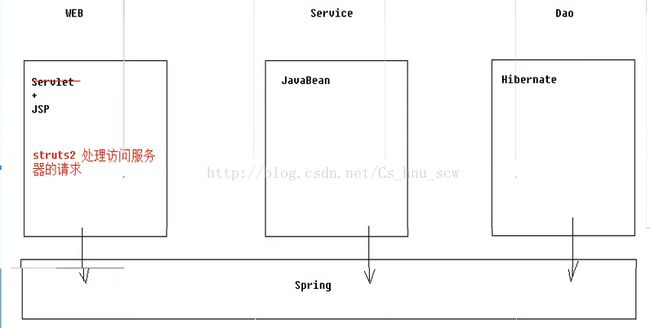
1:struts2的地位
2:struts2的优势
(1)自动封装参数
(2)参数校验
(3)结果的处理(重定向|请求转发)
(4)国际化
(5)显示等待页面
(6)表单的防止重复提交
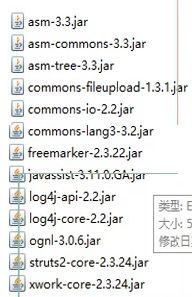
3:导入项目的包
4:struts2框架的搭建
(1)导包,就是上面提到的包,百度就可以得到所有的
(2)配置struts2的dtd约束(为了能够在不联网的时候也能进行代码提示)(这步可以跳过)
1:这个先从上面的包中,找到struts2的核心jar包,就能看到很多版本的dtd,选择最新的就可以了
2:打开选择的dtd文件,然后重新创建一份dtd文件(用记事本创建就行了),
3:将jar包的那个dtd内容,复制到创建的文件中(记住,不能直接将jar中的复制出来,因为是源码不支持这样的复制操作的)
4:打开IDE,选择window中的preferences,然后搜索cata,看到xml catalog,选择这个
5:点击add,然后选择刚才创建的那个文件dtd,key type 选择URL,Key填入,dtd中的一个网址 http://struts.apache.org/dtds/struts-2.3.dtd ,这样就可以了
(3)编写Action类(下面随便写个例子)
public class HelloAction {

	public String hello(){

		System.out.println("hello world!");

		return "success";
	}

}
(4)编写src/struts.xml (名字必须一样)
/hello.jsp
(5)将struts2核心过滤器配置到web.xml中,非常非常重要
  struts2_day01


  	struts2
  	org.apache.struts2.dispatcher.ng.filter.StrutsPrepareAndExecuteFilter


  	struts2
  	/*


    index.html
    index.htm
    index.jsp
    default.html
    default.htm
    default.jsp
(6)测试框架搭建是否成功
创建一个hello.jsp ,,随便就是写了个
hello world !
上面显示的就是环境配置成功了哦。。。是不是很简单呢?
5:struts的核心----------拦截器(Intercepter)
(1)表面上看,拦截器帮我们封装了很多功能。
(2)拦截器优秀的设计,可插拔式设计
(3)aop思想
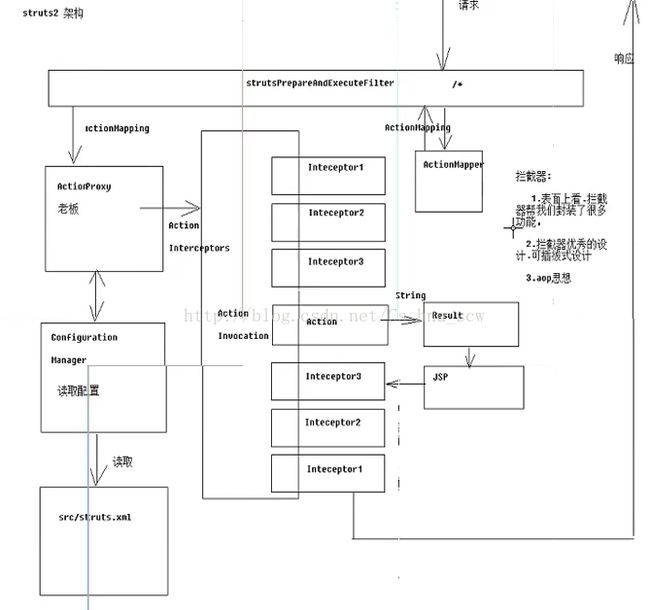
6:struts2架构
7:struts配置详解
(1)struts.xml配置解析
/hello.jsp
(2)struts常量配置方法(方式先后也是加载顺序,配置在后面的方法就会覆盖前面使用的方法,这是需要注意的,所以使用一种方法即可)
方法一:在struts.xml中配置其中的constant标签(重点掌握,实际项目中最常用的方法)
/hello.jsp
方法二:在src下创建struts.properties。把需要进行修改的常量内容进行复制到这个文件中进行自定义的修改value值即可。
方法三:在web.xml中配置
8:struts2配置的进阶(1)动态方法调用(重要)
方法一:(了解这种形式就可以了)
在struts.xml文件进行配置常量
/hello.jsp
对应的这个测试的Action代码:
package cn.itheima.b_dynamic;

//动态方法调用
public class Demo1Action {
	public String add(){
		System.out.println("添加用户!");
	return "success";
	}
	public String delete(){
		System.out.println("删除用户!");
	return "success";
}
	public String update(){
		System.out.println("修改用户!");
	return "success";
}
	public String find(){
		System.out.println("查找用户!");
	return "success";
}


}
比如:http://localhost:8080/项目名/dynamic/Demo1Action!add //这样就会调用Action中的add方法
比如:http://localhost:8080/项目名/dynamic/Demo1Action!delete //这样就会调用Action中的delete方法
方法二:使用通配符来实现(掌握)
/hello.jsp
这样调用的URL就可以写:http://localhost:8080/项目名/Demo1Action_delete //这样就访问了delete方法
(2)struts2中的默认配置(了解就可以了,没什么特别的用)
/hello.jsp
(1)创建Action类的方法
方法一:(用得少)
//方式1: 创建一个类.可以是POJO
//POJO:不用继承任何父类.也不需要实现任何接口.
//使struts2框架的代码侵入性更低.
public class Demo3Action {

}
方法二:(不常用)
import com.opensymphony.xwork2.Action;

//方式2: 实现一个接口Action
// 里面有execute方法,提供action方法的规范.
// Action接口预置了一些字符串.可以在返回结果时使用.为了方便
public class Demo4Action implements Action {

	@Override
	public String execute() throws Exception {
		return null;
	}

}
方法三:(常用)
import com.opensymphony.xwork2.ActionSupport;
//方式3: 继承一个类.ActionSupport
// 帮我们实现了 Validateable, ValidationAware, TextProvider, LocaleProvider .
//如果我们需要用到这些接口的实现时,不需要自己来实现了.
public class Demo5Action  extends ActionSupport{

}
10:结果处理方式(主要是四种方式)
(1)转发
(2)重定向
(3)转发到Action
(4)重定向到Action
			/hello.jsp


			/hello.jsp


	             Demo1Action

	             /


	             Demo1Action

	             /
11:获得Servlet 的 API方式
(1)原理
(2)获取上面域的内容的方法:
方法一:通过ActionContext
package cn.itheima.b_api;

import java.util.Map;

import com.opensymphony.xwork2.ActionContext;
import com.opensymphony.xwork2.ActionSupport;

//如何在action中获得原生ServletAPI
public class Demo5Action extends ActionSupport {

	public String execute() throws Exception {
		//request域=> map (struts2并不推荐使用原生request域)
		//不推荐
		Map requestScope = (Map) ActionContext.getContext().get("request");
		//推荐
		ActionContext.getContext().put("name", "requestTom");
		//session域 => map
		Map sessionScope = ActionContext.getContext().getSession();
		sessionScope.put("name", "sessionTom");
		//application域=>map
		Map applicationScope = ActionContext.getContext().getApplication();
		applicationScope.put("name", "applicationTom");

		return SUCCESS;
	}


}
方法二:ServletActionContext获取(不推荐)
public class Demo6Action extends ActionSupport {
	//并不推荐
	public String execute() throws Exception {
		//原生request
		HttpServletRequest request = ServletActionContext.getRequest();
		//原生session
		HttpSession session = request.getSession();
		//原生response
		HttpServletResponse response = ServletActionContext.getResponse();
		//原生servletContext
		ServletContext servletContext = ServletActionContext.getServletContext();
		return SUCCESS;
	}


}public class Demo7Action extends ActionSupport implements ServletRequestAware {
private HttpServletRequest request;
public String execute() throws Exception {
System.out.println("原生request:"+request);
return SUCCESS;
}
@Override
public void setServletRequest(HttpServletRequest request) {
this.request = request;
}
}方法一:属性驱动获取
HTML代码:
<%@ page language="java" contentType="text/html; charset=UTF-8"
pageEncoding="UTF-8"%>
Insert title here
Action代码(注意要实现set和get方法):
//每次请求Action时都会创建新的Action实例对象
public class Demo8Action extends ActionSupport  {

	public Demo8Action() {
		super();
		System.out.println("demo8Action被创建了!");
	}


	//准备与参数键名称相同的属性
	private String name;
	//自动类型转换 只能转换8大基本数据类型以及对应包装类
	private Integer age;
	//支持特定类型字符串转换为Date ,例如 yyyy-MM-dd
	private Date   birthday;


	public String execute() throws Exception {

		System.out.println("name参数值:"+name+",age参数值:"+age+",生日:"+birthday);

		return SUCCESS;
	}


	public String getName() {
		return name;
	}


	public void setName(String name) {
		this.name = name;
	}


	public Integer getAge() {
		return age;
	}


	public void setAge(Integer age) {
		this.age = age;
	}


	public Date getBirthday() {
		return birthday;
	}

	public void setBirthday(Date birthday) {
		this.birthday = birthday;
	}


}HTML代码(注意提交的name的命名:命名规则就是用要封装成的对象+。+属性名):
<%@ page language="java" contentType="text/html; charset=UTF-8"
pageEncoding="UTF-8"%>
Insert title here
package cn.itheima.domain;

import java.util.Date;

public class User {

	private String name;
	private Integer age;
	private Date birthday;
	public String getName() {
		return name;
	}
	public void setName(String name) {
		this.name = name;
	}
	public Integer getAge() {
		return age;
	}
	public void setAge(Integer age) {
		this.age = age;
	}
	public Date getBirthday() {
		return birthday;
	}
	public void setBirthday(Date birthday) {
		this.birthday = birthday;
	}
	@Override
	public String toString() {
		return "User [name=" + name + ", age=" + age + ", birthday=" + birthday + "]";
	}


}
//struts2如何获得参数-方式2
public class Demo9Action extends ActionSupport  {
	//准备user对象
	private User user;

	public String execute() throws Exception {

		System.out.println(user);

		return SUCCESS;
	}

	public User getUser() {
		return user;
	}

	public void setUser(User user) {
		this.user = user;
	}


}
方法三:模型驱动(特点:通过实现接口-----------------------------缺陷:只能一次封装一个对象数据)
HTML代码和方法一的一样,就是正常的情况的类型。
Action 代码:
public class Demo10Action extends ActionSupport implements ModelDriven {
	//准备user 成员变量
	private User user =new User();

	public String execute() throws Exception {

		System.out.println(user);

		return SUCCESS;
	}

	@Override
	public User getModel() {     //返回需要进行封装的对象
		return user;
	}
}
方法四:用集合封装提交数据
HTML代码:
<%@ page language="java" contentType="text/html; charset=UTF-8"
pageEncoding="UTF-8"%>
Insert title here
Action代码(分别验证用List 和Map进行):
public class Demo11Action extends ActionSupport  {
	//list
	private List list;
	//Map
	private Map map;


	public String execute() throws Exception {

		System.out.println("list:"+list);
		System.out.println("map:"+map);

		return SUCCESS;
	}

	public List getList() {
		return list;
	}

	public void setList(List list) {
		this.list = list;
	}

	public Map getMap() {
		return map;
	}

	public void setMap(Map map) {
		this.map = map;
	}

}
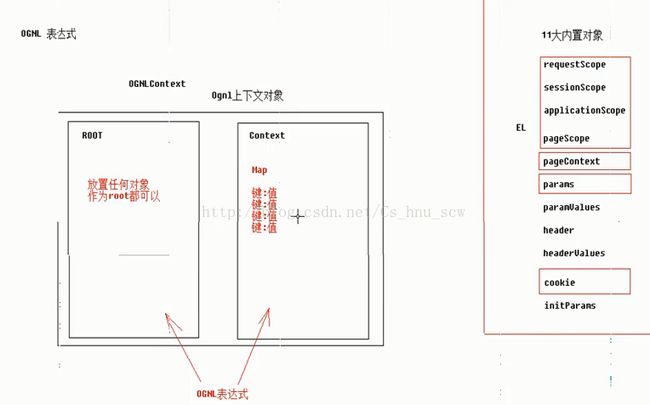
13:OGNL(对象视图导航语言)表达式的知识点
准备工作:
(1)导包:直接导入struct2的包就可以了,因为里面包含使用这个的包
(2)代码准备
//准备工作
	public void fun1() throws Exception{
		//准备ONGLContext
			//准备Root
			User rootUser = new User("tom",18);
			//准备Context
			Map context = new HashMap();
			context.put("user1", new User("jack",18));
			context.put("user2", new User("rose",22));
		OgnlContext oc = new OgnlContext();
		//将rootUser作为root部分
		oc.setRoot(rootUser);
		//将context这个Map作为Context部分
		oc.setValues(context);
		//书写OGNL
		Ognl.getValue("", oc, oc.getRoot());
} @Test
//基本语法演示
//取出root中的属性值
public void fun2() throws Exception{
//准备ONGLContext
//准备Root
User rootUser = new User("tom",18);
//准备Context
Map context = new HashMap();
context.put("user1", new User("jack",18));
context.put("user2", new User("rose",22));
OgnlContext oc = new OgnlContext();
oc.setRoot(rootUser);
oc.setValues(context);
//书写OGNL
//取出root中user对象的name属性
String name = (String) Ognl.getValue("name", oc, oc.getRoot());
Integer age = (Integer) Ognl.getValue("age", oc, oc.getRoot());
System.out.println(name);
System.out.println(age);
}
@Test
//基本语法演示
//取出context中的属性值
public void fun3() throws Exception{
//准备ONGLContext
//准备Root
User rootUser = new User("tom",18);
//准备Context
Map context = new HashMap();
context.put("user1", new User("jack",18));
context.put("user2", new User("rose",22));
OgnlContext oc = new OgnlContext();
oc.setRoot(rootUser);
oc.setValues(context);
//书写OGNL
//取出context中键为user1对象的name属性
String name = (String) Ognl.getValue("#user1.name", oc, oc.getRoot());
String name2 = (String) Ognl.getValue("#user2.name", oc, oc.getRoot());
Integer age = (Integer) Ognl.getValue("#user2.age", oc, oc.getRoot());
System.out.println(name);
System.out.println(name2);
System.out.println(age);
}
@Test
//基本语法演示
//为属性赋值
public void fun4() throws Exception{
//准备ONGLContext
//准备Root
User rootUser = new User("tom",18);
//准备Context
Map context = new HashMap();
context.put("user1", new User("jack",18));
context.put("user2", new User("rose",22));
OgnlContext oc = new OgnlContext();
oc.setRoot(rootUser);
oc.setValues(context);
//书写OGNL
//将root中的user对象的name属性赋值
Ognl.getValue("name='jerry'", oc, oc.getRoot());
String name = (String) Ognl.getValue("name", oc, oc.getRoot());
String name2 = (String) Ognl.getValue("#user1.name='郝强勇',#user1.name", oc, oc.getRoot());
System.out.println(name);
System.out.println(name2);
}
@Test
//基本语法演示
//调用方法
public void fun5() throws Exception{
//准备ONGLContext
//准备Root
User rootUser = new User("tom",18);
//准备Context
Map context = new HashMap();
context.put("user1", new User("jack",18));
context.put("user2", new User("rose",22));
OgnlContext oc = new OgnlContext();
oc.setRoot(rootUser);
oc.setValues(context);
//书写OGNL
//调用root中user对象的setName方法
Ognl.getValue("setName('lilei')", oc, oc.getRoot());
String name = (String) Ognl.getValue("getName()", oc, oc.getRoot());
String name2 = (String) Ognl.getValue("#user1.setName('lucy'),#user1.getName()", oc, oc.getRoot());
System.out.println(name);
System.out.println(name2);
}
@Test
//基本语法演示
//调用静态方法
public void fun6() throws Exception{
//准备ONGLContext
//准备Root
User rootUser = new User("tom",18);
//准备Context
Map context = new HashMap();
context.put("user1", new User("jack",18));
context.put("user2", new User("rose",22));
OgnlContext oc = new OgnlContext();
oc.setRoot(rootUser);
oc.setValues(context);
//书写OGNL
String name = (String) Ognl.getValue("@cn.itheima.a_ognl.HahaUtils@echo('hello world!')", oc, oc.getRoot()); //调用自己定义的一个静态方法
//Double pi = (Double) Ognl.getValue("@java.lang.Math@PI", oc, oc.getRoot()); //调用jdk中的静态方法
Double pi = (Double) Ognl.getValue("@@PI", oc, oc.getRoot()); //等价上面的jdk方法
System.out.println(name);
System.out.println(pi);
}
@Test
//基本语法演示
//ognl创建对象-list|map
public void fun7() throws Exception{
//准备ONGLContext
//准备Root
User rootUser = new User("tom",18);
//准备Context
Map context = new HashMap();
context.put("user1", new User("jack",18));
context.put("user2", new User("rose",22));
OgnlContext oc = new OgnlContext();
oc.setRoot(rootUser);
oc.setValues(context);
//书写OGNL
//创建list对象
Integer size = (Integer) Ognl.getValue("{'tom','jerry','jack','rose'}.size()", oc, oc.getRoot());
String name = (String) Ognl.getValue("{'tom','jerry','jack','rose'}[0]", oc, oc.getRoot());
String name2 = (String) Ognl.getValue("{'tom','jerry','jack','rose'}.get(1)", oc, oc.getRoot());
/*System.out.println(size);
System.out.println(name);
System.out.println(name2);*/
//创建Map对象
Integer size2 = (Integer) Ognl.getValue("#{'name':'tom','age':18}.size()", oc, oc.getRoot());
String name3 = (String) Ognl.getValue("#{'name':'tom','age':18}['name']", oc, oc.getRoot());
Integer age = (Integer) Ognl.getValue("#{'name':'tom','age':18}.get('age')", oc, oc.getRoot());
System.out.println(size2);
System.out.println(name3);
System.out.println(age);
} 14:OGNL与Structs2的结合
(1)参数的获取(三种)
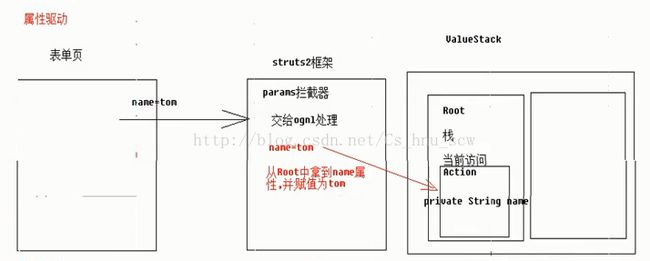
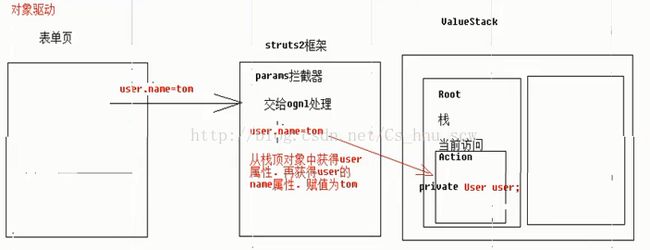
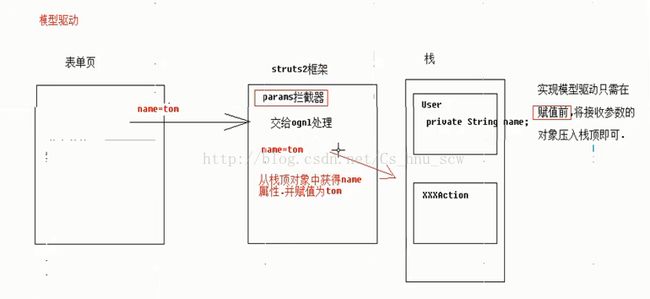
这里用个例子来讲解下如何实现的模型驱动:
html代码:
@Override
	public void prepare() throws Exception {
				//压入栈顶
				//1获得值栈
				ValueStack vs = ActionContext.getContext().getValueStack();
				//2将u压入栈顶
				vs.push(u);
	}
这是后面struts框架进行优化后的代码形式:
public class Demo2Action extends ActionSupport implements ModelDriven {

	private User u = new User();

	@Override
	public String execute() throws Exception {


		System.out.println(u);


		return SUCCESS;
	}

	@Override
	public User getModel() {
		return u;
	}


}
请记住,模型驱动,一定要在赋值前,将参数进行压入栈中,否则是进行不了封装对象的,大家可以试试代码,如果不实现接口,而是把压栈的操作放在execute()中,可以对比一下参数的封装结果哦。。。。。实践就明白了!!!!!!
(2)配置文件
Action代码:
public class Demo3Action extends ActionSupport {
	private String  name;
	@Override
	public String execute() throws Exception {
		name = "jerry";//从数据库中查询
		return SUCCESS;
	}
	public String getName() {
		return name;
	}
	public void setName(String name) {
		this.name = name;
	}
}
xml代码:
			/showvs.jsp


				Demo1Action
				/

				${name}
15:struts2中当程序中需要对异常进行处理时,如何进行对应的异常处理跳转机制。(比如:在进行用户登录验证时候,如果输入的用户名在数据库没有,或者是输入的密码与账号不匹配,这个时候就可以抛出个异常,最好的方式就是,当出现异常时候,则进行跳转到登录界面,并且提示出对应的信息,这样友好又方便)
处理方法:配置struts。xml文件
这样,配置了抓取异常的处理,并且当发生异常后,就会跳转到指定的页面中(这里是到login。jsp页面中)
然后在页面需要进行显示异常信息的地方用OGNL表达式来进行获取即可,比如
16:拦截器的知识点(非常非常重要)
(1)拦截器创建方式
方法一:直接实现接口,不实用
import com.opensymphony.xwork2.ActionInvocation;
import com.opensymphony.xwork2.interceptor.Interceptor;

//拦截器:第一种创建方式
//拦截器生命周期:随项目的启动而创建,随项目关闭而销毁
public class MyInterceptor implements Interceptor {
	@Override
	//初始化方法
	public void init() {

	}

	@Override
	//拦截方法
	public String intercept(ActionInvocation arg0) throws Exception {
		return null;
	}


	@Override
	//销毁方法
	public void destroy() {

	}
}//创建方式2: 继承AbstractInterceptor -> struts2的体贴
//帮我们空实现了init 和 destory方法. 我们如果不需要实现这两个方法,就可以只实现intercept方法
public class MyInterceptor2 extends AbstractInterceptor {
@Override
public String intercept(ActionInvocation arg0) throws Exception {
return null;
}
}方法三:通过继承
import com.opensymphony.xwork2.ActionInvocation;
import com.opensymphony.xwork2.interceptor.MethodFilterInterceptor;

//继承:MethodFilterInterceptor 方法过滤拦截器
//功能: 定制拦截器拦截的方法.
//	定制哪些方法需要拦截.
//	定制哪些方法不需要拦截
public class MyInterceptor3 extends MethodFilterInterceptor{

	@Override
	protected String doIntercept(ActionInvocation invocation) throws Exception {
		//前处理
		System.out.println("MyInterceptor3 的前处理!");
		//放行处理
		String result = invocation.invoke();
		//后处理
		System.out.println("MyInterceptor3 的后处理!");

		return result;  //如果不想放行,则只需要直接返回一个需要跳转页面的字符串结果即可。
	}

}
(2)拦截器的配置(三步骤)
/index.jsp
(3)设置拦截器拦截的方法指定
			                         //这里是重点!!!!!!!!!!!


				 add,delete


			/index.jsp
17:struts2标签库
jsp引用标签:<%@ taglib prefix = "s" uri="/struts-tags"%>
(1)普通标签
①控制标签:iterator,if,elseif,else
②数据标签:property
Action测试类代码:
public class Demo2Action extends ActionSupport {

	public String execute() throws Exception {

		List list = new ArrayList<>();
		list.add("tom");
		list.add("jerry");
		list.add("jack");
		list.add("rose");
		list.add("hqy");

		ActionContext.getContext().put("list", list);
		return SUCCESS;
	}
} <%@ page language="java" contentType="text/html; charset=UTF-8"
pageEncoding="UTF-8"%>
<%@ taglib prefix="s" uri="/struts-tags" %>
Insert title here
list长度为4!
list长度为3!
list不3不4!
(2)UI标签
①:表单标签:form,textfield,password,file,checkboxlist,radio。。。等等
②:非表单标签:Actionerror(配合后台使用,用来作用校验失败而回显提示信息)
Action代码:
import java.util.ArrayList;
import java.util.List;

import com.opensymphony.xwork2.ActionContext;
import com.opensymphony.xwork2.ActionSupport;

public class Demo3Action extends ActionSupport {

	private String name;
	public String execute() throws Exception {
		System.out.println(name);

		this.addActionError("郝强勇!你错了!!!!");

		return SUCCESS;
	}
	public String getName() {
		return name;
	}
	public void setName(String name) {
		this.name = name;
	}
}
JSP标签代码:
<%@ page language="java" contentType="text/html; charset=UTF-8"
    pageEncoding="UTF-8"%>
   <%@ taglib prefix="s" uri="/struts-tags" %>


Insert title here
十八:关于valueStack的详细
其中在strus2中的,主要就是有map栈,对象栈,然后不同的数据存储的话,那么在页面中获取的方式也就不一样了。
/**
		 * 把一个对象放入到map
		 */
		List departments = this.departmentService.getAllDepartment();
		ActionContext.getContext().put("departments", departments);
		//JSP通过标签
		//ServletActionContext.getRequest().setAttribute("departments", departments);


		/**
		 * 对象栈的操作
		 */
		//1把一个对象放入到栈顶(两种方法)
		//JSP通过标签   value不写,默认迭代栈顶的元素
//		ActionContext.getContext().getValueStack().push(departments);
//		ActionContext.getContext().getValueStack().getRoot().add(0, departments);

		//获取栈顶的元素(两种方法)
//		ActionContext.getContext().getValueStack().peek();
//		ActionContext.getContext().getValueStack().getRoot().get(0);

		//弹栈
		//ActionContext.getContext().getValueStack().pop();

		//改变对象栈中的某一个元素的值
		ActionContext.getContext().getValueStack().setValue("name", "asfda");
		ActionContext.getContext().put("bbb", "bbb");
		//获取到栈中对应key值的数据,可以拿到map栈和对象栈的内容
		String name = ActionContext.getContext().getValueStack().findValue("name").toString();
		String bbb = ActionContext.getContext().getValueStack().findValue("bbb").toString();
		System.out.println(name);
System.out.println(bbb); 十九:valueStack与ognl表达式多种情况的使用(这个的话,在jsp中一般就是用EL表达式,ognl表达式(当使用strus2)和自定义标签来进行迭代数据)
public String map(){
		Map map = new HashMap();
		Department department = new Department();
		department.setName("开发部");
		department.setDescription("程序员比较多");
		map.put("d1", department);
		ActionContext.getContext().put("map", map);
		return "listAction";
	}

	public String listMap(){
		List> list = new ArrayList>();

		Map map = new HashMap();
		Department department = new Department();
		department.setName("开发部");
		department.setDescription("程序员比较多");
		map.put("d1", department);

		list.add(map);

		ActionContext.getContext().put("list", list);

		return "listAction";
	}

	public String mapList(){
		Map> map = new HashMap>();

		List departments = new ArrayList();
		Department department = new Department();
		department.setName("开发部");
		department.setDescription("程序员比较多");
		departments.add(department);

		map.put("l1", departments);

		ActionContext.getContext().put("map", map);
		return "listAction";
	}

	public String listMapList(){
		List>> list = new ArrayList>>();

		Map> map = new HashMap>();

		List departments = new ArrayList();
		Department department = new Department();
		department.setName("开发部");
		department.setDescription("程序员比较多");
		departments.add(department);

		map.put("l1", departments);

		list.add(map);

		ActionContext.getContext().put("listMapList", list);

		return "listAction";
	}
这些就是关于struts2的一些知识点,而还有很多信息,我会在后继续进行更新的哦。。欢迎交流,共同学习!!!!!!!!
