SpringCloud学习记录
参考:《Spring Cloud 微服务实战》
使用:SpringBoot
一:创建一个SpringBoot项目:springclouddemo1
文件只有5个,
1、启动类Springclouddemo1Application.java
package com.demo;

import org.springframework.boot.SpringApplication;
import org.springframework.boot.autoconfigure.SpringBootApplication;
import org.springframework.cloud.client.discovery.EnableDiscoveryClient;

@EnableDiscoveryClient	//激活Eureka中的DiscoveryClient实现(自动化配置,创建DiscoveryClient接口针对Eureka客户端的
						//EurekaDiscoveryClient实例),才能实现上述Controller中对服务信息的输出
@SpringBootApplication
public class Springclouddemo1Application {

	public static void main(String[] args) {
		SpringApplication.run(Springclouddemo1Application.class, args);
	}
}
2、HelloController
package com.demo.web;

import org.apache.log4j.Logger;
import org.springframework.beans.factory.annotation.Autowired;
import org.springframework.cloud.client.ServiceInstance;
import org.springframework.cloud.client.discovery.DiscoveryClient;
import org.springframework.web.bind.annotation.RequestMapping;
import org.springframework.web.bind.annotation.RestController;

@RestController
public class HelloController {

	private final Logger logger = Logger.getLogger(HelloController.class);
	@Autowired
	private DiscoveryClient client;

	@RequestMapping("/hello")
	public String hello() {
		ServiceInstance instance = client.getLocalServiceInstance();
		logger.info("/hello,host:"+instance.getHost()+",service_id:"+instance.getServiceId());
		return "Hello Spring Cloud!";
	}
}
3、application.properties
server.port=8888
spring.application.name=hello-service
eureka.client.serviceUrl.defaultZone=http://localhost:1111/eureka/
4、pom.xml(重点:1.3.7版本亲测有效)
	4.0.0

	com.damionew
	springclouddemo1
	0.0.1-SNAPSHOT
	jar

	springclouddemo1
	Demo project for Spring Boot


		org.springframework.boot
		spring-boot-starter-parent
		1.3.7.RELEASE


		UTF-8
		UTF-8
		1.8


			org.springframework.boot
			spring-boot-starter-web


			org.springframework.boot
			spring-boot-starter-actuator


			org.springframework.boot
			spring-boot-starter-test
			test


			org.springframework.cloud
			spring-cloud-starter-eureka-server


				org.springframework.cloud
				spring-cloud-dependencies
				Brixton.SR5
				pom
				import


				org.springframework.boot
				spring-boot-maven-plugin


			spring-snapshots
			Spring Snapshots
			https://repo.spring.io/snapshot

				true


			spring-milestones
			Spring Milestones
			https://repo.spring.io/milestone

				false


			spring-snapshots
			Spring Snapshots
			https://repo.spring.io/snapshot

				true


			spring-milestones
			Spring Milestones
			https://repo.spring.io/milestone

				false
5、终于学了怎么写单元测试:Springclouddemo1ApplicationTests.java
package com.demo;


import static org.hamcrest.CoreMatchers.equalTo;
import static org.springframework.test.web.servlet.result.MockMvcResultMatchers.content;
import static org.springframework.test.web.servlet.result.MockMvcResultMatchers.status;

import org.junit.Before;
import org.junit.Test;
import org.junit.runner.RunWith;
import org.springframework.boot.test.SpringApplicationConfiguration;
import org.springframework.http.MediaType;
import org.springframework.test.context.junit4.SpringJUnit4ClassRunner;
import org.springframework.test.context.web.WebAppConfiguration;
import org.springframework.test.web.servlet.MockMvc;
import org.springframework.test.web.servlet.request.MockMvcRequestBuilders;
import org.springframework.test.web.servlet.setup.MockMvcBuilders;

import com.demo.web.HelloController;

@RunWith(SpringJUnit4ClassRunner.class)	//引入Spring对JUnit4的支持
@SpringApplicationConfiguration(classes=Springclouddemo1Application.class)	//指定SpringBoot的启动类
@WebAppConfiguration	//开启Web应用的配置,用于模拟SevletContext
public class Springclouddemo1ApplicationTests {

	private MockMvc mvc;	//MockMvc对象,用于模拟调用Controller的接口发起请求,在@test定义的hello测试用例中
							//perform函数执行一次请求调用,accept用于执行接收的数据类型,andExpect用于判断接口返回的期望值
	@Before	//Junit中定义在测试用例@Test内容执行前预加载的内容,这里用来初始化对HelloController的模拟
	public void setUp() throws Exception {
		mvc = MockMvcBuilders.standaloneSetup(new HelloController()).build();
	}
	@Test
	public void hello() throws Exception {
		mvc.perform(MockMvcRequestBuilders.get("/hello").accept(MediaType.APPLICATION_JSON))
		.andExpect(status().isOk())
		.andExpect(content().string(equalTo("Hello Spring Could!")));
	}

}
这样首先是创建好了一个SpringBoot项目,启动输入:http://localhost:8888/hello
页面输出:Hello Spring Cloud!
当然,因为现在已经通过@EnableDiscoveryClient注册为Eureka客户端,所以会报错。
二、创建一个eureka-server作为服务注册中心
1、创建启动类:EurekaServerApplication.java
package com.demo;

import org.springframework.boot.autoconfigure.SpringBootApplication;
import org.springframework.boot.builder.SpringApplicationBuilder;
import org.springframework.cloud.netflix.eureka.server.EnableEurekaServer;

@EnableEurekaServer	//该注解启动一个服务注册中心提供给其他应用进行对话
@SpringBootApplication
public class EurekaServerApplication {

	public static void main(String[] args) {
		new SpringApplicationBuilder(EurekaServerApplication.class).web(true).run(args);
	}
}
2、配置application.properties文件
server.port=1111
eureka.instance.hostname=localhost
#	由于该应用为注册中心,所以设置为false,代表不向注册中心注册自己
eureka.client.register-with-eureka=false
#	由于注册中心的职责就是维护服务实例,它并不需要去检索服务,所以也设置为false
eureka.client.fetch-registry=false
eureka.client.serviceUrl.defaultZone=http://${eureka.instance.hostname}:${server.port}/eureka/
3、pom.xml(同样使用1.3.7)
	4.0.0

	com.damionew
	eureka-server
	0.0.1-SNAPSHOT
	jar

	eureka-server
	Demo project for Spring Boot


		org.springframework.boot
		spring-boot-starter-parent
		1.3.7.RELEASE


		UTF-8
		UTF-8
		1.8


			org.springframework.cloud
			spring-cloud-starter-eureka-server


				org.springframework.cloud
				spring-cloud-dependencies
				Brixton.SR5
				pom
				import


				org.springframework.boot
				spring-boot-maven-plugin


			spring-snapshots
			Spring Snapshots
			https://repo.spring.io/snapshot

				true


			spring-milestones
			Spring Milestones
			https://repo.spring.io/milestone

				false


			spring-snapshots
			Spring Snapshots
			https://repo.spring.io/snapshot

				true


			spring-milestones
			Spring Milestones
			https://repo.spring.io/milestone

				false
此时启动以上两个项目,进入localhost:1111/会出现Eureka页面,此时有一个服务为HELLO-SERVICE
三:创建服务消费者ribbon-consumer
1、启动类RibbonConsumerApplication.java
package com.demo;

import org.springframework.boot.SpringApplication;
import org.springframework.boot.autoconfigure.SpringBootApplication;
import org.springframework.cloud.client.discovery.EnableDiscoveryClient;
import org.springframework.cloud.client.loadbalancer.LoadBalanced;
import org.springframework.context.annotation.Bean;
import org.springframework.web.client.RestTemplate;

@EnableDiscoveryClient	//注册为Eureka客户端应用,以获取服务发现能力
@SpringBootApplication
public class RibbonConsumerApplication {

	@Bean
	@LoadBalanced	//开启客户端的负载均衡
	RestTemplate restTemplate() {
		return new RestTemplate();
	}
	public static void main(String[] args) {
		SpringApplication.run(RibbonConsumerApplication.class, args);
	}
}
2、ConsumerController控制器
package com.demo.controller;

import org.springframework.beans.factory.annotation.Autowired;
import org.springframework.web.bind.annotation.RequestMapping;
import org.springframework.web.bind.annotation.RestController;
import org.springframework.web.client.RestTemplate;

@RestController
public class ConsumeController {
	/**
	 * 创建ConsumeController类并实现/ribbon-consumer接口,
	 * 在该接口中,通过启动类创建的RestTemplate来实现对HELLO-SERVICE服务提供的/hello接口进行调用
	 * 访问地址为服务名HELLO-SERVICE而不是具体地址,在服务治理框架中,这是非常重要的特性,也符合对服务治理的解释
	 */
	@Autowired
	RestTemplate restTemplate;
	@RequestMapping("/ribbon-consumer")
	public String helloConsumer() {
		return restTemplate.getForEntity("http://HELLO-SERVICE/hello", String.class).getBody();
	}
}
3、application.properties配置
spring.application.name=ribbon-consumer
server.port=9000
eureka.client.serviceUrl.defaultZone=http://localhost:1111/eureka/
4、pom.xml
	4.0.0

	com.damionew
	ribbon-consumer
	0.0.1-SNAPSHOT
	jar

	ribbon-consumer
	Demo project for Spring Boot


		org.springframework.boot
		spring-boot-starter-parent
		1.3.7.RELEASE


		UTF-8
		UTF-8
		1.8
		Edgware.BUILD-SNAPSHOT


			org.springframework.cloud
			spring-cloud-starter-eureka


			org.springframework.cloud
			spring-cloud-starter-ribbon


			org.springframework.boot
			spring-boot-starter-test
			test


				org.springframework.cloud
				spring-cloud-dependencies
				Brixton.SR5
				pom
				import


				org.springframework.boot
				spring-boot-maven-plugin


			spring-snapshots
			Spring Snapshots
			https://repo.spring.io/snapshot

				true


			spring-milestones
			Spring Milestones
			https://repo.spring.io/milestone

				false


			spring-snapshots
			Spring Snapshots
			https://repo.spring.io/snapshot

				true


			spring-milestones
			Spring Milestones
			https://repo.spring.io/milestone

				false
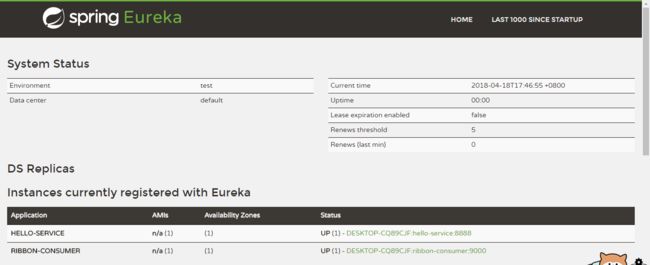
此时,启动三个项目,进入http://localhost:1111/结果如下:
拥有了两个服务,此时通过http://localhost:9000/ribbon-consumer,即消费者请求,可完成HELLO-SERVICE服务的/hello请求,同样输出Hello Spring Could!
