超详细图解从0搭建SSM框架【intellij idea】
关于springMVC的配置,可以参考这篇文章:
SpringMVC 配置FreeMarker模板引擎:
文章链接:http://blog.csdn.net/w8897282/article/details/71215591
第一步:打开intellij idea,创建maven项目
既然是从0开始,那么我们就从打开intellij idea 开始!
点击intellij idea左上方的project->
出现如下界面,选择maven,然后选择项目Java的SDK版本,当然如果项目需要其他的SDK版本你也可以自己选择

这里说明一下,默认的maven项目会提供一些模板给开发者使用,
然后点击下一步
这两个id不是随便写的,后面的模块与模块之间的关系都是依赖于GroupId和ArtifactId来完成的,这里暂不叙述,后面再聊
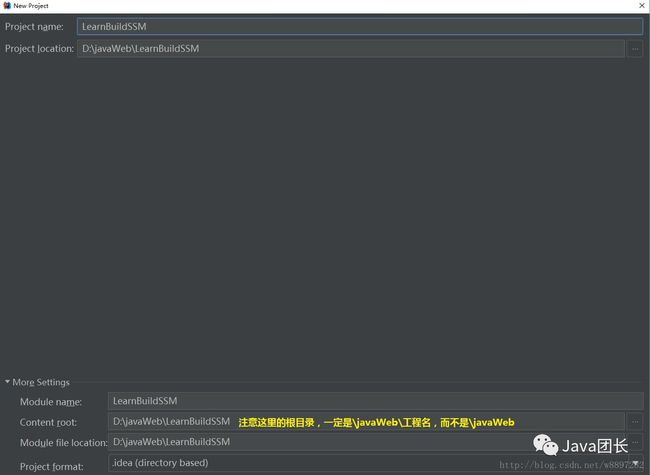
接着再点next,进入填写项目名称的阶段
这里有一个有趣的细节,那就是上一步你的artifactId填写的是什么,下一步中默认的projectName 就会是什么,同时注意下面的Module也会是这个名称。
这里换个名字吧~
点击Finish 完成第一步!
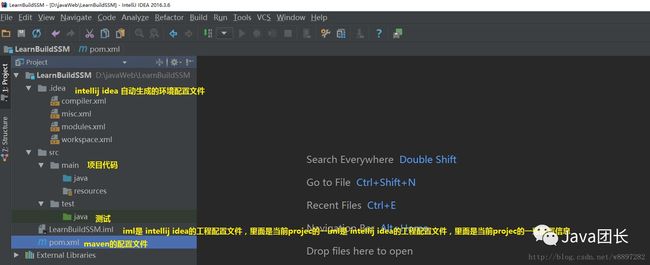
此时的项目结构是这样的
在开始下一步之前,再来深究一下GroupId和ArtifactId的作用
假设我们的项目包含3个模块,分别是web-mobie,web-pc,web-service
那么如果他们的GroupId和ArtifactId设置如下
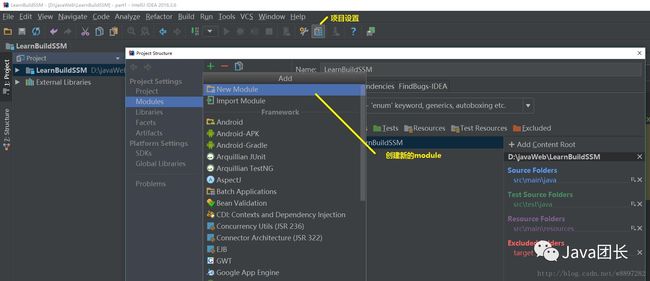
那么我们新建module
然后又出现了我们新建项目时的那个界面了!
操作不赘述,重点是这个界面
然后以此类推添加module
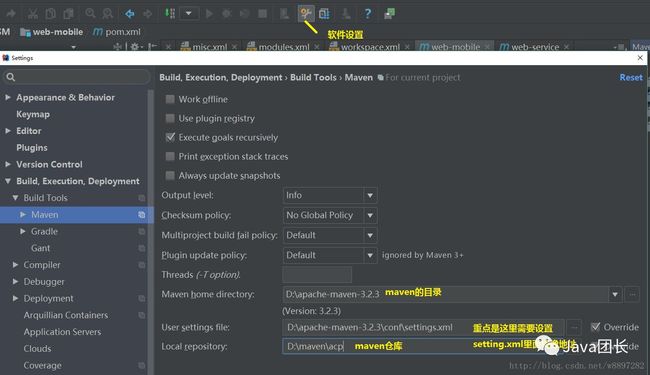
第二步 配置maven
setting.xml镜像配置:
     <mirror>
      <id>alimavenid>
      <name>aliyun mavenname>
      <url>http://maven.aliyun.com/nexus/content/groups/public/url>
      <mirrorOf>centralmirrorOf>
    mirror>
第三步 通过maven添加SSM所需框架和其他库
在项目(注意不是module)的pom.xml文件中添加相应代码:
注意,这里所有的依赖都是可以根据项目的需求自行改变的
第四步 添加各框架的配置文件
Spring与MyBatis的整合
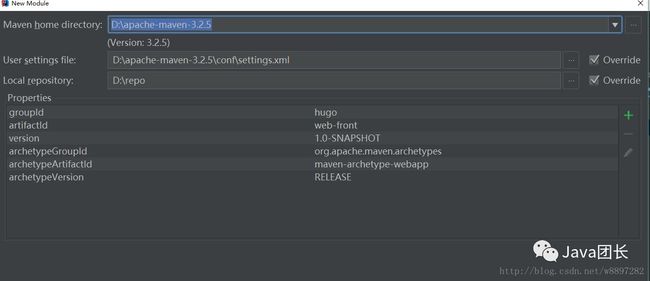
为了方便演示,我们在新建 一个moudle,这次选择web app的模板
结构关系如下,这个moudle是创建在LearnBuildSSM的Project下的。 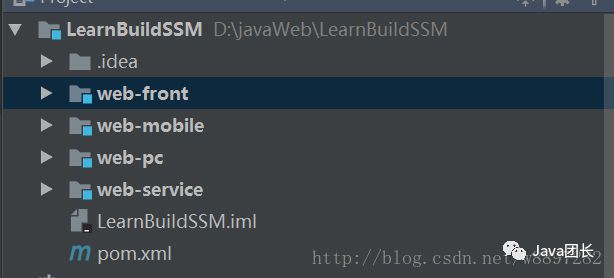
最后点击完成
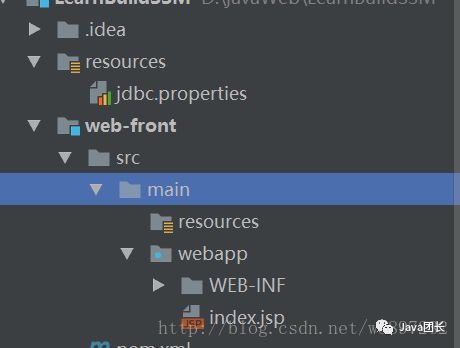
可以看到项目结构如下:
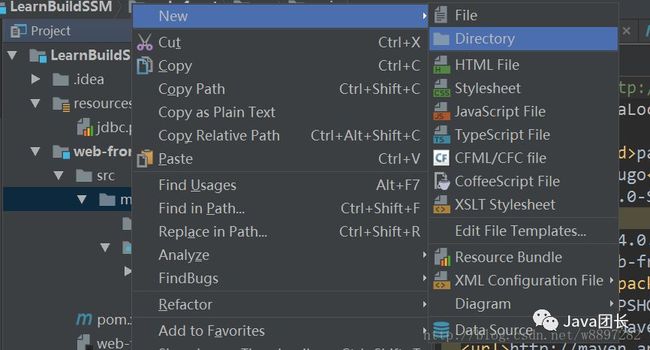
观察发现并没有java这个目录,这就需要我们自己手动创建了
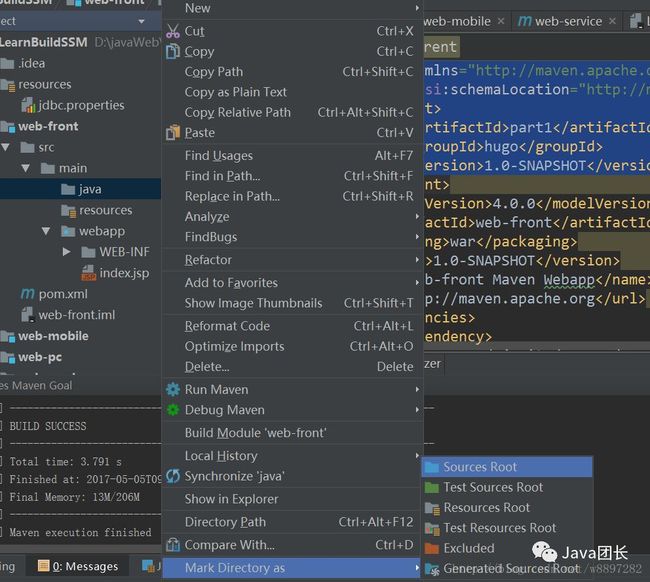
把创建的java目录变为source root
然后同理创建test目录及java下的相关目录,最后的结构图如下: 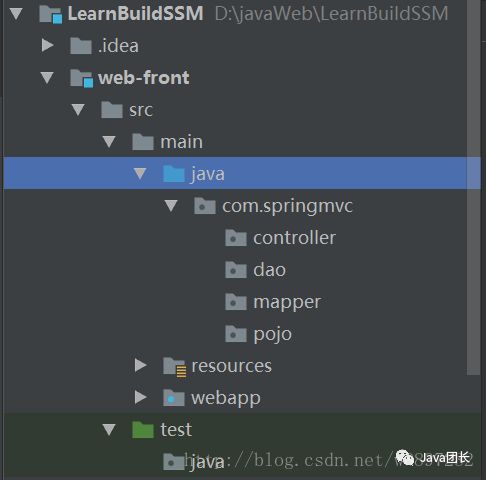
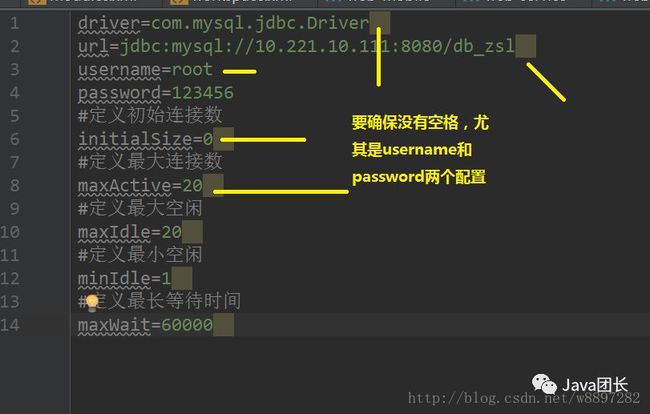
(1)web-front 的resources下新建jdbc.properties(文件编码修改为utf-8),如果不存在这个目录,则自己手动创建一个directory,然后右建make directory as 选择resources root,具体配置根据本机情况调整。
driver=com.mysql.jdbc.Driver
url=jdbc:mysql://localhost:3306/project?useUnicode=true&characterEncoding=utf-8
username=root
password=123456
#定义初始连接数
initialSize=0
#定义最大连接数
maxActive=20
#定义最大空闲
maxIdle=20
#定义最小空闲
minIdle=1
#定义最长等待时间
maxWait=60000
(2)配置log4j,方便日志的输出
参考博文Log4j配置详解
博文链接:http://blog.csdn.net/zhshulin/article/details/37937365
同样在刚才的resources目录下新建log4j.properties
#定义LOG输出级别
log4j.rootLogger=INFO,Console,File
#定义日志输出目的地为控制台
log4j.appender.Console=org.apache.log4j.ConsoleAppender
log4j.appender.Console.Target=System.out
#可以灵活地指定日志输出格式,下面一行是指定具体的格式
log4j.appender.Console.layout = org.apache.log4j.PatternLayout
log4j.appender.Console.layout.ConversionPattern=[%c] - %m%n
#文件大小到达指定尺寸的时候产生一个新的文件
log4j.appender.File = org.apache.log4j.RollingFileAppender
#指定输出目录
log4j.appender.File.File = logs/ssm.log
#定义文件最大大小
log4j.appender.File.MaxFileSize = 10MB
# 输出所以日志,如果换成DEBUG表示输出DEBUG以上级别日志
log4j.appender.File.Threshold = ALL
log4j.appender.File.layout = org.apache.log4j.PatternLayout
log4j.appender.File.layout.ConversionPattern =[%p] [%d{yyyy-MM-dd HH\:mm\:ss}][%c]%m%n
(3)创建Spring-myBatis,此文件就是专门用来整合Spring和mybatis的
xmlns:xsi="http://www.w3.org/2001/XMLSchema-instance" xmlns:p="http://www.springframework.org/schema/p" xmlns:context="http://www.springframework.org/schema/context" xmlns:mvc="http://www.springframework.org/schema/mvc" xsi:schemaLocation="http://www.springframework.org/schema/beans http://www.springframework.org/schema/beans/spring-beans-3.1.xsd http://www.springframework.org/schema/context http://www.springframework.org/schema/context/spring-context-3.1.xsd http://www.springframework.org/schema/mvc http://www.springframework.org/schema/mvc/spring-mvc-4.0.xsd"> class="org.springframework.beans.factory.config.PropertyPlaceholderConfigurer"> destroy-method="close"> class="org.springframework.jdbc.datasource.DataSourceTransactionManager">
这里需要注意一点
这段代码是IDE自动加载map下的.xml文件,由于maven无法对xml文件进行编译打包,须在pom.xml文件中添加如下配置:
······
······
参考博文maven项目无法打包编辑mapper下的xml文件
博文链接:http://blog.csdn.net/u012599988/article/details/44041205
如果不添加,就会报找不到.xml文件(FlieNoFound)的错误
(4)使用MyBatis Generator自动创建代码
参考博文SSM框架——使用MyBatis Generator自动创建代码
博文链接:http://blog.csdn.net/zhshulin/article/details/23912615
最后将生成的文件放到对应的目录当中:
(5)编写测试用例
/**
* Created by hugo on 2017/3/20.
*/
@RunWith(SpringJUnit4ClassRunner.class)
@ContextConfiguration(locations = {"classpath:spring-mybatis.xml"})
public class TestMybatis {
private static Logger logger = Logger.getLogger(TestMybatis.class);
@Resource
private MessageService messageService=null;
@Test
public void test1(){
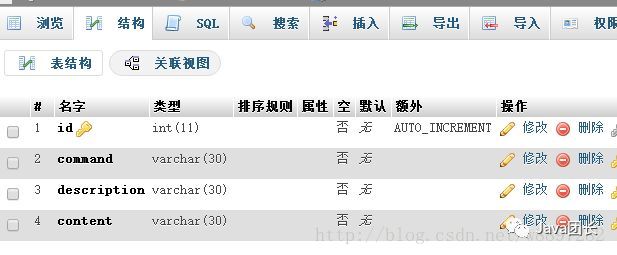
Message message=messageService.getMessageById(1);
logger.info("值:"+message.getCommand());
}
}
SpringMVC整合
最后我们将进行SpringMVC的整合,其配置文件单独存放,然后在web.xml当中配置整合
(1)配置Spring-mvc.xml
xmlns:xsi="http://www.w3.org/2001/XMLSchema-instance" xmlns:p="http://www.springframework.org/schema/p" xmlns:context="http://www.springframework.org/schema/context" xmlns:mvc="http://www.springframework.org/schema/mvc" xsi:schemaLocation="http://www.springframework.org/schema/beans http://www.springframework.org/schema/beans/spring-beans-3.1.xsd http://www.springframework.org/schema/context http://www.springframework.org/schema/context/spring-context-3.1.xsd http://www.springframework.org/schema/mvc http://www.springframework.org/schema/mvc/spring-mvc-4.0.xsd"> class="org.springframework.http.converter.json.MappingJackson2HttpMessageConverter"> class="org.springframework.web.servlet.mvc.annotation.AnnotationMethodHandlerAdapter"> class="org.springframework.web.multipart.commons.CommonsMultipartResolver">
(2) 配置web.xml
"-//Sun Microsystems, Inc.//DTD Web Application 2.3//EN"
"http://java.sun.com/dtd/web-app_2_3.dtd" >
xmlns="http://java.sun.com/xml/ns/javaee" xsi:schemaLocation="http://java.sun.com/xml/ns/javaee http://java.sun.com/xml/ns/javaee/web-app_3_0.xsd" version="3.0">
具体说明详见注释
(3) 测试
我们在controller中新建一个MessageController
@Controller
@RequestMapping("/message")
public class MessageController {
@Resource
private MessageService messageService;
@RequestMapping(value = "/show",method = RequestMethod.GET)
public @ResponseBody
Message helloMvc(HttpServletRequest request, Model model){
int id = Integer.parseInt(request.getParameter("id"));
Message mes=this.messageService.getMessageById(id);
model.addAttribute("message",mes);
return mes;
}
}
然后讲web-front项目添加进tomcat当中
运行项目,在浏览器输入url,得到如下结果:
至此,SSM框架就全部集成完毕了~
总结
最后,再来简单概括一下通过intellij idea 来实现SSM框架集成的步骤
1、新建Maven项目。这里需要通过groupId和ArtifactId来处理好module与moudle之间的关系,同时需要修改intellij idea中的maven配置,重点是要修改setting.xml当中的镜像地址,以方便我们可以快速地下载第三方的类库
2、添加类库。当项目新建完毕后,接下来就是在项目的pom.xml中添加相关类库的依赖,具体这些依赖是添加在工程下的pom.xml里,还是添加在某一个moudle当中的pom.xml需要视整体系统的设计而定
3、配置MyBatis、SpringMVC、log4j和项目的web.xml来完成最终的框架整合。
原文:http://blog.csdn.net/w8897282/article/details/71173211
如果你在学习Java的过程中遇见什么问题或者想获取一些学习资源的话欢迎加入团长的Java学习交流QQ群:495273252

Java团长
微信号:javatuanzhang
每日分享Java技术干货长按识别二维码


