服务之--DNS
1.安装DNS
yum search dns ##查看dns软件

yum install bind.x86_64 ##安装
systemctl start named ##启动服务,密码库存不够需手敲乱码
cat /etc/services | grep domain ##查看domain服务的信息

firewall-cmd –permanent –add-service=dns ##配置火墙服务
firewall-cmd –reload
firewall-cmd –list-all

netstat -antlupe | grep 53 ##查看53端口

vim /etc/named.conf ##编辑配置文件
options{
    listen-on port 53 { any; }; ##端口权限为所有人
    ...
    allow-query { any; };   ##用户权限为所有人
    forwarders  { 172.25.254.123; }; ##访问ip地址
systemctl restart named
netstat -antlupe | grep 53 ##查看53端口(看效果)

2.解析
正向解析
vim /etc/named.conf ##编辑配置文件
options{
    listen-on port 53 { any; }; ##端口权限为所有人
    ...
    allow-query { any; };   ##用户权限为所有人
    forwarders { 172.25.254.123; }; ##访问ip地址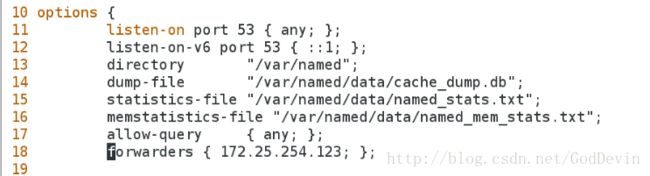
vim /etc/named.rfc1912.zones
 25 zone "westos.com" IN {             ##域名
 26           type master;                    ##类型为主控
 27           file "westos.com.zone";   ##文件存放目录
 28           allow-update { none; };   ##是否允许更新
 29 };
cd /var/named/
cp -p named.localhost westos.com.zone

vim /var/named/westos.com.zone
  1 $TTL 1D
  2 @       IN SOA  dns.westos.com. root.westos.com. (
  3                                         0       ; serial
  4                                         1D      ; refresh
  5                                         1H      ; retry
  6                                         1W      ; expire
  7                                         3H )    ; minimum
  8         NS      dns.westos.com.
  9 dns     A       172.25.66.100
 10 www     A       172.25.66.111
systemctl restart named
测试:vim /etc/resolve 编写nameserver 172.25.66.100
dig www.westos.com

dig dns.westos.com

正向解析轮询
vim /var/named/westos.com.zone
  1 $TTL 1D
  2 @       IN SOA  dns.westos.com. root.westos.com. (
  3                                         0       ; serial
  4                                         1D      ; refresh
  5                                         1H      ; retry
  6                                         1W      ; expire
  7                                         3H )    ; minimum
  8         NS      dns.westos.com.
  9 dns     A       172.25.66.100
 10 www     CNAME   bbs.westos.com.
 11 bbs     A       172.25.66.111
 12 bbs     A       172.25.66.222
systemctl restart named
测试:
dig www.westos.com 间隔几秒再 dig www.westos.com
反向解析
vim /etc/named.rfc1912.zones
 49 zone "66.25.172.in-addr.arpa" IN {
 50         type master;
 51         file "westos.com.ptr";
 52         allow-update { none; };
 53 };
cp -p named.loopback westos.com.ptr
vim westos.com.ptr
  1 $TTL 1D
  2 @       IN SOA  dns.westos.com. root.westos.com. (
  3                                         0       ; serial
  4                                         1D      ; refresh
  5                                         1H      ; retry
  6                                         1W      ; expire
  7                                         3H )    ; minimum
  8         NS      dns.westos.com.
  9 dns     A       172.25.66.100
 10 111     PTR     www.westos.com.
 11 222     PTR     bbs.westos.com.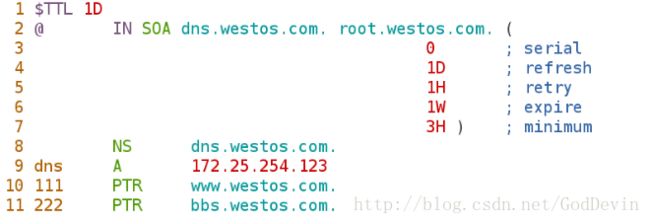
systemctl restart named
测试:dig -x 172.25.66.111

dig -x 172.25.66.222

分权限设定
vim /etc/named.conf
 60 view localnet {
 61         match-clients { 172.25.66.100; };
 62         zone "." IN {
 63         type hint;
 64         file "named.ca";
 65         };
 66 include "/etc/named.rfc1912.zones.inter";
 67 };
 68
 69 view internet {
 70         match-clients { any; };
 71         zone "." IN {
 72         type hint;
 73         file "named.ca";
 74         };
 75 include "/etc/named.rfc1912.zones";
 76 };
cp -p /etc/named.rfc1912.zones /etc/named.rfc1912.zones.inter
vim /etc/named.rfc1912.zones.inter
 25 zone "westos.com" IN {
 26         type master;
 27         file "westos.com.inter";
 28         allow-update { none; };
 29 };
cp -p westos.com.zone westos.com.inter
进入更改数据 :%s/172.25.254/192.168.0/g
vim westos.com.inter
  1 $TTL 1D
  2 @       IN SOA  dns.westos.com. root.westos.com. (
  3                                         0       ; serial
  4                                         1D      ; refresh
  5                                         1H      ; retry
  6                                         1W      ; expire
  7                                         3H )    ; minimum
  8         NS      dns.westos.com.
  9 dns     A       192.169.0.100
 10 www     CNAME   bbs.westos.com.
 11 bbs     A       192.169.0.111
 12 bbs     A       192.169.0.222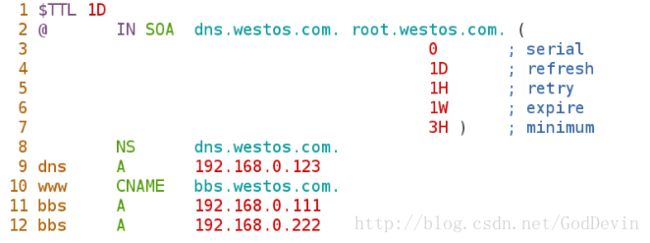
测试:用172.25.66.100测试dig www.westos.com
再用其他主机测试dig www.westos.com

主DNS和副DNS
新开启一台虚拟机
进行安装dns步骤
在副DNS上
vim /etc/named.conf
    10 options {
    11 //      listen-on port 53 { 127.0.0.1; };
    12 //      listen-on-v6 port 53 { ::1; };
    13         directory       "/var/named";
    14         dump-file       "/var/named/data/cache_dump.db";
    15         statistics-file "/var/named/data/named_stats.txt";
    16         memstatistics-file "/var/named/data/named_mem_stats.txt";
    17 //      allow-query     { localhost; };
vim /etc/named.rfc1912.zones
   25 zone "westos.com" IN {
   26         type slave;
   27         masters { 172.25.254.123; };
   28         file "slaves/westos.com.zone";
   29         allow-update { none; };
   30 };
在主DNS上
vim /etc/named.conf ##恢复初始设定
  55 zone "." IN {
  56         type hint;
  57         file "named.ca";
  58 };
  59
  60 include "/etc/named.rfc1912.zones";
  61 include "/etc/named.root.key";
vim /etc/named.rfc1912.zones
  25 zone "westos.com" IN {
  26         type master;
  27         file "westos.com.zone";
  28         allow-update { none; };
  29         also-notify { 172.25.254.223; };
  30 };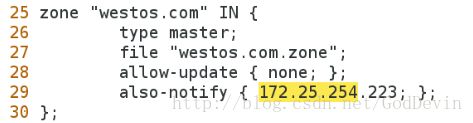
测试:选择一个主机,将DNS解析设为副DNS服务机IP
dig www.westos.com

cp -p westos.com.zone /mnt/ ##为接下来的实验做准备,可以恢复数据
加密传输
rm -rf westos.com.zone*
cp -p /etc/rndc.key /etc/westos.key
cp -p /mnt/westos.com.zone /var/named/
dnssec-keygen -a HMAC-MD5 -b 128 -n HOST westos
vim /etc/westos.key
  1 key "westos" {
  2         algorithm hmac-md5;
  3         secret "dUnXFNK5YcLJ2ZEyq6L3+w==";
  4 };
vim /etc/named.conf
43 include "/etc/westos.key";![]()
vim /etc/named.rfc1912.zones
 25 zone "westos.com" IN {
 26         type master;
 27         file "westos.com.zone";
 28         allow-update { key westos; };
 29         also-notify { 172.25.254.223; };
 30 };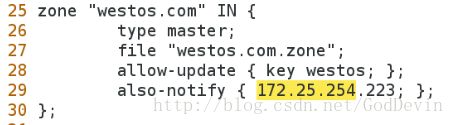
chmod g+w /var/named/
setsebool -P named_write_master_zones 1
在副DNS上更新
进入密码文件
[root@dns-slave mnt]# nsupdate -k Kwestos.+157+08988.private
   > server 172.25.254.123
   > update add devin.westos.com 86400 A 172.25.254.111
   > send
   > quit
   > update delete devin.westos.com
   > send
   > quit
测试:dig devin.westos.com
动态域名解析
rm -rf westos.com.zone*
cp -p /mnt/westos.com.zone /var/named/
systemctl restart named
服务主机安dhcpd
yum install dhcp.x86_64 -y
systemctl start dhcpd
firewall-cmd –permanent –add-service=dhcp
firewall-cmd –reload
cp /usr/share/doc/dhcp-4.2.5/dhcpd.conf.example /etc/dhcp/dhcpd.conf
vim /etc/dhcp/dhcpd.conf
     7 option domain-name "westos.com";
     8 option domain-name-servers 172.25.254.123;
14 ddns-update-style interim;![]()
   28 subnet 172.25.254.0 netmask 255.255.255.0 {
   29   range 172.25.254.80 172.25.254.88;
   30   option routers 172.25.254.123;
   31 }
   32
   33 key westos {
   34         algorithm hmac-md5;
   35         secret 9FiqehIwbOLbTph8zEa/hg==;
   36 }
   37
   38 zone westos.com. {
   39         primary 172.25.254.123;
   40         key westos;
   41 }
systemctl restart dhcp
测试:另一台虚拟机,名称改为devin.westos.com
IP 选择为dhcp分配方式
systemctl restart network
ifconfg
dig devin.westos.com
DNS安装软件,虚拟机
主DNS服务器上
yum install system-config-kickstart -y
yum install httpd -y
system-config-kickstart
生成自动安装引导ks.cfg文件,存放在/var/www/html/下
vim /var/www/html/ks.cfg
