完整的Spring-boot前后台入门程序
网上看了一些教程,总是有些不完整,这里自己写了一个前后台交互的简单案例,只是没有连数据库,数据用后台list模拟传到前台。
用spring-boot搭建环境,可以省去很多配置文件,同时内置了tomcat调式启动也很方便。
1、准备工作
eclipse创建一个maven项目,最简单的就可以,我用的是jdk7。
项目结构如下:
hello包里面就是网上很多的入门程序hello world;
user包里面模拟请求后台数据返回前台展示用户信息。
前台页面默认写在templates内,静态资源引用放在static内。
2、pom.xml配置
  4.0.0
  com.jandmin
  springBoot_demo
  0.0.1-SNAPSHOT

  springBoot_demo
  http://maven.apache.org


  	org.springframework.boot
  	spring-boot-starter-parent
  	1.4.1.RELEASE


  	UTF-8
  	1.7


  		org.springframework.boot
  		spring-boot-starter-web


  		org.springframework.boot
  		spring-boot-starter-test

  		test


		org.springframework.boot
		spring-boot-devtools
		true


		org.springframework.boot
		spring-boot-starter-thymeleaf


		com.alibaba
		fastjson
		1.2.31


  	springBoot_demo


  			org.apache.maven.plugins
  			maven-compiler-plugin

  				${java.version}
  				${java.version}
注意:版本号与eclipse的设置要一致,不然项目会有红x;
加入热部署依赖模块,每次修改代码就不需要重启了;
写前端代码,需要加入模板依赖,不然请求不到后台,具体模板可以参考官网文档。
3、先来一个Helo world吧
3.1 启动类Application.class
package com.jandmin;

import org.springframework.boot.SpringApplication;
import org.springframework.boot.autoconfigure.SpringBootApplication;

/**
 * springBoot 启动类
 * @author JandMin
 *
 */
@SpringBootApplication
public class Application {
	public static void main(String[] args) {
		SpringApplication.run(Application.class, args);
	}
}
package com.jandmin.hello.controller;

import java.util.Arrays;
import java.util.List;

import org.springframework.web.bind.annotation.RequestMapping;
import org.springframework.web.bind.annotation.RestController;

/**
 * Controlle层
 * @author JandMin
 *
 */
@RestController
public class HelloWorldController {

	@RequestMapping("/hello")
	public String hello() {
		return "Hello World !";
	}
	@RequestMapping("/getArray")
	public List getArray(){
		return Arrays.asList(new String[] {"Aa","Bb","Cc"});
	}
}
3.3 运行启动类的main方法,浏览器访问对应路径
默认端口是8080
3.4 junit测试类也贴出来,上面页面访问成功说明已经可以了,测试类可以不写
package com.jandmin.hello.controller;

import static org.hamcrest.Matchers.equalTo;
import static org.springframework.test.web.servlet.result.MockMvcResultMatchers.content;
import static org.springframework.test.web.servlet.result.MockMvcResultMatchers.status;

import org.junit.Before;
import org.junit.Test;
import org.springframework.boot.test.context.SpringBootTest;
import org.springframework.http.MediaType;
import org.springframework.test.web.servlet.MockMvc;
import org.springframework.test.web.servlet.request.MockMvcRequestBuilders;
import org.springframework.test.web.servlet.setup.MockMvcBuilders;

import com.jandmin.hello.controller.HelloWorldController;

/**
 * 用Mock方式测试Controller
 * @author JandMin
 *
 */
@SpringBootTest
public class HelloWorldControllerTest {
	private MockMvc mockMvc;
	@Before
	public void setUp() throws Exception{
		mockMvc = MockMvcBuilders.standaloneSetup(new HelloWorldController()).build();
	}
	@Test
	public void testHello() throws Exception {
		mockMvc.perform(MockMvcRequestBuilders.get("/hello").accept(MediaType.APPLICATION_JSON)).andExpect(status().isOk())
		.andExpect(content().string(equalTo("Hello World !")));
	}

	@Test
	public void testGetArray() throws Exception {
		mockMvc.perform(MockMvcRequestBuilders.get("/getArray").accept(MediaType.APPLICATION_JSON)).andExpect(status().isOk())
	    .andExpect(content().string(equalTo("[\"Aa\",\"Bb\",\"Cc\"]")));
	}

}
注意:测试类这里要注意有几个静态包引用,不然里面的方法会报错的。
4、前台页面交互
4.1 用UserInfo来作为bean存储用户信息
package com.jandmin.user.model;

/**
 * 用户信息Bean
 * @author JandMin
 *
 */
public class UserInfo {
	private long id;			//用户ID
	private String loginname;	//用户登录名
	private String name;		//用户名
	private String passWord;	//用户密码(加密)

	public UserInfo() {
		super();
	}
	public UserInfo(long id, String loginname, String name, String passWord) {
		super();
		this.id = id;
		this.loginname = loginname;
		this.name = name;
		this.passWord = passWord;
	}
	public long getId() {
		return id;
	}
	public void setId(long id) {
		this.id = id;
	}
        ...省略...
}
4.2 sevice模拟访问数据库获取数据
接口:
package com.jandmin.user.service;

import java.util.List;

import com.jandmin.user.model.UserInfo;

public interface UserService {
	/**
	 * 获取用户信息的列表
	 * @return
	 */
	List listUserInfo();

}
实现类:
package com.jandmin.user.service.impl;

import java.util.ArrayList;
import java.util.List;

import org.springframework.stereotype.Service;

import com.jandmin.user.model.UserInfo;
import com.jandmin.user.service.UserService;

/**
 * 用户service实现类
 * @author JandMin
 *
 */
@Service
public class UserServiceImpl implements UserService {

	@Override
	public List listUserInfo() {
		List result = new ArrayList();
		UserInfo u1 = new UserInfo(1,"andy","Andy","123456");
		UserInfo u2 = new UserInfo(2,"carl","Carl","123456");
		UserInfo u3 = new UserInfo(3,"bruce","Bruce","123456");
		UserInfo u4 = new UserInfo(4,"dolly","Dolly","123456");
		result.add(u1);
		result.add(u2);
		result.add(u3);
		result.add(u4);
		return result;
	}

}
4.3 用户controller类
package com.jandmin.user.controller;

import java.util.List;

import org.apache.log4j.Logger;
import org.springframework.beans.factory.annotation.Autowired;
import org.springframework.stereotype.Controller;
import org.springframework.ui.Model;
import org.springframework.web.bind.annotation.RequestMapping;

import com.jandmin.user.model.UserInfo;
import com.jandmin.user.service.UserService;

/**
 * 用户Controller层
 * @author JandMin
 *
 */
@Controller
@RequestMapping(value="/user",produces="text/plain;charset=utf-8")
public class UserController {
	private Logger log = Logger.getLogger(UserController.class);
	@Autowired
	private UserService userService;
	/**
	 * 获取所有用户信息
	 * @return
	 */
	@RequestMapping("/listUserInfo")
	public String listUserInfo(Model model){
		log.info("获取用户信息列表");
		try {
			List userList = userService.listUserInfo();
			UserInfo userInfo = new UserInfo(6,"lusisi","Lusisi","123456");
			model.addAttribute("result", true);
			model.addAttribute("userInfo", userInfo);
			model.addAttribute("users", userList);
		} catch(Exception e) {
			log.info("获取用户信息失败");
			e.printStackTrace();
		}
		return "index";
	}
}
4.4 前台页面,我这里就简单用个ul展示获取到的后台数据
index.html
用户数据展示
列表
-
注意:xmlns:th="http://www.thymeleaf.org"引入命名空间;
index.html要写在resource下的templates文件夹内,如果要修改,请相应的修改springBoot的配置;
static内的资源引入的时候,不要带springBoot自带的路径(static),注意路径前要有“/”,不然引用不到。
5、页面数据验证
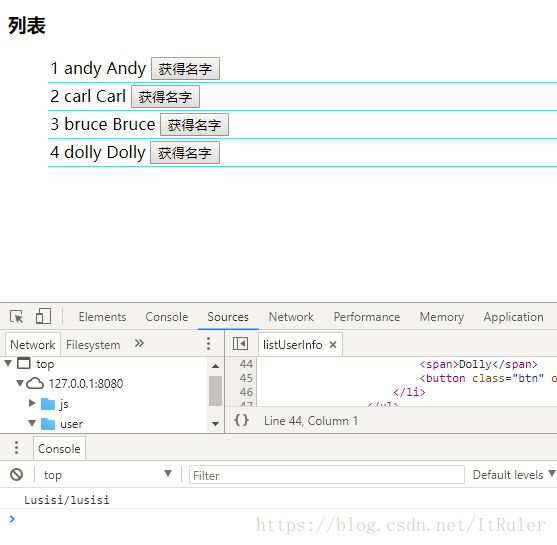
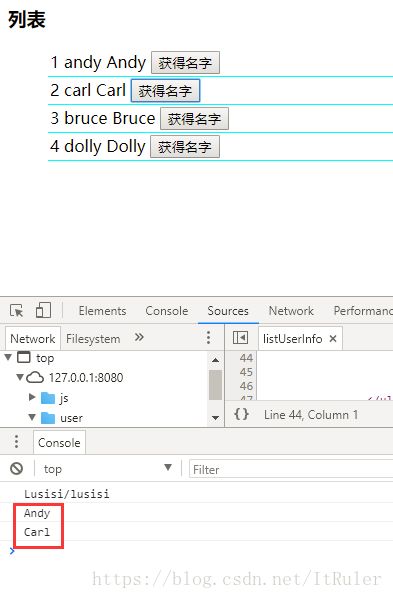
点击相应的button,查看控制台的输出:
好了,就是这么简单,springBoot 继续学习中.....


