Android FFmpeg系列——0 编译.so库
Android FFmpeg系列——1 播放视频
Android FFmpeg系列——2 播放音频
Android FFmpeg系列——3 C多线程使用
Android FFmpeg系列——4 子线程播放音视频
Android FFmpeg系列——5 音视频同步播放
Android FFmpeg系列——6 Java 获取播放进度
Android FFmpeg系列——7 实现快进/快退功能
由于公司项目原因,现在才得空来学习关于FFmpeg库的使用。
在使用FFmpeg库的过程中,哎呦,各种心酸!!项目重新创建了N次,调试了N次,终于把视频流播放出来,心里甚是激动呀!
Android Studio 创建Demo项目,记得把 “Include c++ support” 勾上。
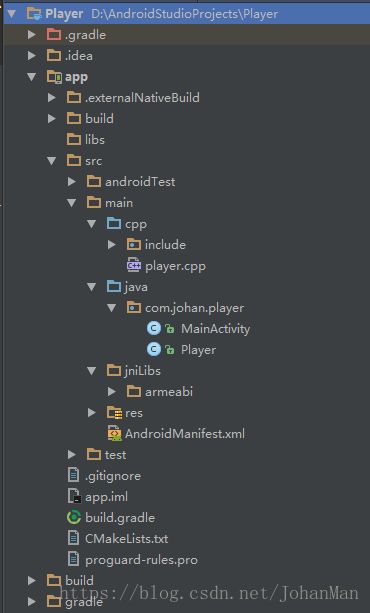
这里主要说2点:
每个人放so位置不一样,这个会影响到配置文件,所以还是放出来会好一点。
...
android {
...
defaultConfig {
...
externalNativeBuild {
cmake {
cppFlags "-std=c++11 -frtti -fexceptions"
}
ndk {
abiFilters "armeabi"
}
}
}
...
externalNativeBuild {
cmake {
path "CMakeLists.txt"
}
}
}
...
cmake_minimum_required(VERSION 3.4.1)
# 自己库文件
add_library(
player
SHARED
src/main/cpp/player.cpp
)
# FFmpeg include 文件
include_directories(src/main/cpp/include)
# 编解码库
add_library(
avcodec-lib
SHARED
IMPORTED
)
set_target_properties(
avcodec-lib
PROPERTIES IMPORTED_LOCATION
${CMAKE_SOURCE_DIR}/src/main/jniLibs/armeabi/libavcodec.so
)
# 滤镜库 暂时没用上
add_library(
avfilter-lib
SHARED
IMPORTED
)
set_target_properties(
avfilter-lib
PROPERTIES IMPORTED_LOCATION
${CMAKE_SOURCE_DIR}/src/main/jniLibs/armeabi/libavfilter.so
)
# 文件格式库 大部分操作都需要这个库
add_library(
avformat-lib
SHARED
IMPORTED
)
set_target_properties(
avformat-lib
PROPERTIES IMPORTED_LOCATION
${CMAKE_SOURCE_DIR}/src/main/jniLibs/armeabi/libavformat.so
)
# 工具库
add_library(
avutil-lib
SHARED
IMPORTED
)
set_target_properties(
avutil-lib
PROPERTIES IMPORTED_LOCATION
${CMAKE_SOURCE_DIR}/src/main/jniLibs/armeabi/libavutil.so
)
# 重采样库 主要用于音频的转换
add_library(
swresample-lib
SHARED
IMPORTED
)
set_target_properties(
swresample-lib
PROPERTIES IMPORTED_LOCATION
${CMAKE_SOURCE_DIR}/src/main/jniLibs/armeabi/libswresample.so
)
# 视频格式转换库 主要用于视频的转换
add_library(
swscale-lib
SHARED
IMPORTED
)
set_target_properties(
swscale-lib
PROPERTIES IMPORTED_LOCATION
${CMAKE_SOURCE_DIR}/src/main/jniLibs/armeabi/libswscale.so
)
# 主要 android 库 native window 需要这个库
target_link_libraries(
player
log
android
avcodec-lib
avfilter-lib
avformat-lib
avutil-lib
swresample-lib
swscale-lib
)
#include
#include
#include
#include
extern "C" {
#include "libavformat/avformat.h"
#include "libavcodec/avcodec.h"
#include "libswscale/swscale.h"
#include "libavutil/imgutils.h"
}
// Android 打印 Log
#define LOGE(FORMAT,...) __android_log_print(ANDROID_LOG_ERROR, "player", FORMAT, ##__VA_ARGS__);
/**
* 播放视频流
* R# 代表申请内存 需要释放或关闭
*/
extern "C"
JNIEXPORT void JNICALL
Java_com_johan_player_Player_playVideo(JNIEnv *env, jobject instance, jstring path_, jobject surface) {
// 记录结果
int result;
// R1 Java String -> C String
const char *path = env->GetStringUTFChars(path_, 0);
// 注册 FFmpeg 组件
av_register_all();
// R2 初始化 AVFormatContext 上下文
AVFormatContext *format_context = avformat_alloc_context();
// 打开视频文件
result = avformat_open_input(&format_context, path, NULL, NULL);
if (result < 0) {
LOGE("Player Error : Can not open video file");
return;
}
// 查找视频文件的流信息
result = avformat_find_stream_info(format_context, NULL);
if (result < 0) {
LOGE("Player Error : Can not find video file stream info");
return;
}
// 查找视频编码器
int video_stream_index = -1;
for (int i = 0; i < format_context->nb_streams; i++) {
// 匹配视频流
if (format_context->streams[i]->codecpar->codec_type == AVMEDIA_TYPE_VIDEO) {
video_stream_index = i;
}
}
// 没找到视频流
if (video_stream_index == -1) {
LOGE("Player Error : Can not find video stream");
return;
}
// 初始化视频编码器上下文
AVCodecContext *video_codec_context = avcodec_alloc_context3(NULL);
avcodec_parameters_to_context(video_codec_context, format_context->streams[video_stream_index]->codecpar);
// 初始化视频编码器
AVCodec *video_codec = avcodec_find_decoder(video_codec_context->codec_id);
if (video_codec == NULL) {
LOGE("Player Error : Can not find video codec");
return;
}
// R3 打开视频解码器
result = avcodec_open2(video_codec_context, video_codec, NULL);
if (result < 0) {
LOGE("Player Error : Can not find video stream");
return;
}
// 获取视频的宽高
int videoWidth = video_codec_context->width;
int videoHeight = video_codec_context->height;
// R4 初始化 Native Window 用于播放视频
ANativeWindow *native_window = ANativeWindow_fromSurface(env, surface);
if (native_window == NULL) {
LOGE("Player Error : Can not create native window");
return;
}
// 通过设置宽高限制缓冲区中的像素数量,而非屏幕的物理显示尺寸。
// 如果缓冲区与物理屏幕的显示尺寸不相符,则实际显示可能会是拉伸,或者被压缩的图像
result = ANativeWindow_setBuffersGeometry(native_window, videoWidth, videoHeight,WINDOW_FORMAT_RGBA_8888);
if (result < 0){
LOGE("Player Error : Can not set native window buffer");
ANativeWindow_release(native_window);
return;
}
// 定义绘图缓冲区
ANativeWindow_Buffer window_buffer;
// 声明数据容器 有3个
// R5 解码前数据容器 Packet 编码数据
AVPacket *packet = av_packet_alloc();
// R6 解码后数据容器 Frame 像素数据 不能直接播放像素数据 还要转换
AVFrame *frame = av_frame_alloc();
// R7 转换后数据容器 这里面的数据可以用于播放
AVFrame *rgba_frame = av_frame_alloc();
// 数据格式转换准备
// 输出 Buffer
int buffer_size = av_image_get_buffer_size(AV_PIX_FMT_RGBA, videoWidth, videoHeight, 1);
// R8 申请 Buffer 内存
uint8_t *out_buffer = (uint8_t *) av_malloc(buffer_size * sizeof(uint8_t));
av_image_fill_arrays(rgba_frame->data, rgba_frame->linesize, out_buffer, AV_PIX_FMT_RGBA, videoWidth, videoHeight, 1);
// R9 数据格式转换上下文
struct SwsContext *data_convert_context = sws_getContext(
videoWidth, videoHeight, video_codec_context->pix_fmt,
videoWidth, videoHeight, AV_PIX_FMT_RGBA,
SWS_BICUBIC, NULL, NULL, NULL);
// 开始读取帧
while (av_read_frame(format_context, packet) >= 0) {
// 匹配视频流
if (packet->stream_index == video_stream_index) {
// 解码
result = avcodec_send_packet(video_codec_context, packet);
if (result < 0 && result != AVERROR(EAGAIN) && result != AVERROR_EOF) {
LOGE("Player Error : codec step 1 fail");
return;
}
result = avcodec_receive_frame(video_codec_context, frame);
if (result < 0 && result != AVERROR_EOF) {
LOGE("Player Error : codec step 2 fail");
return;
}
// 数据格式转换
result = sws_scale(
data_convert_context,
(const uint8_t* const*) frame->data, frame->linesize,
0, videoHeight,
rgba_frame->data, rgba_frame->linesize);
if (result <= 0) {
LOGE("Player Error : data convert fail");
return;
}
// 播放
result = ANativeWindow_lock(native_window, &window_buffer, NULL);
if (result < 0) {
LOGE("Player Error : Can not lock native window");
} else {
// 将图像绘制到界面上
// 注意 : 这里 rgba_frame 一行的像素和 window_buffer 一行的像素长度可能不一致
// 需要转换好 否则可能花屏
uint8_t *bits = (uint8_t *) window_buffer.bits;
for (int h = 0; h < videoHeight; h++) {
memcpy(bits + h * window_buffer.stride * 4,
out_buffer + h * rgba_frame->linesize[0],
rgba_frame->linesize[0]);
}
ANativeWindow_unlockAndPost(native_window);
}
}
// 释放 packet 引用
av_packet_unref(packet);
}
// 释放 R9
sws_freeContext(data_convert_context);
// 释放 R8
av_free(out_buffer);
// 释放 R7
av_frame_free(&rgba_frame);
// 释放 R6
av_frame_free(&frame);
// 释放 R5
av_packet_free(&packet);
// 释放 R4
ANativeWindow_release(native_window);
// 关闭 R3
avcodec_close(video_codec_context);
// 释放 R2
avformat_close_input(&format_context);
// 释放 R1
env->ReleaseStringUTFChars(path_, path);
}
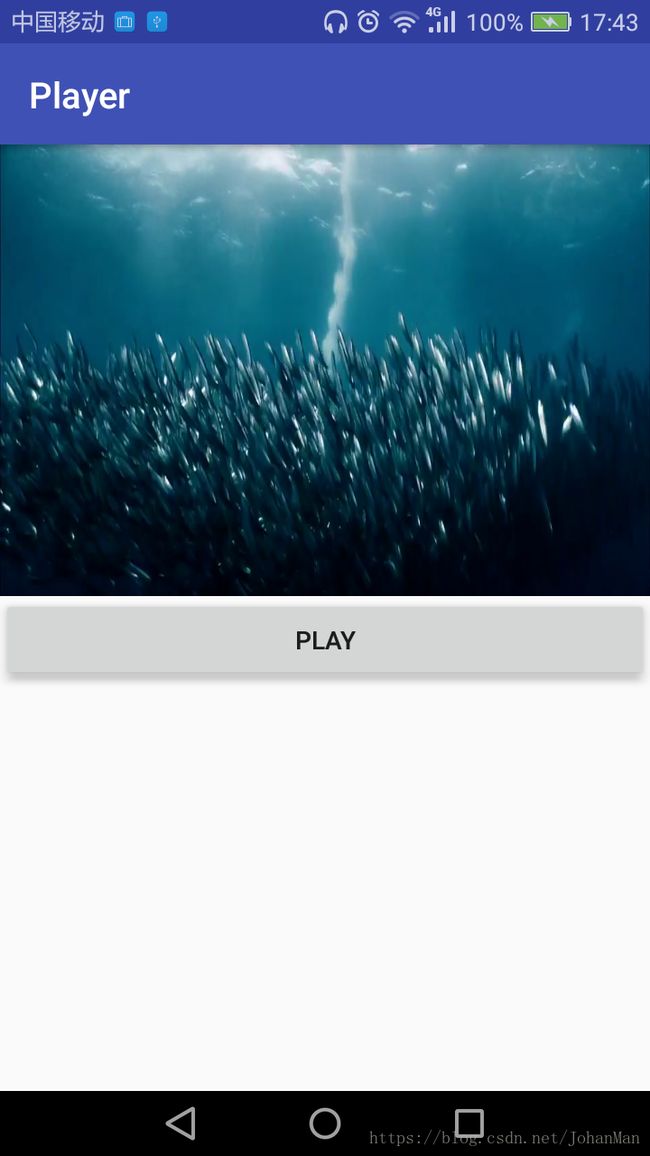
使用 FFmpeg 播放视频流程如下:
代码已经注释得比较清楚了,相信大家看得懂!!
布局文件:
<LinearLayout xmlns:android="http://schemas.android.com/apk/res/android"
android:orientation="vertical"
android:layout_width="match_parent"
android:layout_height="match_parent">
<SurfaceView
android:id="@+id/surface_view"
android:layout_width="match_parent"
android:layout_height="250dp"
/>
<Button
android:layout_width="match_parent"
android:layout_height="wrap_content"
android:text="Play"
android:onClick="play"
/>
LinearLayout>
Player Native 代码:
public class Player {
static {
System.loadLibrary("player");
}
public native void playVideo(String path, Surface surface);
}
Activity 播放代码:
public class MainActivity extends AppCompatActivity {
private SurfaceView surfaceView;
private SurfaceHolder surfaceHolder;
@Override
protected void onCreate(Bundle savedInstanceState) {
super.onCreate(savedInstanceState);
setContentView(R.layout.activity_main);
surfaceView = (SurfaceView) findViewById(R.id.surface_view);
surfaceHolder = surfaceView.getHolder();
}
public void play(View view) {
String videoPath = Environment.getExternalStorageDirectory() + "/mv.mp4";
Player player = new Player();
player.playVideo(videoPath, surfaceHolder.getSurface());
}
}
使用FFmpeg主要是集成时需要谨慎,还有就是对这个库不太了解!
接下来继续摸索!加油!!