1-1.Jetpack 之 Navigation 简单编码模板
一、Navigation
1、Navigation 概述
- Navigation 是 Jetpack 中的一个重要成员,它主要是结合导航图(Navigation Graph)来控制和简化 Fragment 之间的导航,即往哪里走,该怎么走
2、Navigate 引入
- 在模块级
build.gradle中引入相关依赖
implementation 'androidx.navigation:navigation-fragment:2.3.5'
implementation 'androidx.navigation:navigation-ui:2.3.5'
二、Navigation 初体验
1、思路
- 在一个 Activity 中,我们定义两个 Fragment,分别为 NormalOneFragment、NormalTwoFragment
-
在 NormalOneFragment 中,可以前进到 NormalTwoFragment
-
在 NormalTwoFragment 中,可以后退到 NormalOneFragment
2、具体实现
(1)Fragment Layout
- fragment_normal_one.xml
<androidx.constraintlayout.widget.ConstraintLayout xmlns:android="http://schemas.android.com/apk/res/android"
    xmlns:app="http://schemas.android.com/apk/res-auto"
    xmlns:tools="http://schemas.android.com/tools"
    android:layout_width="match_parent"
    android:layout_height="match_parent"
    tools:context=".fragment.NormalOneFragment"
    tools:ignore="MissingConstraints">

    <TextView
        android:layout_width="wrap_content"
        android:layout_height="wrap_content"
        android:text="NormalOneFragment"
        app:layout_constraintEnd_toEndOf="parent"
        app:layout_constraintStart_toStartOf="parent"
        app:layout_constraintTop_toTopOf="parent" />

    <Button
        android:id="@+id/btn_go"
        android:layout_width="wrap_content"
        android:layout_height="wrap_content"
        android:text="前进"
        app:layout_constraintBottom_toBottomOf="parent"
        app:layout_constraintEnd_toEndOf="parent"
        app:layout_constraintStart_toStartOf="parent" />
androidx.constraintlayout.widget.ConstraintLayout>
- fragment_normal_two.xml
<androidx.constraintlayout.widget.ConstraintLayout xmlns:android="http://schemas.android.com/apk/res/android"
    xmlns:tools="http://schemas.android.com/tools"
    android:layout_width="match_parent"
    android:layout_height="match_parent"
    xmlns:app="http://schemas.android.com/apk/res-auto"
    tools:context=".fragment.NormalTwoFragment">

    <TextView
        android:layout_width="wrap_content"
        android:layout_height="wrap_content"
        android:text="NormalTwoFragment"
        app:layout_constraintEnd_toEndOf="parent"
        app:layout_constraintStart_toStartOf="parent"
        app:layout_constraintTop_toTopOf="parent" />

    <Button
        android:id="@+id/btn_back"
        android:layout_width="wrap_content"
        android:layout_height="wrap_content"
        android:text="后退"
        app:layout_constraintBottom_toBottomOf="parent"
        app:layout_constraintEnd_toEndOf="parent"
        app:layout_constraintStart_toStartOf="parent" />
androidx.constraintlayout.widget.ConstraintLayout>
(2)Fragment Code
- NormalOneFragment.java
package com.my.navigation.fragment;

import android.os.Bundle;

import androidx.annotation.NonNull;
import androidx.annotation.Nullable;
import androidx.fragment.app.Fragment;
import androidx.navigation.NavController;
import androidx.navigation.Navigation;

import android.view.LayoutInflater;
import android.view.View;
import android.view.ViewGroup;
import android.widget.Button;

import com.my.navigation.R;

public class NormalOneFragment extends Fragment {

    private NavController navController;

    private Button btnGo;

    @Override
    public View onCreateView(LayoutInflater inflater, ViewGroup container,
                             Bundle savedInstanceState) {
        return inflater.inflate(R.layout.fragment_normal_one, container, false);
    }

    @Override
    public void onViewCreated(@NonNull View view, @Nullable Bundle savedInstanceState) {
        super.onViewCreated(view, savedInstanceState);

        navController = Navigation.findNavController(view);

        btnGo = view.findViewById(R.id.btn_go);

        btnGo.setOnClickListener(v -> navController.navigate(R.id.action_normalOneFragment_to_normalTwoFragment));
    }
}
- NormalTwoFragment.java
package com.my.navigation.fragment;

import android.os.Bundle;

import androidx.annotation.NonNull;
import androidx.annotation.Nullable;
import androidx.fragment.app.Fragment;
import androidx.navigation.NavController;
import androidx.navigation.Navigation;

import android.view.LayoutInflater;
import android.view.View;
import android.view.ViewGroup;
import android.widget.Button;

import com.my.navigation.R;

public class NormalTwoFragment extends Fragment {

    private NavController navController;

    private Button btnBack;

    @Override
    public View onCreateView(LayoutInflater inflater, ViewGroup container,
                             Bundle savedInstanceState) {
        return inflater.inflate(R.layout.fragment_normal_two, container, false);
    }

    @Override
    public void onViewCreated(@NonNull View view, @Nullable Bundle savedInstanceState) {
        super.onViewCreated(view, savedInstanceState);

        navController = Navigation.findNavController(view);

        btnBack = view.findViewById(R.id.btn_back);

        btnBack.setOnClickListener(v -> navController.navigateUp());
    }
}
(3)Navigation Graph
-
创建 Navigation Graph 文件:右击 res 目录 -> 【New】 -> 【Android Recourse File】
-
完成操作后,Android Studio 会自动在 res 目录下创建 navigation 目录,并该目录下创建 Navigation Graph 文件
- 注:如果创建的 Navigation Graph 文件一直处于加载状态,那关掉所有的 XML 文件,然后重新打开它


- 注:如果 res 目录下已经存在 navigation 目录,那可以这样创建 Navigation Graph 文件:右击 navigation 目录 -> 【New】 -> 【Android Recourse File】

- 切换到 Design 视图,开始编辑 Navigation Graph 文件
- 先拖入 NormalOneFragment,再拖入 NormalTwoFragment
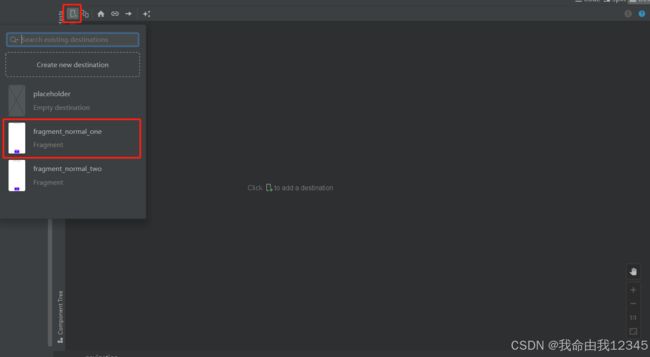
- 从 NormalOneFragment 右侧拉一个箭头指向 NormalTwoFragment,这表示在 NormalOneFragment 中,可以前进到 NormalTwoFragment,在 NormalTwoFragment 中,可以后退到 NormalOneFragment

- 我们把导航图画完之后,Navigation Graph 文件内容是这个样子的
<navigation xmlns:android="http://schemas.android.com/apk/res/android"
    xmlns:app="http://schemas.android.com/apk/res-auto"
    xmlns:tools="http://schemas.android.com/tools"
    android:id="@+id/my_graph_normal"
    app:startDestination="@id/normalOneFragment">

    <fragment
        android:id="@+id/normalOneFragment"
        android:name="com.my.navigation.fragment.NormalOneFragment"
        android:label="fragment_normal_one"
        tools:layout="@layout/fragment_normal_one" >
        <action
            android:id="@+id/action_normalOneFragment_to_normalTwoFragment"
            app:destination="@id/normalTwoFragment" />
    fragment>
    <fragment
        android:id="@+id/normalTwoFragment"
        android:name="com.my.navigation.fragment.NormalTwoFragment"
        android:label="fragment_normal_two"
        tools:layout="@layout/fragment_normal_two" />
navigation>
(4)Activity Layout
- activity_normal.xml
<androidx.constraintlayout.widget.ConstraintLayout xmlns:android="http://schemas.android.com/apk/res/android"
    xmlns:app="http://schemas.android.com/apk/res-auto"
    xmlns:tools="http://schemas.android.com/tools"
    android:layout_width="match_parent"
    android:layout_height="match_parent"
    tools:context=".NormalActivity">

    <fragment
        android:id="@+id/nhf"
        android:name="androidx.navigation.fragment.NavHostFragment"
        android:layout_width="match_parent"
        android:layout_height="match_parent"
        app:navGraph="@navigation/my_graph_normal" />
androidx.constraintlayout.widget.ConstraintLayout>
(5)Activity Code
- NormalActivity.java
package com.my.navigation;

import androidx.appcompat.app.AppCompatActivity;

import android.os.Bundle;

public class NormalActivity extends AppCompatActivity {

    @Override
    protected void onCreate(Bundle savedInstanceState) {
        super.onCreate(savedInstanceState);
        setContentView(R.layout.activity_normal);
    }
}
三、Navigation 案例解析
1、导航图解析
(1)navigation 元素
- 导航图最外层是一个根元素 navigation
-
android:id="@+id/my_graph_normal":导航图的唯一标识符 -
app:startDestination="@id/normalOneFragment":当导航图被加载时应该首先显示的 Fragment
<navigation xmlns:android="http://schemas.android.com/apk/res/android"
    xmlns:app="http://schemas.android.com/apk/res-auto"
    xmlns:tools="http://schemas.android.com/tools"
    android:id="@+id/my_graph_normal"
    app:startDestination="@id/normalOneFragment">

navigation>
(2)fragment 元素
- 导航图里面有两个元素 fragment
-
android:id="@+id/normalOneFragment":Fragment 的唯一标识符 -
android:name="com.my.navigation.fragment.NormalOneFragment":指定 Fragment 的类,应用会创建它 -
android:label="fragment_normal_one":Fragment 的标签,通常用于调试或 UI 显示 -
tools:layout="@layout/fragment_normal_one":指定 Fragment 的布局文件,仅用于 Android Studio 的预览功能
<fragment
    android:id="@+id/normalOneFragment"
    android:name="com.my.navigation.fragment.NormalOneFragment"
    android:label="fragment_normal_one"
    tools:layout="@layout/fragment_normal_one" >
    <action
        android:id="@+id/action_normalOneFragment_to_normalTwoFragment"
        app:destination="@id/normalTwoFragment" />
fragment>
<fragment
    android:id="@+id/normalTwoFragment"
    android:name="com.my.navigation.fragment.NormalTwoFragment"
    android:label="fragment_normal_two"
    tools:layout="@layout/fragment_normal_two" />
(3)action 元素
- 在 normalOneFragment 内部,有一个元素 action,它描述了从这个 Fragment 导航到另一个Fragment 的行为
-
android:id="@+id/action_normalOneFragment_to_normalTwoFragment":导航动作的唯一标识符 -
app:destination="@id/normalTwoFragment":指定导航的目的地 Fragment
<action
    android:id="@+id/action_normalOneFragment_to_normalTwoFragment"
    app:destination="@id/normalTwoFragment" />
2、导航图宿主
- NavHostFragment 是导航图的宿主,导航图中的 fragment 元素会嵌入其中
-
android:id="@+id/nhf":NavHostFragment 的唯一标识符 -
android:name="androidx.navigation.fragment.NavHostFragment":指定 NavHostFragment 的类,应用会创建它 -
app:navGraph="@navigation/my_graph_normal":指定与 NavHostFragment 关联的导航图的资源 ID
<fragment
    android:id="@+id/nhf"
    android:name="androidx.navigation.fragment.NavHostFragment"
    android:layout_width="match_parent"
    android:layout_height="match_parent"
    app:navGraph="@navigation/my_graph_normal" />
3、导航 API
(1)导航对象
- 导航 API 在导航对象上,先要得到导航对象
// 在 Fragment 中,通常在其 onViewCreated 方法或获取

@Override
public void onViewCreated(@NonNull View view, @Nullable Bundle savedInstanceState) {
    super.onViewCreated(view, savedInstanceState);

    NavController navController = Navigation.findNavController(view);
}
// 在 Activity 中,通常在其 onCreate 方法或获取

@Override
protected void onCreate(Bundle savedInstanceState) {
    super.onCreate(savedInstanceState);
    setContentView(R.layout.activity_normal);

    NavController navController = Navigation.findNavController(this, R.id.nhf);
}
(2)跳转与后退
- 跳转,从 NormalOneFragment 跳转到 NormalTwoFragment,其中
R.id.action_moreJumpOneFragment_to_moreJumpTwoFragment是导航动作的唯一标识符
navController.navigate(R.id.action_moreJumpOneFragment_to_moreJumpTwoFragment)
- 后退,从 NormalTwoFragment跳转到 NormalOneFragment
navController.navigateUp()