redhat6.7在vmware中桥接的网卡设置
前言
在公司开发机上,要在虚拟机中抓其他计算机上的包。
同事给了一个装好的vmware_rh6.7镜像文件夹,用vmware14载入,设置网卡后,真机和虚拟机开始单向ping通(真机ping虚拟机), 后来再修改,就互相ping不同了。
回家做个实验,整通了,设置不复杂, 但是不觉得设置步骤和在公司设置有啥区别,为啥呢?
是不是考虑将自己做的虚拟机拷贝到公司去用?
实验
- 下载rhel-server-6.7-x86_64-dvd.iso, 我在百度云盘中下载了一个.
- 建立虚拟机,插入光盘,自动安装完成,中间设置了一下第一个用户名称和口令.
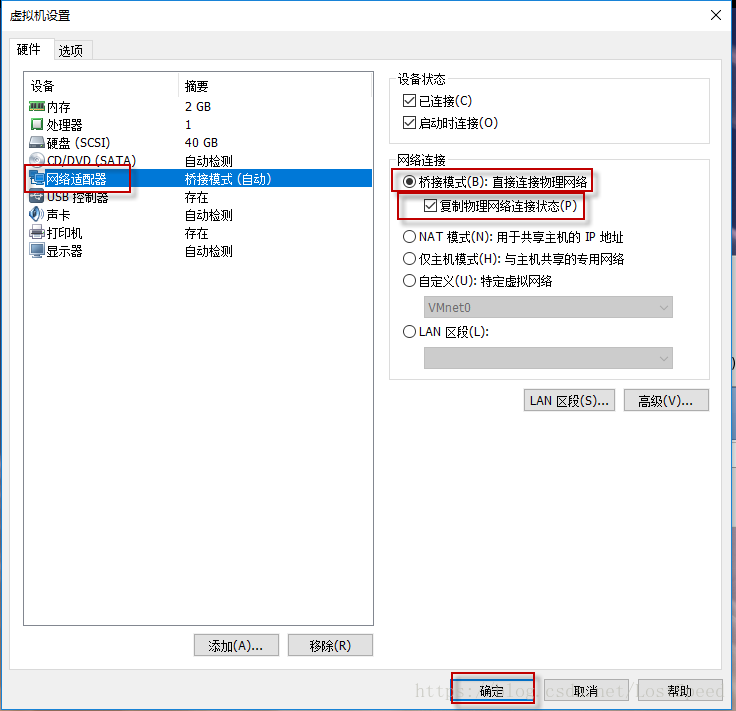
安装完成后,shutdown -hP now 关机 - 在虚拟机关闭状态下,右击虚拟机,设置菜单. 选择网络适配器为桥接。

- 启动虚拟机,因为这时没有网络,设置的过程都在虚拟机控制台中完成。需要切换到root用户。
- 设置网卡配置文件
cd /etc/sysconfig/network-scripts/
mkdir ./bk/
cp ./ifcfg-eth0 ./bk/
vi ./ifcfg-eth0
改好的网卡配置文件如下
# @file /etc/sysconfig/network-scripts/ifcfg-eth0

DEVICE="eth0"
HWADDR="00:0C:29:7D:60:6A"
UUID="c616ce51-578c-4d9e-ace0-7053ed4f72e7"
# IPV6INIT="yes"
ONBOOT="yes"
BOOTPROTO="static"
TYPE="Ethernet"
NM_CONTROLLED="no"

# real pc ip = 192.168.2.xx
IPADDR=192.168.2.41

NETMASK=255.255.255.0

# real pc gateway is 192.68.2.2
GATEWAY=192.168.2.2

DNS1=8.8.8.8
DNS2=8.8.4.4
控制网卡服务,使网卡设置生效
ifconfig eth0 down
ifconfig eth0 up
service network stop
service network start
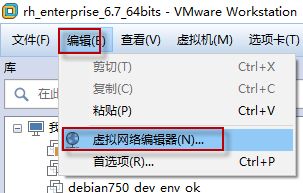
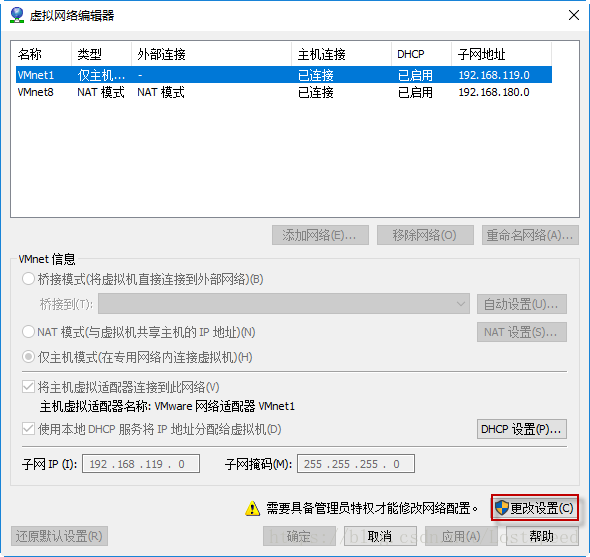
这时还是不能互相ping通的,需要设置一下虚拟网卡编辑器中的桥接的具体网卡(直接选桥接,是自动桥接的,有可能桥接到其他网卡上)。


这时,真机和虚拟机就可以互相ping通了,没有再去设置虚拟机中的防火墙。
C:\Users\>ping 192.168.2.41

正在 Ping 192.168.2.41 具有 32 字节的数据:
来自 192.168.2.41 的回复: 字节=32 时间<1ms TTL=64
来自 192.168.2.41 的回复: 字节=32 时间<1ms TTL=64[root@localhost ~]# ifconfig eth0
eth0 Link encap:Ethernet HWaddr 00:0C:29:7D:60:6A
inet addr:192.168.2.41 Bcast:192.168.2.255 Mask:255.255.255.0
inet6 addr: fe80::20c:29ff:fe7d:606a/64 Scope:Link
UP BROADCAST RUNNING MULTICAST MTU:1500 Metric:1
RX packets:636 errors:0 dropped:0 overruns:0 frame:0
TX packets:467 errors:0 dropped:0 overruns:0 carrier:0
collisions:0 txqueuelen:1000
RX bytes:56096 (54.7 KiB) TX bytes:56956 (55.6 KiB)
[root@localhost ~]# ping 192.168.2.60
PING 192.168.2.60 (192.168.2.60) 56(84) bytes of data.
64 bytes from 192.168.2.60: icmp_seq=1 ttl=128 time=0.195 ms
64 bytes from 192.168.2.60: icmp_seq=2 ttl=128 time=0.259 ms[root@localhost ~]# ping www.baidu.com
PING www.a.shifen.com (61.135.169.121) 56(84) bytes of data.
64 bytes from 61.135.169.121: icmp_seq=1 ttl=57 time=1.98 ms
64 bytes from 61.135.169.121: icmp_seq=2 ttl=57 time=1.41 ms
备注
虽然刚装完的rh6.7,防火墙没耽误事,还是找资料,看看如何查看和开关防火墙
查看防火墙规则
查看防火墙状态
[root@localhost ~]# /etc/init.d/iptables status
Table: filter
Chain INPUT (policy ACCEPT)
num  target     prot opt source               destination
1    ACCEPT     all  --  0.0.0.0/0            0.0.0.0/0           state RELATED,ESTABLISHED
2    ACCEPT     icmp --  0.0.0.0/0            0.0.0.0/0
3    ACCEPT     all  --  0.0.0.0/0            0.0.0.0/0
4    ACCEPT     tcp  --  0.0.0.0/0            0.0.0.0/0           state NEW tcp dpt:22
5    REJECT     all  --  0.0.0.0/0            0.0.0.0/0           reject-with icmp-host-prohibited

Chain FORWARD (policy ACCEPT)
num  target     prot opt source               destination
1    REJECT     all  --  0.0.0.0/0            0.0.0.0/0           reject-with icmp-host-prohibited

Chain OUTPUT (policy ACCEPT)
num  target     prot opt source               destination
防火墙关
[root@localhost ~]# /etc/init.d/iptables stop
iptables: Setting chains to policy ACCEPT: filter          [  OK  ]
iptables: Flushing firewall rules:                         [  OK  ]
iptables: Unloading modules:                               [  OK  ]
防火墙开
[root@localhost ~]# /etc/init.d/iptables start
iptables: Applying firewall rules:                         [  OK  ]
拷贝虚拟机到其他计算机
今天将虚拟机拷贝(将rh6.7虚拟机关了,完全克隆一个新的虚拟机)到公司开发机,需要的网络设置。
* 将虚拟网络编辑器中的桥接,指定具体网卡,按确定。
* 在虚拟机中,配置网卡文件
cd /etc/sysconfig/network-scripts/
vi ./ifcfg-eth0
需要修改的是ip地址(在真机网关同网段,选一个未用的IP)和网关(和真机网关的一样).
# @file /etc/sysconfig/network-scripts/ifcfg-eth0

DEVICE="eth0"
HWADDR="00:0C:29:7D:60:6A"
UUID="c616ce51-578c-4d9e-ace0-7053ed4f72e7"
# IPV6INIT="yes"
ONBOOT="yes"
BOOTPROTO="static"
TYPE="Ethernet"
NM_CONTROLLED="no"

# real pc ip = 192.168.2.xx
IPADDR=192.168.4.41

NETMASK=255.255.255.0

# real pc gateway is 192.68.2.2
GATEWAY=192.168.4.1

DNS1=8.8.8.8
DNS2=8.8.4.4
运行命令,使修改生效。
ifconfig eth0 down
ifconfig eth0 up
service network stop
service network start
reboot
重启后,ifconfig列出了一个eth1, 我没配置啊?也没有 /etc/sysconfig/network-scripts/ifcfg-eth1
但是可用了…
* 虚拟机ping真机 ok
* 真机ping 虚拟机ok
* 虚拟机ping 外网hostname ok
* 运行yum update, 可以从外网得到升级信息。