SpringCloud 学习记录(一):服务注册与发现(eureka+feign)
前面介绍过dubbo远程接口调用的简单使用,这里我们将开始学习如何使用springcloud微服务架构中的服务注册与发现。
一,eureka-server
eureka分为服务端和客户端两部分, eureka server是一个服务注册中心,类似于zookeeper,当然,也可以使用zookeeper代替,后面会详细说明。
首先,新建一个maven springboot应用,这里命名为eureka-server
1,添加依赖包
	org.springframework.cloud
	spring-cloud-starter-eureka-server
2,添加配置文件application.properties
#应用名称
spring.application.name=eureka-server
#服务端口
server.port=8080
#实例ip地址
eureka.instance.hostname=localhost
#设置当前的eureka服务禁止被当做客户端注册
eureka.client.register-with-eureka=false
eureka.client.fetch-registry=false
#设置服务发现地址
eureka.client.serviceUrl.defaultZone=http://localhost:${server.port}/eureka/package com.example;
import org.springframework.boot.autoconfigure.SpringBootApplication;
import org.springframework.boot.builder.SpringApplicationBuilder;
import org.springframework.cloud.netflix.eureka.server.EnableEurekaServer;
@EnableEurekaServer
@SpringBootApplication
public class Application {
public static void main(String[] args) {
new SpringApplicationBuilder(Application.class).web(true).run(args);
}
}

二,eureka-client
还是新建一个maven springboot应用,这里命名为eureka-client
1,添加依赖包
	org.springframework.cloud
	spring-cloud-starter-eureka


	org.springframework.boot
	spring-boot-starter-web
2,添加application.properties配置
spring.application.name=eureka-client
server.port=8081
eureka.client.serviceUrl.defaultZone=http://localhost:8080/eureka
3,启动类Application.java添加注解注册服务@EnableDiscoveryClient
package com.example;

import org.springframework.boot.autoconfigure.SpringBootApplication;
import org.springframework.boot.builder.SpringApplicationBuilder;
import org.springframework.cloud.client.discovery.EnableDiscoveryClient;

@EnableDiscoveryClient
@SpringBootApplication
public class Application {

	public static void main(String[] args) {
		new SpringApplicationBuilder(Application.class).web(true).run(args);
	}

}
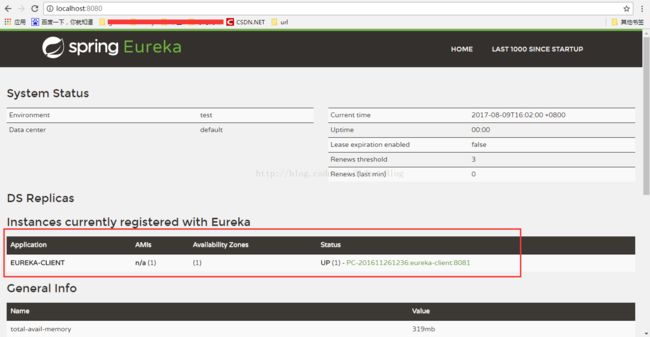
4,启动后刷新eureka-server界面,会发现多了一个注册的客户端实例eureka-client
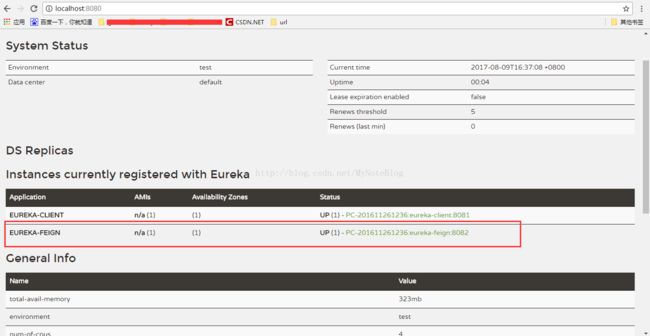
上面简单演示了使用eureka发现和注册服务,下面我们来看,如何使用feign来实现远程接口的调用。
还是新建一个maven springboot应用,这里命名为eureka-feign
1,添加依赖包
        org.springframework.cloud
        spring-cloud-starter-eureka


        org.springframework.cloud
        spring-cloud-starter-feign


        org.springframework.boot
        spring-boot-starter-web
spring.application.name=eureka-feign
server.port=8082
eureka.client.serviceUrl.defaultZone=http://localhost:8080/eureka
feign.httpclient.enabled=true
feign.compression.request.enabled=true
feign.compression.request.mime-types=application/json
feign.compression.request.min-request-size=2048
feign.compression.response.enabled=true
3,Application.java启动类开启注解@EnableFeignClients
package com.example;

import org.springframework.boot.autoconfigure.SpringBootApplication;
import org.springframework.boot.builder.SpringApplicationBuilder;
import org.springframework.cloud.client.discovery.EnableDiscoveryClient;
import org.springframework.cloud.netflix.feign.EnableFeignClients;
import org.springframework.context.annotation.Bean;

import feign.Request;

@EnableFeignClients
@EnableDiscoveryClient
@SpringBootApplication
public class Application {

	public static void main(String[] args) {
		new SpringApplicationBuilder(Application.class).web(true).run(args);
	}

	/**
	 * 自定义feign连接超时时间
	 * @return
	 */
	@Bean
    Request.Options feignOptions() {
        return new Request.Options(/**connectTimeoutMillis**/1000 * 1000, /** readTimeoutMillis **/1000 * 1000);
    }
}
5,添加测试类,从eureka-feign服务中调用eureka-client中的接口
(1) 在eureka-feign中添加TestController.java
package com.example;

import org.springframework.beans.factory.annotation.Autowired;
import org.springframework.web.bind.annotation.RequestMapping;
import org.springframework.web.bind.annotation.RequestMethod;
import org.springframework.web.bind.annotation.RestController;

@RestController
public class TestController {

    @Autowired
    TestClient testClient;

    @RequestMapping(value="/test",method=RequestMethod.GET)
    public String test() {
    	String msg = testClient.test();
    	return msg;
    }

}
package com.example;

import org.springframework.cloud.netflix.feign.FeignClient;
import org.springframework.web.bind.annotation.RequestMapping;
import org.springframework.web.bind.annotation.RequestMethod;

@FeignClient("eureka-client")
public interface TestClient {

    @RequestMapping(value="/test",method=RequestMethod.GET)
    String test();

}
(3) 在eureka-client中添加接口实现
package com.example;
import org.springframework.web.bind.annotation.RequestMapping;
import org.springframework.web.bind.annotation.RequestMethod;
import org.springframework.web.bind.annotation.RestController;
@RestController
public class TestController {
@RequestMapping(value="/test",method=RequestMethod.GET)
public String test() {
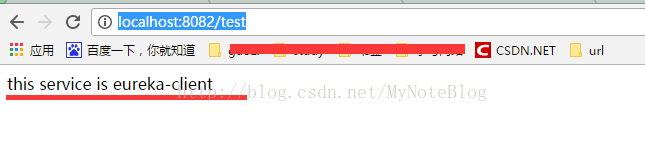
String msg = "this service is eureka-client";
return msg;
}
}接下来启动服务,访问http://localhost:8082/test,查看测试结果:
6,feign还支持负载均衡,不需要额外配置,继续保存服务开启状态,修改eureka-client的port=8083,然后启动
此时有两个eureka-client实例提供服务:

再次访问http://localhost:8082/test,这里共测试了4次,查看控制台日志,端口为8081和端口为8083的服务各调用了两次。
8081端口日志:
2017-08-09 16:50:24.671  INFO 3104 --- [           main] com.netflix.discovery.DiscoveryClient    : Saw local status change event StatusChangeEvent [timestamp=1502268624671, current=UP, previous=STARTING]
2017-08-09 16:50:24.674  INFO 3104 --- [nfoReplicator-0] com.netflix.discovery.DiscoveryClient    : DiscoveryClient_EUREKA-CLIENT/PC-201611261236:eureka-client:8081: registering service...
2017-08-09 16:50:24.739  INFO 3104 --- [nfoReplicator-0] com.netflix.discovery.DiscoveryClient    : DiscoveryClient_EUREKA-CLIENT/PC-201611261236:eureka-client:8081 - registration status: 204
2017-08-09 16:50:24.823  INFO 3104 --- [           main] s.b.c.e.t.TomcatEmbeddedServletContainer : Tomcat started on port(s): 8081 (http)
2017-08-09 16:50:24.825  INFO 3104 --- [           main] .s.c.n.e.s.EurekaAutoServiceRegistration : Updating port to 8081
2017-08-09 16:50:24.830  INFO 3104 --- [           main] com.example.Application                  : Started Application in 8.949 seconds (JVM running for 9.584)
2017-08-09 16:53:24.596  INFO 3104 --- [nio-8081-exec-1] o.a.c.c.C.[Tomcat].[localhost].[/]       : Initializing Spring FrameworkServlet 'dispatcherServlet'
2017-08-09 16:53:24.598  INFO 3104 --- [nio-8081-exec-1] o.s.web.servlet.DispatcherServlet        : FrameworkServlet 'dispatcherServlet': initialization started
2017-08-09 16:53:24.634  INFO 3104 --- [nio-8081-exec-1] o.s.web.servlet.DispatcherServlet        : FrameworkServlet 'dispatcherServlet': initialization completed in 36 ms
--------------this service is eureka-client
--------------this service is eureka-client
2017-08-09 16:55:24.319 INFO 3104 --- [trap-executor-0] c.n.d.s.r.aws.ConfigClusterResolver : Resolving eureka endpoints via configuration2017-08-09 16:54:02.333 INFO 4640 --- [ main] com.netflix.discovery.DiscoveryClient : Saw local status change event StatusChangeEvent [timestamp=1502268842333, current=UP, previous=STARTING]
2017-08-09 16:54:02.336 INFO 4640 --- [nfoReplicator-0] com.netflix.discovery.DiscoveryClient : DiscoveryClient_EUREKA-CLIENT/PC-201611261236:eureka-client:8083: registering service...
2017-08-09 16:54:02.413 INFO 4640 --- [nfoReplicator-0] com.netflix.discovery.DiscoveryClient : DiscoveryClient_EUREKA-CLIENT/PC-201611261236:eureka-client:8083 - registration status: 204
2017-08-09 16:54:02.466 INFO 4640 --- [ main] s.b.c.e.t.TomcatEmbeddedServletContainer : Tomcat started on port(s): 8083 (http)
2017-08-09 16:54:02.467 INFO 4640 --- [ main] .s.c.n.e.s.EurekaAutoServiceRegistration : Updating port to 8083
2017-08-09 16:54:02.477 INFO 4640 --- [ main] com.example.Application : Started Application in 8.863 seconds (JVM running for 9.467)
2017-08-09 16:54:05.998 INFO 4640 --- [nio-8083-exec-2] o.a.c.c.C.[Tomcat].[localhost].[/] : Initializing Spring FrameworkServlet 'dispatcherServlet'
2017-08-09 16:54:05.999 INFO 4640 --- [nio-8083-exec-2] o.s.web.servlet.DispatcherServlet : FrameworkServlet 'dispatcherServlet': initialization started
2017-08-09 16:54:06.027 INFO 4640 --- [nio-8083-exec-2] o.s.web.servlet.DispatcherServlet : FrameworkServlet 'dispatcherServlet': initialization completed in 28 ms
--------------this service is eureka-client
--------------this service is eureka-client
2017-08-09 16:59:01.991 INFO 4640 --- [trap-executor-0] c.n.d.s.r.aws.ConfigClusterResolver : Resolving eureka endpoints via configuration四,上面我们提到过,服务注册不一定要用eureka,下面我们使用zookeeper来代替使用。
首先,对eureka-feign和eureka-client进行改造,主要是配置修改。
1,修改依赖包,将eureka包注释掉,添加zookeeper依赖
            org.springframework.cloud
            spring-cloud-starter-zookeeper-all
#eureka.client.serviceUrl.defaultZone=http://localhost:8080/eureka
spring.cloud.zookeeper.connectString=localhost:2181
spring.cloud.zookeeper.discovery.instancePort=${server.port}访问http://localhost:8082/test,同样可以得到相同的测试结果:
