Spring Cloud Netflix 客户端负载平衡器:Ribbon
部分内容摘自 Spring Cloud 官方文档中文版
本文源码地址:https://github.com/Wyxwx/SpringCloudDemo2
Ribbon 是一个客户端负载均衡器,它可以很好地控制 HTTP 和 TCP 客户端的行为。
目录
负载均衡
Ribbon 基本使用
自定义 Ribbon 客户端
使用属性自定义 Ribbon 客户端
取消在 Ribbon 中使用 Eureka
Ribbon 原生 API
缓存 Ribbon 配置
负载均衡
在如今的网络应用中,单个服务器的性能很难满足高并发的要求。若是执意利用提高服务器的硬件水平,将会得不偿失。在这种情况下,多数应用都选择将服务器集群部署。在 Spring Cloud 中,客户端 Service 都在服务中心注册,将相同功能的客户端命名为相同的 application name,部署在不同的服务器上。服务中心接收到对特定 application name 的请求后,将请求发送至某一客户端 Service 去处理,这就是负载均衡。
Ribbon 基本使用
根据 服务发现:Eureka (一) 注册和运行 创建一个服务注册中心(eureka_server)和两个功能相同的 Eureka 客户端(eureka_client_1、eureka_client_2)
两个客户端的配置文件分别改为:
server.port=8762

eureka.client.service-url.defaultZone=http://localhost:8761/eureka/

spring.application.name=ribbonClient
server.port=8763

eureka.client.service-url.defaultZone=http://localhost:8761/eureka/

spring.application.name=ribbonClient
两个客户端的 spring.application.name 相同,代表提供了同一种服务,分配不同的端口模拟在不同服务器的场景
在两个客户端模块中分别创建一个相同的 HelloController
import org.springframework.beans.factory.annotation.Value;
import org.springframework.web.bind.annotation.RequestMapping;
import org.springframework.web.bind.annotation.RestController;

@RestController
public class HelloController {

    @Value("${server.port}")
    private String port;

    @RequestMapping(value = "/hello")
    public String hello(){
        return "my port is " + port;
    }

}
接下来,按照创建 Eureka 客户端的步骤创建一个新的 Module: ribbon
在创建之后的 pom.xml 里加入以下依赖
            org.springframework.cloud
            spring-cloud-starter-ribbon
            1.4.6.RELEASE
接下来,编写配置文件 application.properties
server.port=8764

# 向服务中心注册
eureka.client.service-url.defaultZone=http://localhost:8761/eureka/

spring.application.name=ribbon
修改启动类,为其添加 @EnableEurekaClient 注解
注入名为 RestTemplate 的类
@LoadBalanced 表明开启负载均衡
package com.example.demo;

import org.springframework.boot.SpringApplication;
import org.springframework.boot.autoconfigure.SpringBootApplication;
import org.springframework.cloud.client.loadbalancer.LoadBalanced;
import org.springframework.cloud.netflix.eureka.EnableEurekaClient;
import org.springframework.context.annotation.Bean;
import org.springframework.web.client.RestTemplate;

@EnableEurekaClient
@SpringBootApplication
public class RibbonApplication {

    public static void main(String[] args) {
        SpringApplication.run(RibbonApplication.class, args);
    }

    @Bean
    @LoadBalanced
    RestTemplate restTemplate(){
        return new RestTemplate();
    }

}
创建一个 HelloController,利用 RestTemplate 访问 url 并接收返回值
import org.springframework.web.bind.annotation.RequestMapping;
import org.springframework.web.bind.annotation.RestController;
import org.springframework.web.client.RestTemplate;

import javax.annotation.Resource;

@RestController
public class HelloController {

    @Resource
    private RestTemplate restTemplate;

    @RequestMapping(value = "/hello")
    public String hello(){
        return restTemplate.getForObject("http://ribbonClient/hello", String.class);
    }

}
依次启动 eureka_server、eureka_client_1、eureka_client_2、ribbon
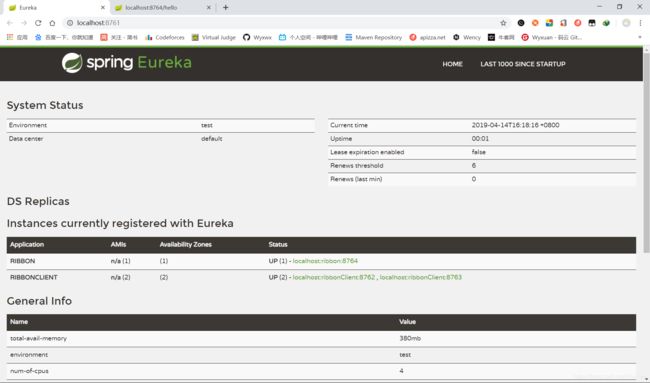
访问 http://localhost:8761/ 可以看到在服务中心注册了两个分别为 ribbon 和 ribbonClient 的 Application
其中,ribbonClient 有两个实例
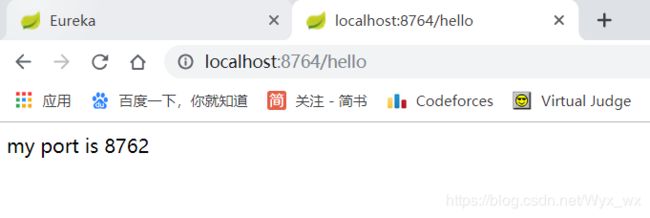
接下来多次访问 http://localhost:8764/hello 可以看到 port 8762 和 port 8763 交替出现,实现了负载均衡
自定义 Ribbon 客户端
Spring Cloud 允许通过使用 @RibbinClient 声明自定义配置来控制客户端,例
@Configuration
@RibbonClient(name = "foo", configuration = FooConfiguration.class)
public class TestConfiguration {
}
表明用 FooConfiguration 中的配置覆盖 RibbonClientConfiguration (默认配置)中的配置,对于在 FooConfiguration 中未出现的配置,仍然按照默认配置来
警告:
FooConfiguration 类必须加入 @Configuration 注解。若是该类在 Application Context 的 @ComponentScan 中,将由所有添加了 @RibbonClients 注解的类共享。所以在使用时,需要采取措施来避免这一现象。可以将其放在一个单独的包中然后指定 @ComponentScan 的路径。
Spring Cloud Neflix 默认为 Ribbon 提供了以下 bean:
- IClientConfig ribbonClientConfig: DefaultClientConfigImpl
- IRule ribbonRule: ZoneAvoiddanceRule
- IPing ribbonPing: NoOpPing
- ServerList
ribbonServerList: ConfigurationBasedServerList - ServerListFilter
ribbonServerListFilter: ZonePreferenceServerListFilter - ILoadBalancer ribbonLoadBalancer: ZoneAwareLoadBalancer
- ServerListUpdater ribbonServerListUpdater: PollingServerListUpdater
使用属性自定义 Ribbon 客户端
从版本 1.2.0 开始,Spring Cloud Netflix 支持使用属性与 Ribbon 文档兼容来自定义 Ribbon 客户端
即可以在配置文件中修改对 Ribbon 客户端的配置
格式:
.ribbon. = 例如,要修改服务名称为 users 的 IRule,可以在 application.properties 中添加以下内容
users.ribbon.NFLoadBalancerRuleClassName=com.netflix.loadbalancer.WeightedResponseTimeRule取消在 Ribbon 中使用 Eureka
想要在 Ribbon 中取消使用 Eureka,需要先在 Ribbon 中禁用 Eureka,然后配置可以使用的微服务节点
配置文件 application.properties 如下:
server.port=8764

eureka.client.service-url.defaultZone=http://localhost:8761/eureka/

spring.application.name=ribbon

# 在 Ribbon 中禁用 Eureka
ribbon.eureka.enabled = false

# 配置可以使用的微服务节点,多个节点间用逗号隔开
ribbon.ribbon.listOfServers: example.com,google.com
Ribbon 原生 API
改写上文的 HelloController
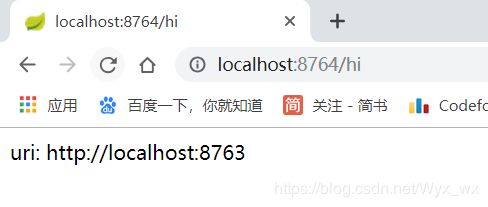
添加 LoadBalancerClient 属性及 hi 方法,重启启动类,访问 http://localhost:8764/hi,可以看到两个端口交替出现,即实现了负载均衡
import org.springframework.cloud.client.ServiceInstance;
import org.springframework.cloud.client.loadbalancer.LoadBalancerClient;
import org.springframework.web.bind.annotation.RequestMapping;
import org.springframework.web.bind.annotation.RestController;
import org.springframework.web.client.RestTemplate;

import javax.annotation.Resource;
import java.net.URI;

@RestController
public class HelloController {

    @Resource
    private RestTemplate restTemplate;
    @Resource
    private LoadBalancerClient loadBalancerClient;

    @RequestMapping(value = "/hello")
    public String hello(){
        return restTemplate.getForObject("http://ribbonClient/hello", String.class);
    }

    @RequestMapping(value = "/hi")
    public String hi(){
        ServiceInstance instance = loadBalancerClient.choose("ribbonClient");
        URI uri = URI.create(String.format("http://%s:%s", instance.getHost(), instance.getPort()));
        return "uri: " + uri;
    }

}
缓存 Ribbon 配置
每一个 Ribbon 客户端都有一个由 Spring Cloud 维护的相应的子应用程序 context,这个 context 在第一次请求中被延迟加载到客户端。
可以通过配置改变延迟加载的行为
ribbon.eager-load.enabled=true

# 指定 Ribbon 客户端
ribbon.eager-load.clients=client1,client2


