SpringCloud-Eureka 注册中心以及服务提供与搭建和调用
Eureka
Eureka(原来以为是缩写,原来就是一个单词,翻译为:我发现了,我找到了!0.0)是Netflix开源的一款提供服务注册和发现的产品,它提供了完整的Service Registry和Service Discovery实现。也是springcloud体系中最重要最核心的组件之一。
这个东西通俗的理解就像是一个淘宝,你是卖家也好,还是买家也好,你要交易,你得在我这先注册一个账号。
1,先新建一个maven工程
2,在pom文件中引入相关jar包
学习大佬的教程,结果用大佬的demo直接报错,启动程序一直提示:
Caused by: java.lang.ClassNotFoundException: com.sun.jersey.api.core.DefaultResourceConfig
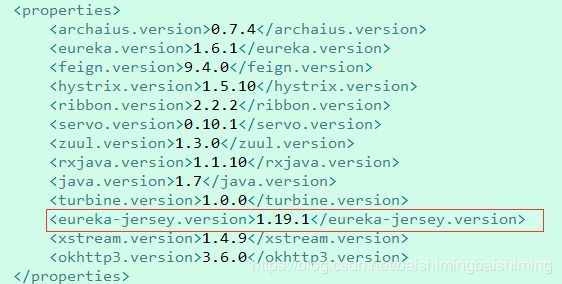
郁闷,查看spring-cloud-starter-eureka-server jar包
发现其中引入的jersey的jar是1.19.1,然后自己研究,发现1.19可以使用,遂在pom文件中引入,按照我的理解1.19.1肯定比1.19版本高的,怎么反而不行了?
再启动,然后这个错误是消失了,结果后面又报错,又出来一个servo 包下的类找不到,mmp~又是版本问题,再引入 servo包,ok了~
最终形成如下的pom配置文件
 2        org.springframework.boot
 3        spring-boot-starter-parent
 4        1.5.8.RELEASE
 5
 6
 7
 8
 9         org.springframework.cloud
10         spring-cloud-starter
11
12
13         com.sun.jersey
14            jersey-bundle
15              1.19
16
17
18
19             com.netflix.servo
20             servo-core
21             0.12.7
22
23
24         org.springframework.cloud
25         spring-cloud-starter-eureka-server
26
27
28
29
30
31         org.springframework.cloud
32         spring-cloud-dependencies
33         Dalston.RC1
34         pom
35         import
36
37
38
39
40
41       spring-milestones
42       Spring Milestones
43       https://repo.spring.io/milestone
44
45         false
46
47
48
3,编写启动类代码
1 @SpringBootApplication
2 @EnableEurekaServer
3 public class App {
4
5     public static void main(String[] args) {
6         SpringApplication.run(App.class, args);
7     }
8 }
注意添加EnableEurekaServer注解
4,添加配置文件
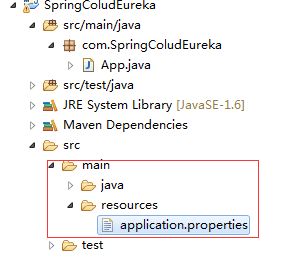
对于这个配置文件的添加有2种格式,一种是application.properties 另外一种是 application.yaml。对于2种格式的区别,我们不做比较。但是对于这个文件的位置,我还是纳闷了一会,最后经过尝试,如图所示位置
并且需要注意文件名称一个字母都不能少0.0,我就是由于没注意少写个字母,也报错了。。。。
application.properties 格式,文件内容如下:
1 spring.application.name=spring-cloud-eureka
2 server.port=8000
3 eureka.client.register-with-eureka=false
4 eureka.client.fetch-registry=false
5 eureka.client.serviceUrl.defaultZone=http://localhost:${server.port}/eureka/
注意第3 行默认是true也就是如果你不加上这个false,启动就会报错,因为他会想把自己注册到自己上面!!!第4行默认也是true,意思是他要不要获取注册到服务中心的信息
5,启动注册中心
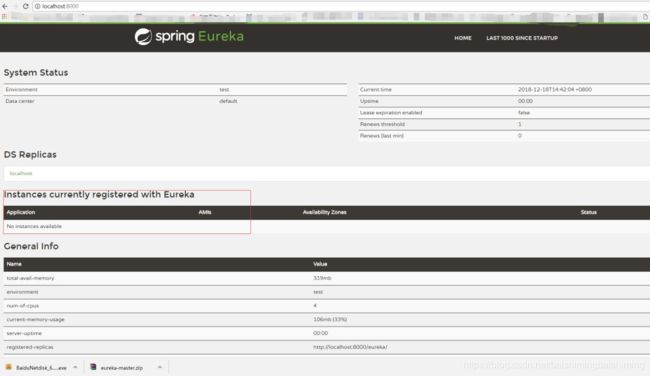
在浏览器输入 localhost:8000,查看注册中心是否正常启动,出现如下截图,说明已经ok
有了注册中心,我们在接着搞一个服务提供者,和服务消费者。
服务提供者
1,新建maven工程
2,在pom文件中引入和注册中心服务一样的jar包。
3,编写application.properties
内容如下:
1 spring.application.name=spring-cloud-producer
2 server.port=9000
3 eureka.client.serviceUrl.defaultZone=http://localhost:8000/eureka/
第一行是给自己的服务命名,第二行设置自己的访问端口,第三行设置自己要注册到那个注册中心,因为我们在上面设置了eureka注册中心是本地的8000端口,所以就写这个地址
4,编写启动类代码
1 @SpringBootApplication
2 @EnableDiscoveryClient
3 public class App
4 {
5     public static void main( String[] args )
6     {
7         SpringApplication.run(App.class, args);
8     }
9 }
注意添加 EnableDiscoveryClient 注解
5,编写服务控制器类代码
@RestController
2 public class HelloController {
3
4     @RequestMapping("/hello")
5     public String hello(@RequestParam String name) {
6         return "hello "+name+",nice to meet you!";
7     }
8 }
到这里 服务提供者完成,启动程序,无报错即可,刷新注册中心的页面,会看到Application中当前注册的服务。
服务调用者
1,新建maven工程
2,同样在pom文件中引入和之前一样的内容。
3,编写application.properties
1 spring.application.name=spring-cloud-consumer
2 server.port=9001
3 eureka.client.serviceUrl.defaultZone=http://localhost:8000/eureka/
第一行也是给当前服务起名字,第二行设置端口,第三行设置注册中心url。
4,编写启动类代码
 1 @SpringBootApplication
 2 @EnableDiscoveryClient
 3 @EnableFeignClients
 4 public class App
 5 {
 6     public static void main( String[] args )
 7     {
 8         SpringApplication.run(App.class, args);
 9     }
10 }
注意这个启动类,比服务提供者多了一个EnableFeignClients注解,这个注解的作用就是启用feign进行远程调用。
5,编写feign调用实现
1 @FeignClient(name= "spring-cloud-producer")
2 public interface HelloRemote {
3     @RequestMapping(value = "/hello")
4     public String hello(@RequestParam(value = "name") String name);
5 }
注意这是一个接口,上面的注解参数name,就是指定你当前要调用的服务提供者名称。另外还要注意方法中的参数name 和服务提供者中的参数保持一致
6,编写服务调用者控制器类
 1 @RestController
 2 public class ConsumerController {
 3
 4     @Autowired
 5     HelloRemote HelloRemote;
 6
 7     @RequestMapping("/hello/{name}")
 8     public String hello(@PathVariable("name") String name) {
 9         return HelloRemote.hello(name);
10     }
11
12 }
在当前类中引入HelloRemote 接口,通过调用本地hello方法,然后再调用HelloRemote 接口中的方法
启动程序,无报错即可。
刷新注册中心这个时候应该可以看到2个服务已经注册
测试验证
打开浏览器输入 : http://localhost:9001/hello/JJ
如上图正常返回结果,说明整个服务调用和提供者ok!!!


