串口通信是在工程应用中很常见。在上位机与下位机通讯过程中常通过有线的串口进行通信,在低速传输模式下串口通信得到广泛使用。在说个之前先来简单解释一下上位机与下位机的概念。
上位机与下位机
通常上位机指的是PC,下位机指的是单片机或者带微处理器的系统。下位机一般是将模拟信号经过AD采集将模拟量转换为数字量,下位机再经过数字信号处理以后将数字信号通过串口发送到上位机,相反上位机可以给下位机发送一些指令或者信息。常见的通信串口包括RS232、RS485、RS422等。这些串口只是在电平特性有所不同,在上位机与下位机进行数据通信时可以不考虑电平特性,而且现在在硬件上有各种转接接口,使用起来也很方便。
当然在通常做简单的串口UART实验时我们可以使用各种各样的串口助手小软件,但是这些串口小工具有时候并不能很好满足需求,那就尝试着自己写一套属于自己的串口助手?接下来说说如何使用java实现上位机与下位机之间的RS485串口通信。
step 1: 下载支持java串口通信的jar包,这里给出下载地址:
http://files.cnblogs.com/files/Dreamer-1/mfz-rxtx-2.2-20081207-win-x86.zip(32bit 下载地址)
http://files.cnblogs.com/files/Dreamer-1/mfz-rxtx-2.2-20081207-win-x64.zip (64位下载地址)
对以上的版本解释一下,因为本人在这里踩了一个坑,32位或者64位是与ecplise/myecplise一致,要是版本弄错了会报错。
step 2:下载了那个jar包解压后会出现一下内容:

这个文件夹里面需要注意两点:jar包RXTXcomm需要导入到java工程里面去。另外就是需要将rxtxParallel.dll与rxtxSerial.dll复制在安转JDK的bin文件下和jre的bin文件夹下面,这样才能保证能够正常使用这个jar包。以下是将两个dll文件复制的位置:
C:\Program Files (x86)\Java\jdk1.8.0_25\bin\
C:\Program Files (x86)\Java\jdk1.8.0_25\jre\bin\
怎么讲jar包导入java工程里面就是比较简单的操作,可以参考:http://jingyan.baidu.com/article/ca41422fc76c4a1eae99ed9f.html
step 3:RXTXComm Api如何使用
接下来就是使用该导入jar包进行编码实现串口通信的功能了。在编码之前先来理一理串口通信的主要环节,本人总结主要分为以下几点:
1)计算机首先需要进行硬件check,查找是否有可用的COM端口,并对该对端口进行简要判断,包括这些端口是否是串口,是否正在使用。以下是部分主要代码:
public static final ArrayList uartPortUseAblefind()
{
Enumeration portList=CommPortIdentifier.getPortIdentifiers();
ArrayList portNameList=new ArrayList();
while(portList.hasMoreElements())
{
String portName=portList.nextElement().getName();
portNameList.add(portName);
}
return portNameList;
}
以下是测试类的测试实例:
ArrayList arraylist=UARTParameterSetup.uartPortUseAblefind();
int useAbleLen=arraylist.size();
if(useAbleLen==0)
{
System.out.println("没有找到可用的串口端口,请check设备!");
}
else
{
System.out.println("已查询到该计算机上有以下端口可以使用:");
for(int index=0;index"该COM端口名称:"+arraylist.get(index));
}
}
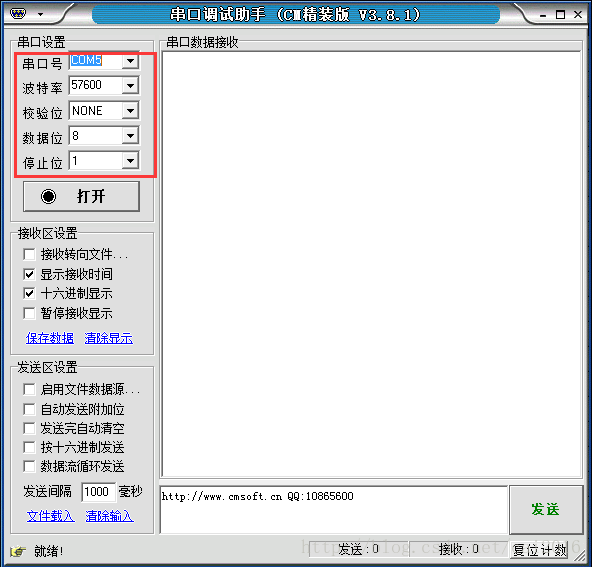
2)通过计算机对串口的自检后,可以对串口参数进行简单的配置。常见的配置可以从常见的串口助手中得到启发。以下是一个串口助手的人机交换界面:

以下是对串口设置主要代码:
public static final SerialPort portParameterOpen(String portName,int baudrate)
{
SerialPort serialPort=null;
try
{
CommPortIdentifier portIdentifier = CommPortIdentifier.getPortIdentifier(portName);
CommPort commPort=portIdentifier.open(portName,1000);
if(commPort instanceof SerialPort)
{
System.out.println("该COM端口是串口!");
serialPort=(SerialPort)commPort;
serialPort.setSerialPortParams(baudrate, SerialPort.DATABITS_8,SerialPort.STOPBITS_1, SerialPort.PARITY_NONE);
System.out.println("串口参数设置已完成,波特率为"+baudrate+",数据位8bits,停止位1位,无奇偶校验");
}
else
{
System.out.println("该com端口不是串口,请检查设备!");
}
}
catch (NoSuchPortException e)
{
e.printStackTrace();
}
catch (PortInUseException e)
{
e.printStackTrace();
}
catch (UnsupportedCommOperationException e)
{
e.printStackTrace();
}
return serialPort;
}
以上代码就是返回一个对象,同时也返回了对象属性,因为对象在java里面是属于传值引用。对以上需要说明的是:在实验时需要连接串口才能让计算机检测到才能让程序工作,这里使用的是RS485转接线:

3)通过以上两个步骤后基本对串口的设置也完成了,对于串口类型的确认例如:RS232/RS485/RS422等,可以作为进一步确认的条件。RS485可以在gnu.io中找到。

接下来就是上位机与下位机之间的双向通信的功能实现了。该部分主要是利用java的输入输出流来实现。以下是主要代码:
class DataTransimit
{
public static void uartSendDatatoSerialPort(SerialPort serialPort,byte[] dataPackage)
{
OutputStream out=null;
try
{
out=serialPort.getOutputStream();
out.write(dataPackage);
out.flush();
} catch (IOException e)
{
e.printStackTrace();
}finally
{
if(out!=null)
{
try
{
out.close();
out=null;
System.out.println("数据已发送完毕!");
} catch (IOException e)
{
e.printStackTrace();
}
}
}
}
public static byte[] uartReceiveDatafromSingleChipMachine(SerialPort serialPort)
{
byte[] receiveDataPackage=null;
InputStream in=null;
try
{
in=serialPort.getInputStream();
int bufferLength=in.available();
while(bufferLength!=0)
{
receiveDataPackage=new byte[bufferLength];
in.read(receiveDataPackage);
bufferLength=in.available();
}
}
catch (IOException e)
{
e.printStackTrace();
}
return receiveDataPackage;
}
通过以上关于Uart两个基本类实现对底层Uart的功能封装,其中一个类主要负责Uart串口自检和基本设置,另外一个类主要has数据传输的两个方法。接下来以一个实例说一说通过RS485串口通信将系统当前时间发送至单板机系统。
step 4:实现实时系统时间的数据包传输至下位机
这一步可以分为以下两个步骤:首先实现获取系统时间,将时间进行封装成帧;另外就是通过RS485串口将时间数据包发送至单板机系统进行解析。
1) 系统时间的获取
根据java面对对象设计思想,这里将有关系统时间的方法归为一类。
以下是获取当前系统时间代码:
public static String getCurrentDateTime()
{
Calendar calendar=Calendar.getInstance();
int year = calendar.get(Calendar.YEAR);
int month=calendar.get(Calendar.MONTH);
int day=calendar.get(Calendar.DATE);
int minute=calendar.get(Calendar.MINUTE);
int hour=calendar.get(Calendar.HOUR);
int second=calendar.get(Calendar.SECOND);
String curerentDateTime = year + " " + (month + 1 )+ " " + day + " "+ (hour+12) + " " + minute + " " + second + " ";
timeCheckSum=year+(month+1)+day+(hour+12)+minute+second;
return curerentDateTime;
}
java 提供了calender类,该类提供了一些与时间有关方法。至于Calendar.getInstance()使用单例模式获取一个Calendar实例对象,单例模式就是一个类在任何时候只允许有一个实例化对象。获取系统时间除了使用Calendar还可以使用Date类,通过创建对象也可以实现系统当前时间的获取。timeCheckSum作为时间数据的校验和发送至单板机作为自定义协议的一部分。
由于发送的数据包通常是以字节(byte)为单位进行发送和传输的,因此需要将int型的时间转换为byte使用byte[]进行存储,作为一个数据包发送。
public static byte[] dateTimeBytesGet(String currenDateTime)
{
int rawDataSize=6;
byte[] dateTimeBytes=new byte[rawDataSize+1];
String[] currentDateTimeSplit=currenDateTime.split(" ");
if(currentDateTimeSplit.length==rawDataSize)
{
for(int dataIndex=0;dataIndexint dateTemp=Integer.parseInt(currentDateTimeSplit[dataIndex]);
if(dataIndex==0)
{
byte H8bits=(byte)((dateTemp)>>8);
byte L8bits=(byte)((dateTemp)&0xff);
dateTimeBytes[dataIndex]= H8bits;
dateTimeBytes[dataIndex+1]= L8bits;
}
dateTimeBytes[dataIndex+1]=(byte)dateTemp;
}
}else
{
System.out.println("当前时间获取出现异常数据");
System.exit(-1);
dateTimeBytes=null;
}
return dateTimeBytes;
}
以上数据可以使用7个byte对时间数据进行存储,因为年份需要使用两个字节来存储,格式为高字节在前,低字节在后,之后依次存放。
将时间数据存放在byte[]数组以后接下来就是添加自己的协议部分了。该部分具有较大的随意性,因为该协议可以根据不同的风格有不同的形式。为了简单起见,只需要在时间数据byte[]之前添加head、CMD、时间数据长度length这三个字节进行补充,时间数据byte[]后面依次添加校验和的高低字节以及tail指令即可。以上基本实现了一个简单的时间数据package。以下是本模块的代码:
public static byte[] makeCurrentDateTimefromStringtoFramePackage(byte[] dateTimeBytes)
{
int dataLength=13;
byte[] terimalTimePackage=new byte[dataLength];
terimalTimePackage[0]=0x2F;
terimalTimePackage[1]=0X5A;
terimalTimePackage[2]=7;
for(int dataIndex=0;dataIndex3]=dateTimeBytes[dataIndex];
}
byte sumH8bits=(byte)((timeCheckSum)>>8);
byte sumL8bits=(byte)((timeCheckSum)&0xff);
terimalTimePackage[10]=sumH8bits;
terimalTimePackage[11]=sumL8bits;
terimalTimePackage[12]=0X30;
return terimalTimePackage;
}
下面给出了将时间数据byte数组进行解析的debug代码,一方面是确定上位机本部分模块的程序可靠性,另外也可以直接移植到下位机对数据包的解析之中。在下位机解析过程中需要注意一点:因为在java中8大基本类型都是带符号,年份时间和时间校验和拆分为高低字节时,低字节是二进制无符号的,但是计算机却是按照有符号数(补码方式)进行读取,例如在2016年转换为二进制数为:11111100000,那么高字节为00000111,低字节为11100000。计算机读取为:高字节为7,低字节为-32。其实由两个byte真实还原的过程应为:7<<8+(低字节二进制数字)=7*256+224=2016,因此在debug解析时间数据包时需要将有符号数字转换为无符号数字。
public static String dateTimeBytesfromTostring(byte[] currentDateTime)
{
String string="";
if(currentDateTime.length==7)
{
string=((currentDateTime[0]<<8)+bytetoUnsigendInt(currentDateTime[1]))+" "+currentDateTime[2]+" "+
currentDateTime[3]+" "+currentDateTime[4]+" "+currentDateTime[5]+" "+
currentDateTime[6];
}
return string;
}
public static int bytetoUnsigendInt(byte aByte)
{
String s=String.valueOf(aByte);
int bytetoUnsigendInt=0;
for(int i=0;iif(s.charAt(i)!='0')
{
bytetoUnsigendInt+=1<<(7-i);
}
}
return bytetoUnsigendInt;
}
2)将最后的时间数据包通过RS485串口发送至下位机
结合前面的串口程序就可以使用串口发送程序了。在程序debug的前期可以在程序的关键位置输出日志就是打印log的方法可以提高程序调试的效率。以下是主类的测试代码:
SerialPort serialPort=UARTParameterSetup.portParameterOpen(arraylist.get(0), 57600);
DataTransimit.uartSendDatatoSerialPort(serialPort, dataFrame);
String currentDateTime=SystemDateTimeGet.getCurrentDateTime();
System.out.println(currentDateTime);
byte[] bytes=SystemDateTimeGet.dateTimeBytesGet(currentDateTime);
String str=SystemDateTimeGet.dateTimeBytesfromTostring(bytes);
System.out.println(str);
byte[] terimalTimeByte=SystemDateTimeGet.makeCurrentDateTimefromStringtoFramePackage(bytes);
System.out.println(Arrays.toString(terimalTimeByte));
DataTransimit.uartSendDatatoSerialPort(serialPort, terimalTimeByte);
以下是测试结果:
当没有串口设备接入计算机时控制台打印一条信息:
没有找到可用的串口端口,请check设备!
当RS485设备接入计算机时,控制台打印消息如下:

通过以上几个步骤基本实现了上位机与下位机串口通信的功能,接下来还可以对程序进行改进:
1)添加界面,可以类比串口助手界面根据自身需要设计独具风格的人机交互界面。
2) 在程序中添加线程,在以上程序中对于系统时间的获取可以通过线程的方式进行获取,这样上位机就可以一直往下位机发送数据包,而不是仅仅发一次。
3)对于上位机数据接收,除了以上最基本的接收功能外,还可以使用JDBC与mysql等数据进行存储,并绘画数据曲线实现特性分析。


