Android组件之Fragment详解
Fragment详解
Fragment是Android3.0开始引入的组件,主要是为了便于大屏UI的设计和实现。它有自己的生命周期,但是它的生命周期会受到加载Fragment的Activity的生命周期的约束。在开始讲解前,老规矩,首先提出问题:
-
Fragment生命周期
-
FragmentManager和FragmentTransaction
-
Fragment的add、show、hide、replace、remove操作
-
Fragment的回滚操作
-
如何实现Fragment的切换
一、Fragment的生命周期分析
Fragment的生命周期主要有onAttach()->onCreate()->onCreateView()->onActivityCreated()->onStart()->onResume()->onPause->onStop()->onDestoryView()->onDestory()->onDetach()。
具体生命周期如下图 1.
图 1
(1)onAttach()
将Fragment和Activity相关联。在使用时我们通常会使用以下代码添加fragment
getSupportFragmentManager().beginTransaction()
.add(R.id.
frame_container
,
msg_fragment
);
此时将fragment添加到Activity中,则会首先调用onAttach()方法。
(2)onCreate()
创建Fragment对象
(3)onCreateView()
在创建Fragment视图时调用
1. public View onCreateView(LayoutInflater inflater, ViewGroup container,
2. Bundle savedInstanceState) {
3. return inflater.inflate(R.layout.fragment3, container, false);
4. }
通过LayoutInflater的inflate()方法,来绑定xml文件,从而完成视图创建
这里的inflate()方法,
第一个参数为布局文件,
第二个参数为ViewGroup root,表示父窗口,如果返回null,表示没有父窗口,则该Fragment无法显示;
第三个参数,attchToRoot,如果为true,则表示,当前Fragment的xml的根节点作为整个Activity的根节点,此时Acrtivity的其他控件都将不显示。
(4)onActivityCreated()
在Activity的onCreate()方法结束后调用。此时Activity已经完成创建。但此时Activity并不一定是在onCreate()生命周期,可能在onResume()周期中,原因前面也讲过,因为Fragment的添加在Activity的onResume()时进行,也可能是在Activity的onCreate()时进行。
(5)onStart()
与Activity的onStart()相绑定,此时Fragment对于用户已经可见,但是无法交互。
(6)onResume()
与Activity的onResume()相绑定,在onResume()方法之后就可以与用户交互了。
(7)onPause()
与 Activity的onPause()想绑定,且意义与Activity相同
(8)onStop()
与Activity的onStop()相绑定,意义也与Activity相同。
(9)onDestoryView()
在Fragment即将结束结束或者保存,此时会回调此方法,用于将onCreateView的视图和fragment分离,而要重新显示的话,需要重新创建视图,介于Activity的onStop和onDestory()之间调用。
例如我们在使用remove某一个Fragment时,但是这个Fragment加入了回退栈,此时则会调用
onDestoryView()销毁视图,但是不会调用onDestory()。(具体后面会有相应的例子,别急。)
生命周期如下:
2018-05-16 18:06:09.452 30265-30265/com.sky_wf.chinachat D/ChinaChat: , <> ||| com.sky_wf.chinachat.activity.fragment.Fragment_Msg$onStop()@52
2018-05-16 18:06:09.459 30265-30265/com.sky_wf.chinachat D/ChinaChat: , <> ||| com.sky_wf.chinachat.activity.fragment.Fragment_Msg$onDestroyView()@58
重新add这个Fragent,则生命周期如下:
2018-05-16 18:06:12.936 30265-30265/com.sky_wf.chinachat D/ChinaChat: , <> ||| com.sky_wf.chinachat.activity.fragment.Fragment_Msg$onCreateView()@38
2018-05-16 18:06:12.947 30265-30265/com.sky_wf.chinachat D/ChinaChat: , <> ||| com.sky_wf.chinachat.activity.fragment.Fragment_Msg$onActivityCreated()@46
会发现,由于Fragment对象并没有销毁且仍然和Activity绑定,因此此时只调用onCreateView->onActivityCreated()
(10)onDestory()
和Activity的onDestory()绑定,在这个过程中Fragment对象销毁,但仍然和Activity绑定
(11)onDetach()
完成Fragment和Activity的解绑。
二、FragmentTransaction和FragmentManager的分析
1、FragmentManager
FragmentManger是Fragment的管理器,主要用来对Activity中的Fragment进行管理,比如获取Fragmen事务、执行回退栈的出栈等。
它是一个抽象类,因此通常我们使用它的子类FragmentManagerImpl。
接下来我们来看FragmentManagerImpl的常用方法,如下表 1:
|
方法名
|
方法说明
|
|
public
FragmentTransaction beginTransaction()
|
获取FragmentTransaction对象
|
|
public
Fragment findFragmentById(
int
id)
|
根据id获取对应的Fragment
|
|
public
Fragment findFragmentByTag(String tag)
|
根据tag获取对应的Fragment
|
|
boolean
popBackStackState
|
执行回退栈的出栈
|
|
public int
getBackStackEntryCount()
|
获取回退栈的大小
|
表 1
2、FragmentTransaction
FragmentTransaction是Fragment事务类, 主要用于对Activity中Fragment进行操作,比如add,remove,replace,hide,,show等。
它是一个抽象类,通常我们使用它的子类
BackStackRecord。
常用的方法如下表 2:
|
方法名
|
方法说明
|
|
FragmentTransaction add(Fragment var1
,
String var2)
;
FragmentTransaction add(@IdRes
int
var1
,
Fragment var2)
;
FragmentTransaction add(@IdRes
int
var1
,
Fragment var2
,
@Nullable String var3)
;
|
将Fragment添加到Activity的Container中
|
|
public
FragmentTransaction replace(
int
containerViewId
,
Fragment fragment)
|
移除Container中的Fragment,替换为该Fragment
|
|
public
FragmentTransaction remove(Fragment fragment)
|
从Container中移除该Fragment
|
|
public
FragmentTransaction hide(Fragment fragment)
|
隐藏参数中给出的Fragment
|
|
public
FragmentTransaction show(Fragment fragment)
|
显示参数中给出Fragment
|
|
public int
commit()
|
执行完上述操作后,必须调用commit进行提交
|
|
public
FragmentTransaction addToBackStack(String name)
|
将当前事务(在commit之前)中所有的Fragment加入到回退栈中
|
三、实例讲解
接下来我们将通过Demo来讲解Fragmen的具体用法,并具体讲解了hide、show、replace、add、remove的方法的使用。
源码地址: https://github.com/DaMiaoKobe/ChinaChat
这里我们定义一个四个Fragment和一个MainActivity
-
Fragment_Msg
-
Fragment_Friends
-
Fragment_Discover
-
Fragment_Porfile
-
MainActivity
1、Fragment_Msg
其他三个Fragment只是类名不一样方法都相同,这里就不一一列举了
/**
* @Date :  2018/5/14
* @Author : WF
* @Description :Msg界面
*/
public class Fragment_Msg extends BaseFragment {
    private final String TAG = "Fragment_Msg";

    @Override
    public void onAttach(Context context) {
        super.onAttach(context);
        Debugger.d(TAG,"<>");
    }

    @Override
    public void onCreate(@Nullable Bundle savedInstanceState) {
        super.onCreate(savedInstanceState);
        Debugger.d(TAG,"<>");
    }

    @Nullable
    @Override
    public View onCreateView(@NonNull LayoutInflater inflater, @Nullable ViewGroup container, @Nullable Bundle savedInstanceState) {
        Debugger.d(TAG,"<>");
        View view = inflater.inflate(R.layout.fragment_msg,container,false);
        return view;
    }

    @Override
    public void onActivityCreated(@Nullable Bundle savedInstanceState) {
        super.onActivityCreated(savedInstanceState);
        Debugger.d(TAG,"<>");
    }

    @Override
    public void onStop() {
        super.onStop();
        Debugger.d(TAG,"<>");
    }

    @Override
    public void onDestroyView() {
        super.onDestroyView();
        Debugger.d(TAG,"<>");
    }

    @Override
    public void onDestroy() {
        super.onDestroy();
        Debugger.d(TAG,"<>");
    }
}
2、MainActivity
public class MainActivity extends BaseFragmentActivity
{
private Fragment[] fragments;
private Fragment_Msg msg_fragment;
private Fragment_Friends friend_fragment;
private Fragment_Discover discover_fragment;
private Fragment_Porfile profile_fragment;
private TextView unreadMsgLable;
private TextView unreadAdressLable;
private TextView unreadFindLable;
private TextView unreadProfileLable;
private ImageView[] imageBottom;// 底部img
private TextView[] txtBottom;//底部txt
private TextView txt_title;
private ImageView img_right;
private int currentTabIndex = 0;// 当前Fragment的index
private int index = 0;
private final String TAG = "MainActivity";
@Override
protected void onCreate(Bundle savedInstanceState)
{
super.onCreate(savedInstanceState);
setContentView(R.layout.activity_main);
Debugger.d(TAG, ">>onCreate<<");
findViewById();
initViews();
initTabView();
}
private void initViews() {
img_right.setVisibility(View.VISIBLE);
img_right.setImageResource(R.drawable.icon_add);
txt_title.setVisibility(View.VISIBLE);
}
private void findViewById()
{
img_right = (ImageView)findViewById(R.id.img_right);
txt_title = (TextView)findViewById(R.id.txt_left);
}
private void initTabView() {
unreadMsgLable = (TextView)findViewById(R.id.unread_msg_number);
unreadAdressLable = (TextView)findViewById(R.id.unread_friend_number);
unreadFindLable = (TextView)findViewById(R.id.unread_discover_number);
unreadProfileLable = (TextView)findViewById(R.id.unread_profile_number);
msg_fragment = new Fragment_Msg();
friend_fragment = new Fragment_Friends();
discover_fragment = new Fragment_Discover();
profile_fragment = new Fragment_Porfile();
fragments = new Fragment[]{msg_fragment,friend_fragment,discover_fragment,profile_fragment};
imageBottom = new ImageView[4];
imageBottom[0] = (ImageView)findViewById(R.id.img_chinachat);
imageBottom[1] = (ImageView)findViewById(R.id.img_friend);
imageBottom[2] = (ImageView)findViewById(R.id.img_discover);
imageBottom[3] = (ImageView)findViewById(R.id.img_profile);
imageBottom[0].setSelected(true);
txtBottom = new TextView[4];
txtBottom[0] = (TextView)findViewById(R.id.txt_chinachat);
txtBottom[1] = (TextView)findViewById(R.id.txt_friend);
txtBottom[2] = (TextView)findViewById(R.id.txt_discover);
txtBottom[3] = (TextView)findViewById(R.id.txt_profile);
txtBottom[0].setTextColor(0xFF45C01A);
//添加四个Fragment,并默认显示msg_fragment
getSupportFragmentManager().beginTransaction()
.add(R.id.frame_container,msg_fragment)
.add(R.id.frame_container,friend_fragment)
.add(R.id.frame_container,discover_fragment)
.add(R.id.frame_container,profile_fragment)
.hide(friend_fragment)
.hide(profile_fragment)
.hide(discover_fragment)
.commit();
}
/**根据点击,呈现对应的Fragment
* @param view
*/
public void onTabClicked(View view)
{
switch (view.getId())
{
case R.id.bottom_chinachat:
index = 0;
txt_title.setText("喵信");
break;
case R.id.bottom_friend:
index = 1;
break;
case R.id.bottom_discover:
index = 2;
break;
case R.id.bottom_profile:
index = 3;
break;
}
if(currentTabIndex!=index)
{
FragmentTransaction transaction = getSupportFragmentManager().beginTransaction();
transaction.hide(fragments[currentTabIndex]);
if(!fragments[index].isAdded())
{
transaction.add(R.id.frame_container,fragments[index]);
}
transaction.show(fragments[index]);
transaction.commit();
}
imageBottom[currentTabIndex].setSelected(false);
imageBottom[index].setSelected(true);
txtBottom[currentTabIndex].setTextColor(0xFF999999);
txtBottom[index].setTextColor(0xFF45C01A);
currentTabIndex = index;
}
@Override
protected void onStop() {
super.onStop();
Debugger.d(TAG, ">>onStop<<");
}
@Override
protected void onDestroy() {
super.onDestroy();
Debugger.d(TAG, ">>onDestroy<<");
}
@Override
public boolean onKeyDown(int keyCode, KeyEvent event) {
switch (event.getKeyCode())
{
case KeyEvent.KEYCODE_BACK:
// FragmentManager manager = getSupportFragmentManager();
// manager.popBackStack();
// return true;
}
return super.onKeyDown(keyCode, event);
}
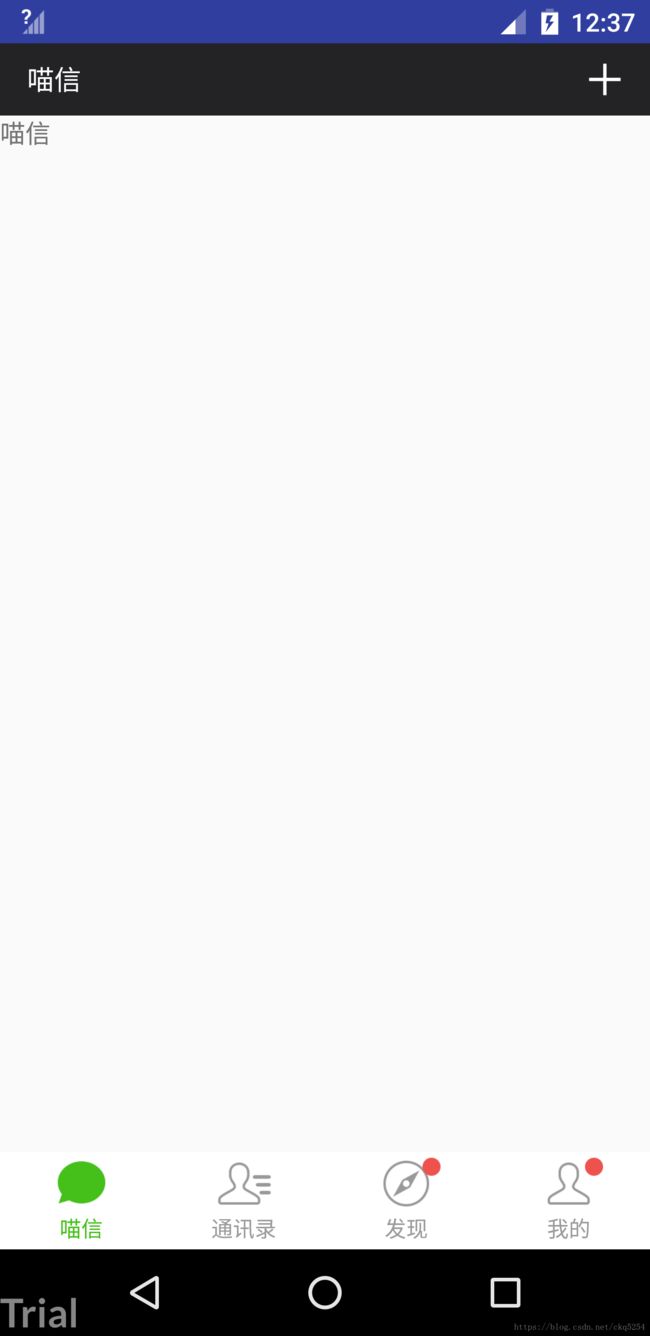
}3、效果图
在第一次进入时,会显示第一个tab内容,也就是一个TextView显示喵信,而点击底部其他tab,则对应会切换到它们的Fragment。
4、分析与讲解:
这里是一个放微信的主界面,在点击下面四个tab,上面对应的TextView会显示响应的title。接下来我们来看代码。
(1)第一次进入Activity时显示某一个Fragment
这里我们在Activity的onCreate()方法中做了如下处理:
getSupportFragmentManager().beginTransaction()
.add(R.id.frame_container,msg_fragment)
.add(R.id.frame_container,friend_fragment)
.add(R.id.frame_container,discover_fragment)
.add(R.id.frame_container,profile_fragment)
.hide(friend_fragment)
.hide(profile_fragment)
.hide(discover_fragment)
.commit();
这里我们
getSupportFragmentManager().beginTransaction()获取到FragmentTransaction对象,然后调用add()方法将四个Fragment分别添加到Activity的Container中,由于我们初始化进入时需要显示在第一个Tab喵信上,因此这里我们调用hide()方法隐藏其他三个Fragment,当然最后需要我们调用commit()方法提交事务。
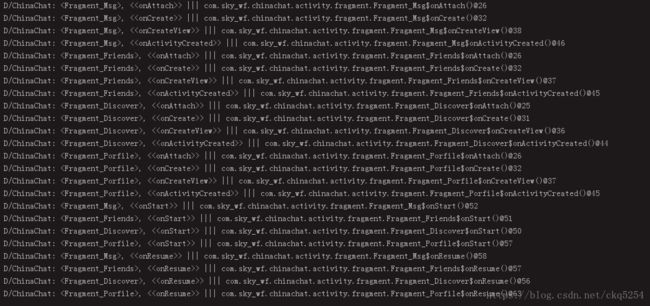
运行程序,但不点击底部tab,则只是执行上面的add和hide操作。log如下图 1:

分析log,可以发现四个Fragment均执行了onAttach()-》onCreate()-》onCreateView()-》onActivityCreated()-》onStart()-》onResume()
并且在对三个Fragment执行hide操作后,仍然处于onResume(),因此可以说明以下两点:
(1)add操作:
将Fragment添加到Activity的Container,并且添加的Fragment的生命周期和Activity当前生命周期一致,均处于onResume(),无论是否是当前正在显示的Fragment。
需要注意:
已经添加过的Fragment对象,如果重复添加,则会报错
java.lang.IllegalStateException: Fragment already added: Fragment_Friends{e0793ae #1 id=0x7f0b0087}
(2)hide操作:
在使用hide()隐藏其他三个Fragment界面的内容后,这三个Fragment的生命周期并没有改变,说明它的效果类似于我们常用的setVisiable(View.InVisiable),也就是我们常说的可见不可见。
这里如果我们不使用hide,只是add(),效果如下 图:
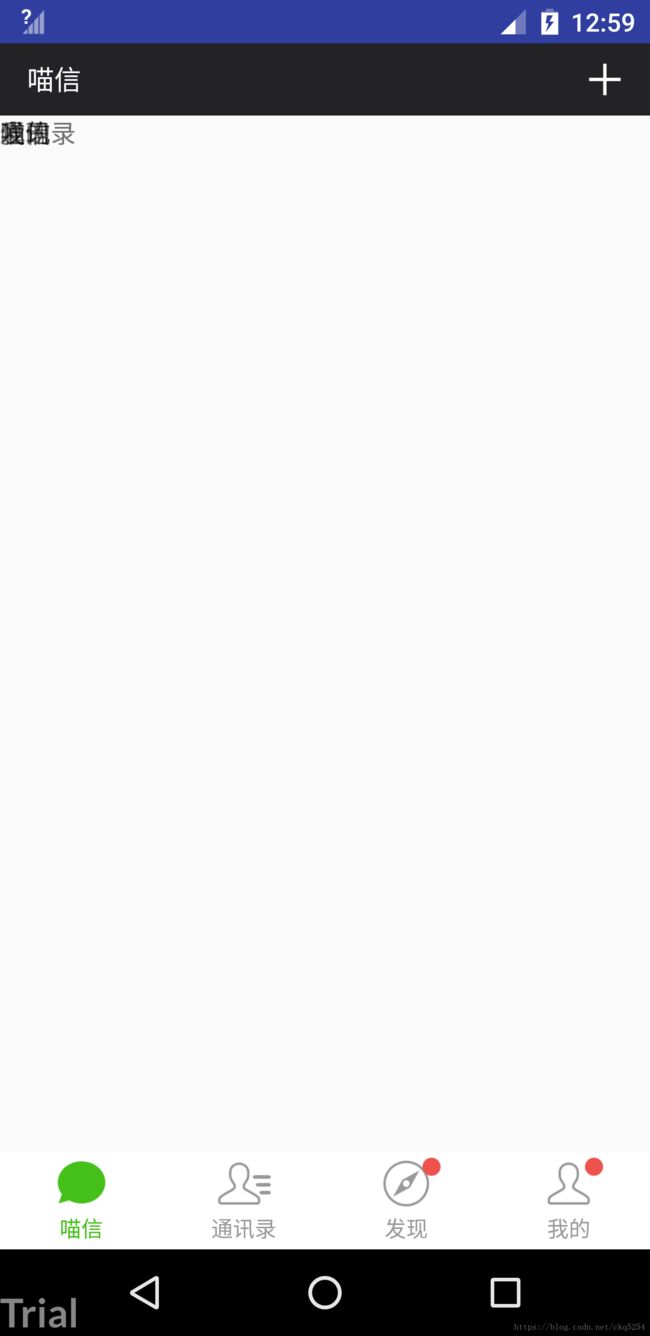
我们会发现,此时四个Fragment的内容叠加在一起。
(3)show操作
show操作和 我们的hide()相对应,它代表设置参数中的Fragment可见。
我们在上面的代码进行修改,如下:
public void onCreate()
{
........
getSupportFragmentManager().beginTransaction()
.add(R.id.frame_container,msg_fragment)
.add(R.id.frame_container,friend_fragment)
.add(R.id.frame_container,discover_fragment)
.add(R.id.frame_container,profile_fragment)
.hide(friend_fragment)
.hide(profile_fragment)
.hide(discover_fragment)
.show(msg_fragment)
.show(friend_fragment)//增加show(friend_fragment)
.commit()
;
}
效果图如下:
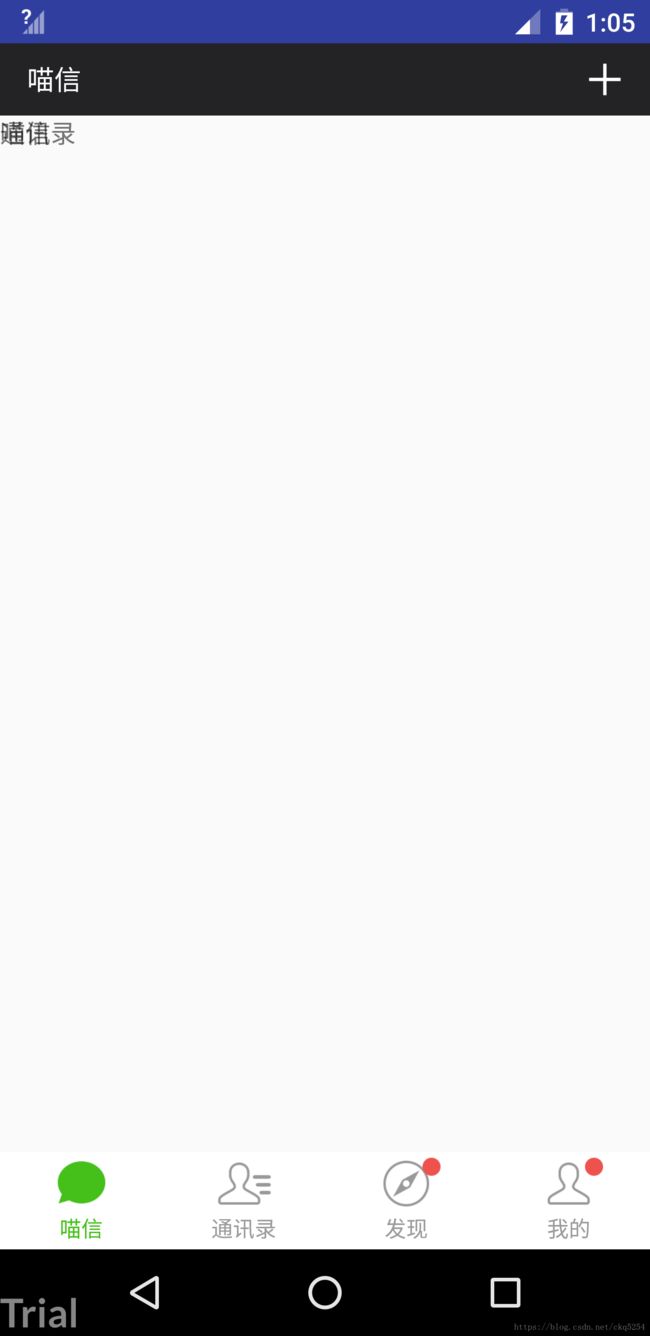
可以看到,我们对
friend_fragment
先hide(),然后再调用show()方法,此时
friend_fragment
可见。
2、点击底部tab,切换Fragment
这里我们看点击事件的处理方法onTabClicked()
public void onTabClicked(View view)
{
switch (view.getId())
{
case R.id.bottom_chinachat:
index = 0;
txt_title.setText("喵信");
break;
case R.id.bottom_friend:
index = 1;
break;
case R.id.bottom_discover:
index = 2;
break;
case R.id.bottom_profile:
index = 3;
break;
}
if(currentTabIndex!=index)
{
FragmentTransaction transaction = getSupportFragmentManager().beginTransaction();
transaction.hide(fragments[currentTabIndex]);
if(!fragments[index].isAdded())
{
transaction.add(R.id.frame_container,fragments[index]);
}
transaction.show(fragments[index]);
transaction.commit();
}
imageBottom[currentTabIndex].setSelected(false);
imageBottom[index].setSelected(true);
txtBottom[currentTabIndex].setTextColor(0xFF999999);
txtBottom[index].setTextColor(0xFF45C01A);
currentTabIndex = index;
}
这里我们在点击不同的tab时,呈现对应的Fragment。同样我们是通过前面提到的hide()和show()来完成对应的隐藏和呈现操作。
那么我们只能通过show()和hide()来实现Fragment的显示和隐藏么?显然不是,接下来我们再来看其他实现方法:
(1)remove操作
我们对上面的代码做一些修改,不使用hide()来隐藏当前正在显示的Fragment,而使用remove来执行。具体修改如下:
if(currentTabIndex!=index)
{
FragmentTransaction transaction = getSupportFragmentManager().beginTransaction();
transaction.remove(fragments[currentTabIndex]);//替换之前的transaction.hide(fragments[currentTabIndex]);
if(!fragments[index].isAdded())
{
transaction.add(R.id.frame_container,fragments[index]);
}
transaction.show(fragments[index]);
transaction.commit();
}
我们在隐藏其他Fragment时使用replace()代替hide(),运行程序,点击tab,则log如下图:

可以看到我们使用remove()来隐藏Fragment,则对应的Fragment会依次调用onStop()-》onDestoryView()-》onDestory()-》onDetach()(这里我的程序里没有写onDetach(),但实际上会调用的),也就是说在调用remove后,对应的Fragment会销毁并与Activity解绑。
而remove的Fragment要重新显示时,需要重新创建Fragment实例并通过add()操作添加到Activity中。
(2)replace操作
通常我们对上面的代码做一些修改,注释掉之前的hide()操作,把show()改为replace(),具体修改如下:
if(currentTabIndex!=index)
{
FragmentTransaction transaction = getSupportFragmentManager().beginTransaction();
// transaction.remove(fragments[currentTabIndex]);//替换之前的transaction.hide(fragments[currentTabIndex]);
if(!fragments[index].isAdded())
{
transaction.add(R.id.frame_container,fragments[index]);
}
transaction.replace(R.id.frame_containere,fragments[index]);//替换之前的show()方法
transaction.commit();
}
这里我们注释掉remove()方法,将show()方法替换为replace()方法,运行结果如下:

我们会发现,在调用replace()方法后,其他三个Fragment均销毁了。而销毁的Fragment需要重新显示时,需要重新创建对象,因此这里的开销还是相对比较大的。
5、总结
-
show() 用来在界面上呈现Fragment视图,相当于View的的setVisiable(View.Visiable )。
-
hide() 用来隐藏Fragment视图,相当于View的setVisiable(View.InVisiable)
-
add() 用来向Activity中添加Fragment对象,但是需要注意已经添加的Fragment对象,不能重复添加,否则报错 java.lang.IllegalStateException: Fragment already added:
-
remove() 移除Activity中的添加过的Fragment对象,被移除的Fragment会被系统销毁。
-
replace() 调用replace方法,会移除其他Fragmen并销毁,只保留将要替代的Fragment对象。由于会销毁其他Fragment,因此开销较大。注意,我们要添加的Fragment对象,如果在执行replace之前没有添加到Activity,在执行replace后,则会被添加到当前的Activity中。(关于add和replace无法混用问题,后面会具体分析)
四、Fragment的回滚
回滚,从文字含义来讲,就是类似于我们使用git时的回退,我们可以看到我们的提交操作,也就是日志log,如果我们需要回退到某一次提交时,那么执行命令就可以了。
而这里我们的回滚操作也是类似的,我们在执行add()、replace()、hide()、show()、remove()操作时,均可以加入到回退栈中,便于执行回滚操作。
接下来我们通过实例来说明,上面的例子。
1、首先我们依次add了四个Fragment对象,然后分别加入回退栈并提交
具体操作如下:
(1)add Fragment_msg
(2)add Fragment_friend
(3)add Fragment_discover
(4)add Fragment_profile
getSupportFragmentManager().beginTransaction().replace(R.id.
frame_container
,
msg_fragment
)
;
FragmentTransaction transaction = getSupportFragmentManager().beginTransaction()
;
transaction.add(R.id.
frame_container
,
fragments
[
0
])
;
transaction.addToBackStack(
"msg"
)
;//加入到回退栈
transaction.commit
()
;
FragmentTransaction transaction1 = getSupportFragmentManager().beginTransaction()
;
transaction1.add(R.id.
frame_container
,
fragments
[
1
])
;
transaction1.addToBackStack(
"friend"
)
;//加入到回退栈
transaction1.commit
()
;
FragmentTransaction transaction2 = getSupportFragmentManager().beginTransaction()
;
transaction2.add(R.id.
frame_container
,
fragments
[
2
])
;
transaction2.addToBackStack(
"discover"
)
;//加入到回退栈
transaction2.commit
()
;
FragmentTransaction transaction3 = getSupportFragmentManager().beginTransaction()
;
transaction3.add(R.id.
frame_container
,
fragments
[
3
])
;//加入到回退栈
transaction3.addToBackStack(
"profile"
)
;
transaction3.commit
()
;
运行log如下:
可以看到四个Fragment均完成创建。
2、执行remove(fragment_friend),删除Fragment_fried
FragmentTransaction transaction = getSupportFragmentManager().beginTransaction();
transaction.remove(fragments[index]);//这里的index对应fragmen_friend的索引
transaction.addToBackStack("hide"+index);//加入到回退栈
transaction.commit();
运行log如下:
可以看到,调用remove后,fragment_friend的视图销毁了,但是fragment_friend对象并没有销毁(原因自然是因为fragment_friend加入了回退),也就是说加入回退栈,则fragment对象不销毁,不加入回退栈,调用remove则fragment对象销毁。
FragmentTransaction transaction = getSupportFragmentManager().beginTransaction()
;
transaction.remove(
fragments
[
index
])
;//这里的index对应fragmen_discover的索引
transaction.addToBackStack(
"hide"
+
index
)
;//加入到回退栈
transaction.commit();
运行log如下:
4、点击返回键,执行第一次回滚操作。
@Override
public boolean onKeyDown(int keyCode, KeyEvent event) {
switch (event.getKeyCode())
{
case KeyEvent.KEYCODE_BACK:
FragmentManager manager = getSupportFragmentManager();
manager.popBackStack();//回退栈的栈顶出栈
return true;
}
return super.onKeyDown(keyCode, event);
}
我们预想,它应该回退到执行remove(fragment_discover)操作之前,那么结果如何呢?运行log如下:

我们会发现,fragment_discover重新创建视图,加入到Acitivty中,和我们预想的一致。
5、再次点击返回键,执行第二次回滚
我们预想,它应该回退到执行remove(fragment_friend)操作之前,那么结果如何呢?运行log如下:

我们会发现,fragment_friend重新创建视图,加入到Acitivty中,和我们预想的一致。
6、再次点击返回键,执行第三次回滚
我们预想,它应该回退到执行add(fragment_profile)操作之前,那么结果如何呢?运行log如下:

我们会发现,此时Fragment_profile销毁,Acitivity中只有Fragment_msg,Fragment_friend,,Fragment_discover
到这里我们也就对回滚操作有了一个大致的认识,那么就下来我们总结整理一下:
7、总结:
(1)回滚,类似于git的提交回退,我们可以利用回滚来回到之前的状态。
(2)执行remove()和replace()操作,如果不添加到回退栈,那么fragment视图和fragment对象均会销毁,如果添加到回退栈,则只销毁fragment视图,但是不销毁fragment对象。
(3)show、hide、remove、replace、add均可以执行回滚操作
五、补充:
1、关于app包下的Fragment和v4包下的Fragment的区别
(1)android.app.Fragment兼容最低版本为Android 3.0,而 android.support.v4.app.Fragment 兼容的最低版本为1.6
(2)获取FragmentManager的方式不同
v4包下的Fragment:通过 getSupportFragmentManager().获取FragmentManager
app包下的Fragment:通过 getFragmentManager()来获取FragmentManager
2、如何实现fragment的切换
这里我们推荐的解决方案是使用show+hide,这样可以避免fragment的销毁和重建的消耗
3、关于fragment的add和replace的混合使用问题
这个问题其实是谷歌的bug,主要原因是在与replace方法中在清空所有container中所有fragment实例时的问题,代码如下:
1. for (int i=0;i
2. Fragment old = mManager.mAdded.get(i);
3. ……
4. mManager.removeFragment(old, mTransition, mTransitionStyle);
5. }
这里们还是以上面为例子,此时我们add了四个fragment,然后执行replace()操作,则首先清空里面所有的fragment,分析这里的循环:
(1)i=0时,mManager.mAdded.size()=4,
-
mManager.mAdded.get(0)=Fragment_msg
-
mManager.mAdded.get(1)=Fragment_friend
-
mManager.mAdded.get(2)=Fragment_discover
-
mManager.mAdded.get(3)=Fragment_profile
此时mManager.mAdded.get(0)为Fragment_msg,则它被移除,移除后mManager.mAdded.size()=3,注意这里,循环的限制条件已经发生改变
(2)i=1时,mManager.mAdded.size()=3,
-
mManager.mAdded.get(0)=Fragment_friend
-
mManager.mAdded.get(1)=Fragment_discover
-
mManager.mAdded.get(2)=Fragment_profile
此时mManager.mAdded.get(1)为Fragment_discover,则将它移除,移除后mManager.mAdded.size()=2,注意这里,由于在执行第一次操作时,改变了mAdded.size(),因此第一次操作前mManager.mAdded.get(1)=Fragment_friend,而第二次操作前mManager.mAdded.get(1)=Fragment_discover,他们是不一样的,这样就导致Fragment_friend依然在Activity的Container中,没有被移除。、
这里也就解释了我们在使用add和replace时,即使执行了replace操作,仍然无法移除fragment。
但是这个bug,Google在Android 5.0开始就修复了,因此现在使用是正常的,但是还是需要考虑replace()销毁fragment带来的开销。