Java后台接口开发实战演练
文章目录
- 前言
- 实战演练
- POST请求
- GET请求
- 接收PC端上传文件
- 接收Android端上传文件
- 问题
- 源码
前言
作为一名普通的Android开发者,想要独立开发一个App,最头疼的地方在于后台接口没人写,正常来说会有以下两种解决方案:
- 用第三方服务
- 自己搭建服务器
第一种方案我之前试过,使用的是bmob后端云,还别说,当时用的还挺顺手,以致于最后成功的把我的App上架到应用市场,然鹅,好景不长,慢慢的,bmob开始各种收费了,一个是短信没法正常使用,后来我换成了mob的短信SDK,觉得用着不顺手,又换回了bmob的邮件登陆,再后来邮件又收费了,直到最后图片服务无法使用才导致我不想再用第三方服务,改为自己搭建服务
以上是背景介绍,下面进入实战
实战演练
这是一个java webapp项目,以下是开发环境
开发工具:intellij idea ultimate 2018.1
数据库:mysql 5.7.19
服务器:tomcat 7.0.75
开发框架:springmvc + mybatis
以下只放出一些关键代码,这些代码都是经过本人实际测试成功的,详细源码可移步文末的github链接查看
POST请求
代码:
 /**
     * 用户登陆,Post方式
     *
     * @param param
     * @return
     */
    @RequestMapping(value = "login", method = RequestMethod.POST)
    @ResponseBody
    public Map login(@RequestParam("param") String param) {
        out.println("welcome to login on post,param=" + param);
        ObjectMapper objectMapper = new ObjectMapper(); //转换器
        Map map = new HashMap<>();
        try {
            LoginBean loginBean = objectMapper.readValue(param, LoginBean.class); //json转换成map
            ResultBean result = onLogin(loginBean.getName(), loginBean.getPassword());
            out.println("result==>" + result);
            map.put("code", result.getCode());
            map.put("reason", result.getReason());
            map.put("success", result.isSuccess());
        } catch (IOException e) {
            e.printStackTrace();
        }
        return map;
    }
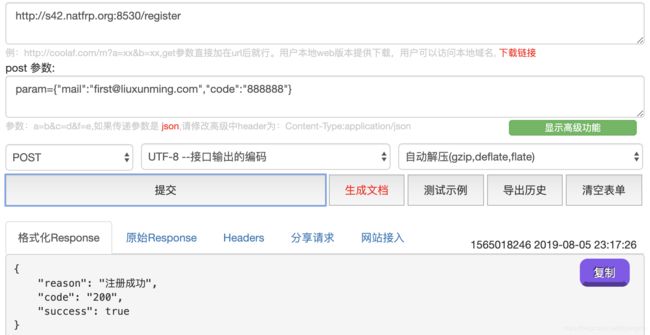
模拟post请求测试地址:http://coolaf.com/
此处我把本地的localhost通过内网穿透转换成一个外网地址,这样方便调用,具体如何调用可参考 Java web项目使用【内网穿透】来实现对外访问
测试效果如下:

数据库记录
![]()
GET请求
代码:
 /**
     * 获取数据库中的列表,get方式
     *
     * @return
     */
    @RequestMapping(value = "userList", method = RequestMethod.GET)
    @ResponseBody
    public Map userList() {
        out.println("welcome to userList");
        Map map = new HashMap<>();
        ResultBean result = onUserList();
        out.println("result==>" + result);
        map.put("code", result.getCode());
        map.put("reason", result.getReason());
        map.put("success", result.isSuccess());
        map.put("records", result.getRecords());
        return map;
    }
接收PC端上传文件
Spring MVC文件上传教程 commons-io/commons-uploadfile
 @RequestMapping(value = "/do", method = RequestMethod.POST)
    public String uploadDo(HttpServletRequest request, Model model, @RequestParam("file") MultipartFile[] files) {
        //获取目录/创建路径
//        String uploadRootPath = request.getServletContext().getRealPath("upload");
        String uploadRootPath = "/Users/liuxunming/Documents/AppService/Images/";
        //获取路径
        File uploadRootDir = new File(uploadRootPath);
        if (!uploadRootDir.exists()) {
            uploadRootDir.mkdirs();
        }

        //用来存放上传后的路径地址的变量
        List uploadFiles = new ArrayList();
        for (int i = 0; i < files.length; i++) {
            MultipartFile file = files[i];

            //原文件名
            String name = file.getOriginalFilename();
            System.out.print(name);


            if (name != null && name.length() > 0) {
                try {

                    //获取文件字节流
                    byte[] bytes = file.getBytes();

                    //新文件路径
                    File serverFile = new File(uploadRootDir.getAbsolutePath() + File.separator + name);

                    //将文件字节流输出到刚创建的文件上
                    BufferedOutputStream stream = new BufferedOutputStream(new FileOutputStream(serverFile));
                    stream.write(bytes);
                    stream.close();

                    //将文件路径添加到uploadFiles中
                    uploadFiles.add(serverFile);
                    System.out.println(serverFile);


                } catch (IOException e) {
                    // TODO Auto-generated catch block
                    //e.printStackTrace();
                    System.out.println("error to file:" + name);
                }
            }

        }
        model.addAttribute("uploadFiles", uploadFiles);
        return "uploadResult";

    }
接收Android端上传文件
springmvc服务端+android客户端的文件上传,此参考博文中不仅包括java端接收上传的代码,还包括Android端上传文件的代码
 /**
     * 手机端上传文件
     *
     */
    @Resource
    private MobileResult mobileResult;

    @RequestMapping("/mobile/uploadfile")
    @ResponseBody
    public MobileResult uploadPhone(@RequestParam(value = "file", required = false) MultipartFile file, HttpServletRequest request)
            throws IllegalStateException, IOException {

        String path = uploadFile(file, request);

        mobileResult.setCode("200");

        mobileResult.setPath(path);

        mobileResult.setMessage("上传成功");

        return mobileResult;

    }

    private String uploadFile(MultipartFile file, HttpServletRequest request) throws IOException {

//        String path = request.getSession().getServletContext().getRealPath("upload");
        String path = "/Users/liuxunming/Documents/AppService/Images/";
        String fileName = file.getOriginalFilename();

        File targetFile = new File(path, fileName);

        if (!targetFile.exists()) {
            targetFile.mkdirs();
        }

        file.transferTo(targetFile);

        return targetFile.getAbsolutePath();

    }
问题
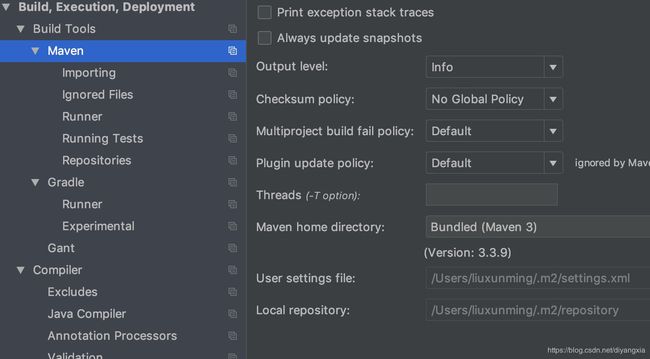
1、把项目代码导入到Intelj Idea里无法正常运行,一堆报错,都是程序包xxx不存在,根本原因就是maven本地库的配置有误

这里的local repository的目录一定要选择实际存在的,笔者之前是填的E:/MavenRepository,然而其实mac上根本没有E盘,后来直接改成默认的就好了
源码
https://github.com/xmliu/app-service-demo
各位在对该源码测试运行时,如果有什么问题,欢迎在博文留下评论或者在github提出issue
