Java线程并发中的锁——Lock(下)
接上篇文章
独占式同步状态获取与释放
通过调用同步器的acquire(int arg)方法可以获取同步状态,该方法对中断不敏感,也就是由于线程获取同步状态失败后进入同步队列中,后续对线程进行中断操作时,线程不会从同步队列中移出,代码示例:
public final void acquire(int arg) {
    if (!tryAcquire(arg) &&
    acquireQueued(addWaiter(Node.EXCLUSIVE), arg))
    selfInterrupt();
}
上述代码主要完成了同步状态获取、节点构造、加入同步队列以及在同步队列中自旋等待的相关工作,其主要逻辑是:首先调用自定义同步器实现的tryAcquire(int arg)方法,该方法保证线程安全的获取同步状态,如果同步状态获取失败,则构造同步节点(独占式Node.EXCLUSIVE,同一时刻只能有一个线程成功获取同步状态)并通过addWaiter(Node node)方法将该节点加入到同步队列的尾部,最后调用acquireQueued(Node node,int arg)方法,使得该节点以“死循环”的方式获取同步状态。如果获取不到则阻塞节点中的线程,而被阻塞线程的唤醒主要依靠前驱节点的出队或阻塞线程被中断来实现
下面我们看下同步器的addWriter和enq方法
private Node addWaiter(Node mode) {
        Node node = new Node(Thread.currentThread(), mode);
        // 快速尝试在尾部添加
        Node pred = tail;
        if (pred != null) {
            node.prev = pred;
            if (compareAndSetTail(pred, node)) {
                pred.next = node;
                return node;
            }
        }
        enq(node);
        return node;
    }
private Node enq(final Node node) {
        for (;;) {
            Node t = tail;
            if (t == null) { // Must initialize
                if (compareAndSetHead(new Node()))
                    tail = head;
            } else {
                node.prev = t;
                if (compareAndSetTail(t, node)) {
                    t.next = node;
                    return t;
                }
            }
        }
    }
上述代码通过使用compareAndSetTail(Node expect,Node update)方法来确保节点能够被线程安全添加。试想一下:如果使用一个普通的LinkedList来维护节点之间的关系,那么当一个线程获取了同步状态,而其他多个线程由于调用tryAcquire(int arg)方法获取同步状态失败而并发地被添加到LinkedList时,LinkedList将难以保证Node的正确添加,最终的结果可能是节点的数量有偏差,而且顺序也是混乱的。在enq(final Node node)方法中,同步器通过“死循环”来保证节点的正确添加,在“死循环”中只有通过CAS将节点设置成为尾节点之后,当前线程才能从该方法返回,否则,当前线
程不断地尝试设置。可以看出,enq(final Node node方法将并发添加节点的请求通过CAS变得“串行化”了。节点进入同步队列之后,就进入了一个自旋的过程,每个节点(或者说每个线程)都在自省地观察,当条件满足,获取到了同步状态,就可以从这个自旋过程中退出,否则依旧留在这个自旋过程中(并会阻塞节点的线程)
我们来看看同步器中的acquireQueue方法
    /**
     * Acquires in exclusive uninterruptible mode for thread already in
     * queue. Used by condition wait methods as well as acquire.
     *
     * @param node the node
     * @param arg the acquire argument
     * @return {@code true} if interrupted while waiting
     */
    final boolean acquireQueued(final Node node, int arg) {
        boolean failed = true;
        try {
            boolean interrupted = false;
            for (;;) {
                final Node p = node.predecessor();
                if (p == head && tryAcquire(arg)) {
                    setHead(node);
                    p.next = null; // help GC
                    failed = false;
                    return interrupted;
                }
                if (shouldParkAfterFailedAcquire(p, node) &&
                    parkAndCheckInterrupt())
                    interrupted = true;
            }
        } finally {
            if (failed)
                cancelAcquire(node);
        }
    }
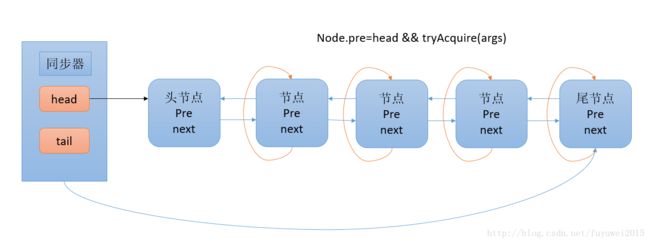
在acquireQueued(final Node node,int arg)方法中,当前线程在“死循环”中尝试获取同步状态,而只有前驱节点是头节点才能够尝试获取同步状态,因为
1、头节点是成功获取到同步状态的节点,而头节点的线程释放了同步状态之后,将会唤醒其后继节点,后继节点的线程被唤醒后需要检查自己的前驱节点是否是头节点。
2、维护同步队列的FIFO原则。该方法中,节点自旋获取同步状态的行为如下图所示

上图中由于非首节点线程前驱节点出队或者被中断而从等待状态返回,随后检查自己的前驱是否是头节点,如果是则尝试获取同步状态。可以看到节点和节点之间在循环检查的过程中基本不相互通信,而是简单地判断自己的前驱是否为头节点,这样就使得节点的释放规则符合FIFO,并且也便于对过早通知的处理(过早通知是指前驱节点不是头节点的线程由于中断而被唤醒)。
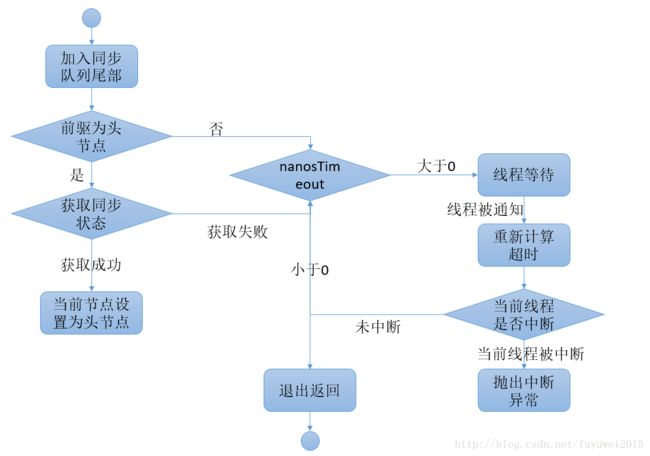
独占式同步状态获取流程,也就是acquire(int arg)方法调用流程,如下图所示

前驱节点为头节点且能够获取同步状态的判断条件和线程进入等待状态是获取同步状态的自旋过程。当同步状态获取成功之后,当前线程从acquire(int arg)方法返回,如果对于锁这种并发组件而言,代表着当前线程获取了锁
当前线程获取同步状态并执行了相应逻辑之后,就需要释放同步状态,使得后续节点能够继续获取同步状态。通过调用同步器的release(int arg)方法可以释放同步状态,该方法在释放了同步状态之后,会唤醒其后继节点(进而使后继节点重新尝试获取同步状态)
同步器的释放代码如下:
  /**
     * Releases in exclusive mode.  Implemented by unblocking one or
     * more threads if {@link #tryRelease} returns true.
     * This method can be used to implement method {@link Lock#unlock}.
     *
     * @param arg the release argument.  This value is conveyed to
     *        {@link #tryRelease} but is otherwise uninterpreted and
     *        can represent anything you like.
     * @return the value returned from {@link #tryRelease}
     */
    public final boolean release(int arg) {
        if (tryRelease(arg)) {
            Node h = head;
            if (h != null && h.waitStatus != 0)
                unparkSuccessor(h);
            return true;
        }
        return false;
    }
该方法执行时,会唤醒头节点的后继节点线程。分析了独占式同步状态获取和释放过程后,适当做个总结:在获取同步状态时,同步器维护一个同步队列,获取状态失败的线程都会被加入到队列中并在队列中进行自旋;移出队列(或停止自旋)的条件是前驱节点为头节点且成功获取了同步状态。在释放同步状态时,同步器调用tryRelease(int arg)方法释放同步状态,然后唤醒头节点的后继节点
共享式同步状态的获取与释放
共享式获取与独占式获取最主要的区别在于同一时刻能否有多个线程同时获取到同步状态。以文件的读写为例,如果一个程序在对文件进行读操作,那么这一时刻对于该文件的写操作均被阻塞,而读操作能够同时进行。写操作要求对资源的独占式访问,而读操作可以是共享式访问,两种不同的访问模式在同一时刻对文件或资源的访问情况。
通过调用同步器的acquireShared(int arg)方法可以共享式地获取同步状态,我们看下同步器的acquireShared和doAcquireShared方法
/**
     * Acquires in shared mode, ignoring interrupts.  Implemented by
     * first invoking at least once {@link #tryAcquireShared},
     * returning on success.  Otherwise the thread is queued, possibly
     * repeatedly blocking and unblocking, invoking {@link
     * #tryAcquireShared} until success.
     *
     * @param arg the acquire argument.  This value is conveyed to
     *        {@link #tryAcquireShared} but is otherwise uninterpreted
     *        and can represent anything you like.
     */
    public final void acquireShared(int arg) {
        if (tryAcquireShared(arg) < 0)
            doAcquireShared(arg);
    }
    /**
     * Acquires in shared uninterruptible mode.
     * @param arg the acquire argument
     */
    private void doAcquireShared(int arg) {
        final Node node = addWaiter(Node.SHARED);
        boolean failed = true;
        try {
            boolean interrupted = false;
            for (;;) {
                final Node p = node.predecessor();
                if (p == head) {
                    int r = tryAcquireShared(arg);
                    if (r >= 0) {
                        setHeadAndPropagate(node, r);
                        p.next = null; // help GC
                        if (interrupted)
                            selfInterrupt();
                        failed = false;
                        return;
                    }
                }
                if (shouldParkAfterFailedAcquire(p, node) &&
                    parkAndCheckInterrupt())
                    interrupted = true;
            }
        } finally {
            if (failed)
                cancelAcquire(node);
        }
    }
注:为何JDK原理的死循环都是for(;;)而不是while(1),因为while(1)编译之后是mov eax,1 test eax,eax je foo+23h jmp foo+18h,for(;;)编译之后是jmp foo+23h,可以看出for(;;)指令少,不占用寄存器,没有判断跳转,效率更高
在acquireShared(int arg)方法中,同步器调用tryAcquireShared(int arg)方法尝试获取同步状态,tryAcquireShared(int arg)方法返回值为int类型,当返回值大于等于0时,表示能够获取到同步状态。因此,在共享式获取的自旋过程中,成功获取到同步状态并退出自旋的条件就是
tryAcquireShared(int arg)方法返回值大于等于0。可以看到,在doAcquireShared(int arg方法的自旋过程中,如果当前节点的前驱为头节点时,尝试获取同步状态,如果返回值大于等于0,表示该次获取同步状态成功并从自旋过程中退出。与独占式一样,共享式获取也需要释放同步状态,通过调用releaseShared(int arg)方法可以释放同步状态,该方法代码如下
   /**
     * Releases in shared mode.  Implemented by unblocking one or more
     * threads if {@link #tryReleaseShared} returns true.
     *
     * @param arg the release argument.  This value is conveyed to
     *        {@link #tryReleaseShared} but is otherwise uninterpreted
     *        and can represent anything you like.
     * @return the value returned from {@link #tryReleaseShared}
     */
    public final boolean releaseShared(int arg) {
        if (tryReleaseShared(arg)) {
            doReleaseShared();
            return true;
        }
        return false;
    }
该方法在释放同步状态之后,将会唤醒后续处于等待状态的节点。对于能够支持多个线程同时访问的并发组件(比如Semaphore),它和独占式主要区别在于tryReleaseShared(int arg)方法必须确保同步状态(或者资源数)线程安全释放,一般是通过循环和CAS来保证的,因为释放同步状态的操作会同时来自多个线程。
独占式超时过去同步状态
通过调用同步器的doAcquireNanos(int arg,long nanosTimeout)方法可以超时获取同步状态,即在指定的时间段内获取同步状态,如果获取到同步状态则返回true,否则,返回false。
在Java 5之前,当一个线程获取不到锁而被阻塞在synchronized之外时,对该线程进行中断操作,此时该线程的中断标志位会被修改,但线程依旧会阻塞在synchronized上,等待着获取锁。在Java 5中,同步器提供了acquireInterruptibly(int arg)方法,这个方法在等待获取同步状态时,如果当前线程被中断,会立刻返回,并抛出InterruptedException
超时获取同步状态过程可以被视作响应中断获取同步状态过程的“增强版”,doAcquireNanos(int arg,long nanosTimeout)方法在支持响应中断的基础上,增加了超时获取的特性。针对超时获取,主要需要计算出需要睡眠的时间间隔nanosTimeout,为了防止过早通知,
nanosTimeout计算公式为:nanosTimeout-=now-lastTime,其中now为当前唤醒时间,lastTime为上次唤醒时间,如果nanosTimeout大于0则表示超时时间未到,需要继续睡眠nanosTimeout纳秒,反之,表示已经超时,该方法代码如下
  /**
     * Acquires in exclusive timed mode.
     *
     * @param arg the acquire argument
     * @param nanosTimeout max wait time
     * @return {@code true} if acquired
     */
    private boolean doAcquireNanos(int arg, long nanosTimeout)
        throws InterruptedException {
        long lastTime = System.nanoTime();
        final Node node = addWaiter(Node.EXCLUSIVE);
        boolean failed = true;
        try {
            for (;;) {
                final Node p = node.predecessor();
                if (p == head && tryAcquire(arg)) {
                    setHead(node);
                    p.next = null; // help GC
                    failed = false;
                    return true;
                }
                if (nanosTimeout <= 0)
                    return false;
                if (shouldParkAfterFailedAcquire(p, node) &&
                    nanosTimeout > spinForTimeoutThreshold)
                    LockSupport.parkNanos(this, nanosTimeout);
                long now = System.nanoTime();
                nanosTimeout -= now - lastTime;
                lastTime = now;
                if (Thread.interrupted())
                    throw new InterruptedException();
            }
        } finally {
            if (failed)
                cancelAcquire(node);
        }
    }
该方法在自旋过程中,当节点的前驱节点为头节点时尝试获取同步状态,如果获取成功则从该方法返回,这个过程和独占式同步获取的过程类似,但是在同步状态获取失败的处理上有所不同。如果当前线程获取同步状态失败,则判断是否超时(nanosTimeout小于等于0表示
已经超时),如果没有超时,重新计算超时间隔nanosTimeout,然后使当前线程等待nanosTimeout纳秒(当已到设置的超时时间,该线程会从LockSuport.parkNanos(Object blocker,long nanos)方法返回)。如果nanosTimeout小于等于spinForTimeoutThreshold(1000纳秒)时,将不会使该线程进行超时等待,而是进入快速的自旋过程。原因在于,非常短的超时等待无法做到十分精确,如果这时再进行超时等待,相反会让nanosTimeout的超时从整体上表现得反而不精确。因此,在超时非常短的场景下,同步器会进入无条件的快速自旋。
独占超时获取同步状态的流程如下:

自定义同步组件
设计一个同步工具:该工具在同一时刻,只允许至多两个线程同时访问,超过两个线程的访问将被阻塞,我们将这个同步工具命名为TwinsLock。
首先,确定访问模式。TwinsLock能够在同一时刻支持多个线程的访问,这显然是共享式访问,因此,需要使用同步器提供的acquireShared(int args)方法等和Shared相关的方法,这就要求TwinsLock必须重写tryAcquireShared(int args)方法和tryReleaseShared(int args)方法,这样才能保证同步器的共享式同步状态的获取与释放方法得以执行。
其次,定义资源数。TwinsLock在同一时刻允许至多两个线程的同时访问,表明同步资源数为2,这样可以设置初始状态status为2,当一个线程进行获取,status减1,该线程释放,则status加1,状态的合法范围为0、1和2,其中0表示当前已经有两个线程获取了同步资源,此时再有其他线程对同步状态进行获取,该线程只能被阻塞。在同步状态变更时,需要使用compareAndSet(int expect,int update)方法做原子性保障。
最后,组合自定义同步器。
public class TwinsLock implements Lock {

    private final Sync sync = new Sync(2);

    @SuppressWarnings("serial")
    private static final class Sync extends AbstractQueuedSynchronizer{
        Sync(int count){
            if(count <0){
                throw new IllegalArgumentException("count must larger than zero");
            }
            setState(count);
        }

        public int tryAcquireShared(int reduceCount){
            for(;;){
                int current = getState();
                int newCount = current - reduceCount;
                if(newCount < 0 || compareAndSetState(current, newCount)){
                    return newCount;
                }
            }
        }

        public boolean tryReleaseShared(int returnCount){
            for(;;){
                int current = getState();
                int newCount = current+returnCount;
                if(compareAndSetState(current, newCount)){
                    return true;
                }
            }
        }

    }
    @Override
    public void lock() {
        sync.acquireShared(1);
    }
    @Override
    public void lockInterruptibly() throws InterruptedException {
        // TODO Auto-generated method stub
    }
    @Override
    public boolean tryLock() {
        // TODO Auto-generated method stub
        return false;
    }
    @Override
    public boolean tryLock(long time, TimeUnit unit)
            throws InterruptedException {
        // TODO Auto-generated method stub
        return false;
    }
    @Override
    public void unlock() {
        sync.tryReleaseShared(1);
    }
    @Override
    public Condition newCondition() {
        // TODO Auto-generated method stub
        return null;
    }
}
测试类
public class TwinsLockTest {
    public static void main(String[] args) {
        final Lock lock = new TwinsLock();
        class Worker extends Thread{
            public void run(){
                for(;;){
                    lock.lock();
                    try {
                        Thread.sleep(1000);
                        System.out.println(Thread.currentThread().getName());
                        Thread.sleep(1000);
                    } catch (InterruptedException e) {
                        e.printStackTrace();
                    }finally{
                        lock.unlock();
                    }
                }
            }
        }

        for(int i=0;i<10;i++){
            Worker worker = new Worker();
            worker.setDaemon(true);
            worker.start();
        }

        for(int i=0;i<10;i++){
            try {
                Thread.sleep(1000);
                System.out.println("----");
            } catch (InterruptedException e) {
                e.printStackTrace();
            }
        }
    }
}
运行结果如下:
Thread-0
Thread-1
----
----
----
Thread-1
Thread-0
----
----
Thread-1
Thread-0
----
----
Thread-0
Thread-1
----
Thread-1
Thread-0
----
----
如果限制改成5,结果如下:
Thread-2
Thread-3
Thread-0
----
Thread-1
Thread-4
----
----
Thread-3
Thread-2
Thread-0
Thread-4
Thread-1
----
----
Thread-0
Thread-3
Thread-4
Thread-2
Thread-1
----
Thread-4
Thread-3
Thread-2
Thread-0
----
由于并发的情况不同,线程数不同,但是都在5以内