CentOS7安装iptables防火墙(禁用/停止自带的firewalld服务)
使用背景:
1,CentOS7 默认的防火墙 不是iptables, 而是firewalle.
2,一些软件的端口号要放开来提供服务,如:22,80等常用端口
3,提供web服务的需要
使用步骤:
一,安装centos7,自行百度
二,centos7 基本配置,参考我的另一篇文章:https://blog.csdn.net/gaokcl/article/details/82834925
三,CentOS7安装iptables防火墙:
0,CentOS7默认的防火墙不是iptables,而是firewalle.
查看: 打开/etc/sysconfig/目录后,并未发现iptables文档(可能会有iptables-config文档等,别混淆了)
[root@localhost ~]# cd /etc/sysconfig/
1, 安装 iptable 与 iptable-service
#先检查是否安装了iptables
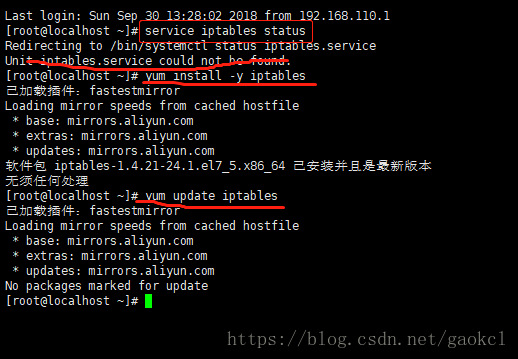
[root@localhost ~]# service iptables status
#安装iptables
[root@localhost ~]# yum install -y iptables #通常情况下是安装好了的
yum install -y iptables* (网友推荐,看下面的评论,在这里,谢谢他/她)
#升级iptables
[root@localhost ~]# yum update iptables
#安装iptables-services
[root@localhost ~]# yum install iptables-services #通常情况下没有安装
2,禁用/停止自带的firewalld服务
#停止firewalld服务
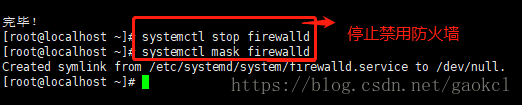
[root@localhost ~]# systemctl stop firewalld
#禁用firewalld服务
[root@localhost ~]# systemctl mask firewalld
#查看iptables现有规则
[root@localhost ~]# iptables -L -n
#先允许所有,不然有可能会杯具
[root@localhost ~]# iptables -P INPUT ACCEPT

[root@localhost ~]# systemctl enable iptables.service # 设置防火墙开机启动

--------------------- 启动/关闭/重启 iptables ------------------------------------
[root@localhost ~]# systemctl stop iptables
[root@localhost ~]# systemctl start iptables
[root@localhost ~]# systemctl restart iptables
--------------------------------------------------------------------------------------------
# @1,手动添加端口号 (方法一)
[root@localhost ~]# vi /etc/sysconfig/iptables #配置防火墙端口
-A INPUT -m state --state NEW -m tcp -p tcp --dport 3306 -j ACCEPT
-A INPUT -m state --state NEW -m tcp -p tcp --dport 8080 -j ACCEPT
-A INPUT -m state --state NEW -m tcp -p tcp --dport 6379 -j ACCEPT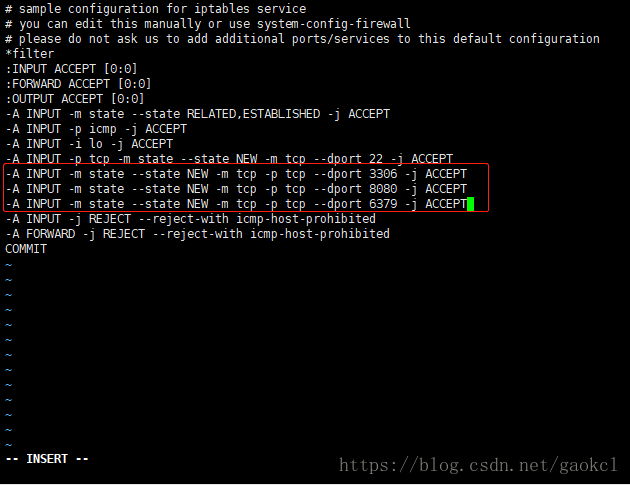
[root@localhost ~]# service iptables save #保存防火墙配置
--end
################################### 具体配置说明 ######################################
@ 2,命令 添加端口号 ( 方法二 ):
参考:https://www.linuxidc.com/Linux/2017-10/147238.htm
一,安装iptable iptable-service
1,先检查是否安装了iptables
[root@localhost ~]# service iptables status
2,安装iptables
[root@localhost ~]# yum install -y iptables
3,升级iptables
[root@localhost ~]# yum update iptables
4,安装iptables-services
[root@localhost ~]# yum install iptables-services
二,禁用/停止自带的firewalld服务
1,停止firewalld服务
[root@localhost ~]# systemctl stop firewalld
2,禁用firewalld服务
[root@localhost ~]# systemctl mask firewalld
三,设置现有规则
  #查看iptables现有规则
  [root@localhost ~]# iptables -L -n

  #先允许所有,不然有可能会杯具
  [root@localhost ~]# iptables -P INPUT ACCEPT

  #清空所有默认规则
  [root@localhost ~]# iptables -F

  #清空所有自定义规则
  [root@localhost ~]# iptables -X

  #所有计数器归0
  [root@localhost ~]# iptables -Z

  #允许来自于lo接口的数据包(本地访问)
  [root@localhost ~]# iptables -A INPUT -i lo -j ACCEPT

  #开放22端口
  iptables -A INPUT -p tcp --dport 22 -j ACCEPT

  #开放21端口(FTP)
  iptables -A INPUT -p tcp --dport 21 -j ACCEPT

  #开放80端口(HTTP)
  iptables -A INPUT -p tcp --dport 80 -j ACCEPT

  #开放443端口(HTTPS)
  iptables -A INPUT -p tcp --dport 443 -j ACCEPT

  ...

   ====>  按照实际要求:是否加下面的:
  -------------------------------------------------------------------

  #允许ping
  iptables -A INPUT -p icmp --icmp-type 8 -j ACCEPT

  #允许接受本机请求之后的返回数据 RELATED,是为FTP设置的
  iptables -A INPUT -m state --state  RELATED,ESTABLISHED -j ACCEPT

  #其他入站一律丢弃
  iptables -P INPUT DROP

  #所有出站一律绿灯
  iptables -P OUTPUT ACCEPT

  #所有转发一律丢弃
  iptables -P FORWARD DROP

   -------------------------------------------------------------------
四,其他规则设定
 #如果要添加内网ip信任(接受其所有TCP请求)
 iptables -A INPUT -p tcp -s 45.96.174.68 -j ACCEPT

 #过滤所有非以上规则的请求
 iptables -P INPUT DROP

 #要封停一个IP,使用下面这条命令:
 iptables -I INPUT -s ***.***.***.*** -j DROP

 #要解封一个IP,使用下面这条命令:
 iptables -D INPUT -s ***.***.***.*** -j DROP
五,保存规则设定
#保存上述规则
service iptables save
六,开启iptables服务
#注册iptables服务
#相当于以前的chkconfig iptables on
systemctl enable iptables.service

#开启服务
systemctl start iptables.service

#查看状态
systemctl status iptables.service
----------------------------------------------------------------------------------------------------
问题
-----------------------------------------------------------------------------------------------------
问题:解决vsftpd在iptables开启后,无法使用被动模式的问题
1.首先在/etc/sysconfig/iptables-config中修改或者添加以下内容
#添加以下内容,注意顺序不能调换

IPTABLES_MODULES="ip_conntrack_ftp"

IPTABLES_MODULES="ip_nat_ftp"
2.重新设置iptables设置
iptables -A INPUT -m state --state RELATED,ESTABLISHED -j ACCEPT
以下为完整设置脚本
#!/bin/sh
iptables -P INPUT ACCEPT
iptables -F
iptables -X
iptables -Z
iptables -A INPUT -i lo -j ACCEPT
iptables -A INPUT -p tcp --dport 22 -j ACCEPT
iptables -A INPUT -p tcp --dport 21 -j ACCEPT
iptables -A INPUT -p tcp --dport 80 -j ACCEPT
iptables -A INPUT -p tcp --dport 443 -j ACCEPT
iptables -A INPUT -p icmp --icmp-type 8 -j ACCEPT
iptables -A INPUT -m state --state RELATED,ESTABLISHED -j ACCEPT
iptables -P INPUT DROP
iptables -P OUTPUT ACCEPT
iptables -P FORWARD DROP
service iptables save
systemctl restart iptables.service
参考:https://blog.csdn.net/bitterliquor/article/details/70256141
CentOS7
[root@localhost ~]# cat /etc/redhat-release # 查看centos版本
CentOS Linux release 7.2.1511 (Core)1.关闭firewall
[root@localhost ~]# systemctl stop firewalld.service # 停止firewall
[root@localhost ~]# systemctl disable firewalld.service # 禁止firewall开机启动2.安装iptables
[root@localhost ~]# yum install iptables-services # 安装
[root@localhost ~]# systemctl restart iptables.service # 重启防火墙使配置生效
[root@localhost ~]# systemctl enable iptables.service # 设置防火墙开机启动
[root@localhost ~]# systemctl disable iptables.service # 禁止防火墙开机启动
CentOS6
[root@localhost ~]# service iptable status --查看防火墙状态
[root@localhost ~]# servcie iptables stop --临时关闭防火墙
[root@localhost ~]# service iptables start --临时启动防火墙
[root@localhost ~]# service iptables restart --重启防火墙
[root@localhost ~]# chkconfig iptables off --永久关闭防火墙
[root@localhost ~]# chkconfig iptables on --永久开启防火墙