Python实现Mean Shift算法
声明:代码的运行环境为Python3。Python3与Python2在一些细节上会有所不同,希望广大读者注意。本博客以代码为主,代码中会有详细的注释。相关文章将会发布在我的个人博客专栏《Python从入门到深度学习》,欢迎大家关注~
在K-Means算法中,聚类的类别个数需要提前指定,对于类别个数未知的数据集,K-Means算法和K-Means++算法将很难对其进行求解,所以需要一些能够处理未知类别个数的算法来处理此类问题。Mean Shift算法,又称作均值漂移算法,它跟K-Means算法一样,都是基于聚类中心的聚类算法,不同的是,它不需要提前指定聚类中心的个数,聚类中心是通过在给定区域中样本的均值来确定的,通过不断更新聚类中心,直至聚类中心不再改变为止。
一、Mean Shift向量与核函数
1、Mean Shift向量
对于给定的n维空间![]() 中的m个样本点
中的m个样本点![]() ,对于其中的一个样本X,其Mean Shift的向量为:
,对于其中的一个样本X,其Mean Shift的向量为:
其中,![]() 指的是一个半径为h的高维球区域,
指的是一个半径为h的高维球区域,![]() 定义为:
定义为:
2、核函数
通过上述方式求出的Mean Shift向量时存在问题的,即在![]() 区域内每一个
区域内每一个![]() 对样本X的贡献是一样的,然而实际上,每一个样本
对样本X的贡献是一样的,然而实际上,每一个样本![]() 对样本X的贡献是不一样的,我们可以通过核函数对每一个样本的贡献进行度量。
对样本X的贡献是不一样的,我们可以通过核函数对每一个样本的贡献进行度量。
核函数的定义如下:
设Z是输入空间,H是特征空间,如果存在一个Z到H的映射:![]() 使得所有
使得所有![]() ,函数
,函数![]() 满足条件:
满足条件:![]() ,则称
,则称![]() 为核函数,
为核函数,![]() 为映射函数。
为映射函数。
我们在Mean Shift算法中使用的是高斯核函数,这也是最常用的核函数之一,高斯核函数的表达式为:
其中,h为带宽,当带宽一定时,样本点之间的距离越近,核函数的值越大;当样本点距离一定时,带宽越大,核函数的值越小。
下面我们使用Python代码实现高斯核函数:
import numpy as np
import math

def gs_kernel(dist, h):
    '''
    高斯核函数
    :param dist: 欧氏距离
    :param h: 带宽
    :return: 返回高斯核函数的值
    '''
    m = np.shape(dist)[0]  # 样本个数
    one = 1 / (h * math.sqrt(2 * math.pi))
    two = np.mat(np.zeros((m, 1)))
    for i in range(m):
        two[i, 0] = (-0.5 * dist[i] * dist[i].T) / (h * h)
        two[i, 0] = np.exp(two[i, 0])

    gs_val = one * two
    return gs_val
二、Mean Shift原理
在Mean Shift中通过迭代的方式找到最终的聚类中心,即对每一个样本点计算其漂移均值,以计算出来的漂移均值点作为新的起始点重复上述步骤,直到满足终止条件,得到的最终的漂移均值点即为最终的聚类中心。
Mean Shift算法实现过程如下:
def mean_shift(points, h=2, MIN_DISTANCE=0.000001):
    '''
    训练Mean Shift模型
    :param points: 特征点
    :param h: 带宽
    :param MIN_DISTANCE: 最小误差
    :return: 返回特征点、均值漂移点、类别
    '''
    mean_shift_points = np.mat(points)
    max_min_dist = 1
    iteration = 0  # 迭代的次数
    m = np.shape(mean_shift_points)[0]  # 样本的个数
    need_shift = [True] * m  # 标记是否需要漂移

    # 计算均值漂移向量
    while max_min_dist > MIN_DISTANCE:
        max_min_dist = 0
        iteration += 1
        print("iteration : " + str(iteration))
        for i in range(0, m):
            if not need_shift[i]:  # 判断每一个样本点是否需要计算偏移均值
                continue
            point_new = mean_shift_points[i]
            point_new_start = point_new
            point_new  = shift_point(point_new, points, h)  # 对样本点进行漂移计算
            dist = distince(point_new, point_new_start)  # 计算该点与漂移后的点之间的距离

            if dist > max_min_dist:
                max_min_dist = dist
            if dist < MIN_DISTANCE:
                need_shift[i] = False

            mean_shift_points[i] = point_new
    # 计算最终的类别
    lb = lb_points(mean_shift_points)  # 计算所属的类别
    return np.mat(points), mean_shift_points, lb
其中,shift_point()方法目的在于计算漂移量,lb_points()方法的目的在于计算最终所属分类,distance()方法用于计算欧氏距离,三个方法的实现过程分别如下:
(1)shift_point()方法
def shift_point(point, points, h):
    '''
    计算漂移向量
    :param point: 需要计算的点
    :param points: 所有的样本点
    :param h: 带宽
    :return: 返回漂移后的点
    '''
    points = np.mat(points)
    m = np.shape(points)[0]  # 样本的个数
    # 计算距离
    point_dist = np.mat(np.zeros((m, 1)))
    for i in range(m):
        point_dist[i, 0] = distince(point, points[i])

    # 计算高斯核函数
    point_weights = gs_kernel(point_dist, h)

    # 计算分母
    all_sum = 0.0
    for i in range(m):
        all_sum += point_weights[i, 0]

    # 计算均值偏移
    point_shifted = point_weights.T * points / all_sum
    return point_shifted
(2)lb_points()
def lb_points(mean_shift_points):
    '''
    计算所属类别
    :param mean_shift_points: 漂移向量
    :return: 返回所属的类别
    '''
    lb_list = []
    m, n = np.shape(mean_shift_points)
    index = 0
    index_dict = {}
    for i in range(m):
        item = []
        for j in range(n):
            item.append(str(("%5.2f" % mean_shift_points[i, j])))

        item_1 = "_".join(item)
        if item_1 not in index_dict:
            index_dict[item_1] = index
            index += 1

    for i in range(m):
        item = []
        for j in range(n):
            item.append(str(("%5.2f" % mean_shift_points[i, j])))

        item_1 = "_".join(item)
        lb_list.append(index_dict[item_1])
    return lb_list
(3)distince()方法
def distince(pointA, pointB):
    '''
    计算欧氏距离
    :param pointA: A点坐标
    :param pointB: B点坐标
    :return: 返回得到的欧氏距离
    '''
    return math.sqrt((pointA - pointB) * (pointA - pointB).T)
三、Mean Shift算法举例
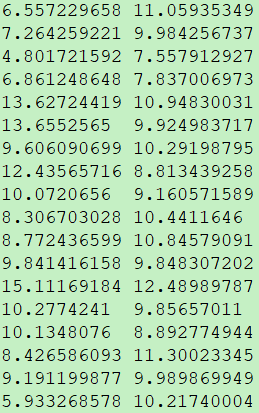
1、数据集:数据集含有两个特征,如下图所示:
2、加载数据集
我们此处使用如下方法加载数据集,也可使用其他的方式进行加载,此处可以参考我的另外一篇文章《Python两种方式加载文件内容》。加载文件内容代码如下:
def load_data(path, feature_num=2):
    '''
    导入数据
    :param path: 路径
    :param feature_num: 特行总数
    :return: 返回数据特征
    '''
    f = open(path)
    data = []
    for line in f.readlines():
        lines = line.strip().split("\t")
        data_tmp = []
        if len(lines) != feature_num:  # 判断特征的个数是否正确,把不符合特征数的数据去除
            continue
        for i in range(feature_num):
            data_tmp.append(float(lines[i]))
        data.append(data_tmp)
    f.close()
    return data
3、保存聚类结果
通过Mean Shift聚类后,我们使用一下方法进行聚类结果的保存
def save_result(file_name, data):
    '''
    保存聚类结果
    :param file_name: 保存的文件名
    :param data: 需要保存的文件
    :return:
    '''
    f = open(file_name, "w")
    m, n = np.shape(data)
    for i in range(m):
        tmp = []
        for j in range(n):
            tmp.append(str(data[i, j]))
        f.write("\t".join(tmp) + "\n")
    f.close()
4、调用Mean Shift算法
if __name__ == "__main__":
    data = load_data("F://data", 2)
    points, shift_points, cluster = mean_shift(data, 2)
    save_result("sub", np.mat(cluster))
    save_result("center", shift_points)
5、结果展示
得到的聚类结果如下所示:
你们在此过程中遇到了什么问题,欢迎留言,让我看看你们都遇到了哪些问题。


