SpringBoot学习笔记【二】Druid 监控记录持久化 + 数据库密码加密
目录
一、监控记录持久化
二、数据库密码加密
上一篇中我们构建了SpringBoot种子项目,整合了Mybatis、Druid、Swagger2【链接:SpringBoot学习笔记【一】整合 Mybatis + Druid + Swagger2】,过程中我们发现以下两个问题:
1. application.yml配置文件中的数据库用户密码是明文的,直接将密码以明文的方式写在配置文件中显然是不合适的。
2. Druid监控平台是基于内存的,重启则会丢失监控数据。
关于以上两个问题的配置,Druid的Wiki中已经给出了解决方案,下面我们带着以上两个问题进行学习。
一、监控记录持久化
Wiki链接:怎么保存Druid的监控记录
Druid监控记录持久需要配置 spring.datasource.druid.timeBetweenLogStatsMillis 属性,这个表示每隔多长时间将监控记录输出到日志文件中,当 timeBetweenLogStatsMillis > 0 时,Druid会自动进行监控记录的日志输出。
这里的日志输出默认是在com.alibaba.druid.pool.DruidDataSourceStatLoggerImpl中实现的,代码如下:
public class DruidDataSourceStatLoggerImpl extends DruidDataSourceStatLoggerAdapter {

    private static Log LOG    = LogFactory.getLog(DruidDataSourceStatLoggerImpl.class);

    private Log        logger = LOG;

    public DruidDataSourceStatLoggerImpl(){
        this.configFromProperties(System.getProperties());
    }

    /**
     * @since 0.2.21
     */
    @Override
    public void configFromProperties(Properties properties) {
        String property = properties.getProperty("druid.stat.loggerName");
        if (property != null && property.length() > 0) {
            setLoggerName(property);
        }
    }

    public Log getLogger() {
        return logger;
    }

    @Override
    public void setLoggerName(String loggerName) {
        logger = LogFactory.getLog(loggerName);
    }

    @Override
    public void setLogger(Log logger) {
        if (logger == null) {
            throw new IllegalArgumentException("logger can not be null");
        }
        this.logger = logger;
    }

    public boolean isLogEnable() {
        return logger.isInfoEnabled();
    }

    public void log(String value) {
        logger.info(value);
    }

    @Override
    public void log(DruidDataSourceStatValue statValue) {
        if (!isLogEnable()) {
            return;
        }
        Map map = new LinkedHashMap();

        map.put("url", statValue.url);
        map.put("dbType", statValue.getDbType());
        map.put("name", statValue.getName());
        map.put("activeCount", statValue.getActiveCount());

        if (statValue.getActivePeak() > 0) {
            map.put("activePeak", statValue.getActivePeak());
            map.put("activePeakTime", statValue.getActivePeakTime());
        }
        map.put("poolingCount", statValue.getPoolingCount());
        if (statValue.getPoolingPeak() > 0) {
            map.put("poolingPeak", statValue.getPoolingPeak());
            map.put("poolingPeakTime", statValue.getPoolingPeakTime());
        }
        map.put("connectCount", statValue.getConnectCount());
        map.put("closeCount", statValue.getCloseCount());

        if (statValue.getWaitThreadCount() > 0) {
            map.put("waitThreadCount", statValue.getWaitThreadCount());
        }

        if (statValue.getNotEmptyWaitCount() > 0) {
            map.put("notEmptyWaitCount", statValue.getNotEmptyWaitCount());
        }

        if (statValue.getNotEmptyWaitMillis() > 0) {
            map.put("notEmptyWaitMillis", statValue.getNotEmptyWaitMillis());
        }

        if (statValue.getLogicConnectErrorCount() > 0) {
            map.put("logicConnectErrorCount", statValue.getLogicConnectErrorCount());
        }

        if (statValue.getPhysicalConnectCount() > 0) {
            map.put("physicalConnectCount", statValue.getPhysicalConnectCount());
        }

        if (statValue.getPhysicalCloseCount() > 0) {
            map.put("physicalCloseCount", statValue.getPhysicalCloseCount());
        }

        if (statValue.getPhysicalConnectErrorCount() > 0) {
            map.put("physicalConnectErrorCount", statValue.getPhysicalConnectErrorCount());
        }

        if (statValue.getExecuteCount() > 0) {
            map.put("executeCount", statValue.getExecuteCount());
        }

        if (statValue.getErrorCount() > 0) {
            map.put("errorCount", statValue.getErrorCount());
        }

        if (statValue.getCommitCount() > 0) {
            map.put("commitCount", statValue.getCommitCount());
        }

        if (statValue.getRollbackCount() > 0) {
            map.put("rollbackCount", statValue.getRollbackCount());
        }

        if (statValue.getPstmtCacheHitCount() > 0) {
            map.put("pstmtCacheHitCount", statValue.getPstmtCacheHitCount());
        }

        if (statValue.getPstmtCacheMissCount() > 0) {
            map.put("pstmtCacheMissCount", statValue.getPstmtCacheMissCount());
        }

        if (statValue.getStartTransactionCount() > 0) {
            map.put("startTransactionCount", statValue.getStartTransactionCount());
            map.put("transactionHistogram", rtrim(statValue.getTransactionHistogram()));
        }

        if (statValue.getConnectCount() > 0) {
            map.put("connectionHoldTimeHistogram", rtrim(statValue.getConnectionHoldTimeHistogram()));
        }

        if (statValue.getClobOpenCount() > 0) {
            map.put("clobOpenCount", statValue.getClobOpenCount());
        }

        if (statValue.getBlobOpenCount() > 0) {
            map.put("blobOpenCount", statValue.getBlobOpenCount());
        }

        if (statValue.getSqlSkipCount() > 0) {
            map.put("sqlSkipCount", statValue.getSqlSkipCount());
        }

        ArrayList> sqlList = new ArrayList>();
        if (statValue.sqlList.size() > 0) {
            for (JdbcSqlStatValue sqlStat : statValue.getSqlList()) {
                Map sqlStatMap = new LinkedHashMap();
                sqlStatMap.put("sql", sqlStat.getSql());

                if (sqlStat.getExecuteCount() > 0) {
                    sqlStatMap.put("executeCount", sqlStat.getExecuteCount());
                    sqlStatMap.put("executeMillisMax", sqlStat.getExecuteMillisMax());
                    sqlStatMap.put("executeMillisTotal", sqlStat.getExecuteMillisTotal());

                    sqlStatMap.put("executeHistogram", rtrim(sqlStat.getExecuteHistogram()));
                    sqlStatMap.put("executeAndResultHoldHistogram", rtrim(sqlStat.getExecuteAndResultHoldHistogram()));
                }

                long executeErrorCount = sqlStat.getExecuteErrorCount();
                if (executeErrorCount > 0) {
                    sqlStatMap.put("executeErrorCount", executeErrorCount);
                }

                int runningCount = sqlStat.getRunningCount();
                if (runningCount > 0) {
                    sqlStatMap.put("runningCount", runningCount);
                }

                int concurrentMax = sqlStat.getConcurrentMax();
                if (concurrentMax > 0) {
                    sqlStatMap.put("concurrentMax", concurrentMax);
                }

                if (sqlStat.getFetchRowCount() > 0) {
                    sqlStatMap.put("fetchRowCount", sqlStat.getFetchRowCount());
                    sqlStatMap.put("fetchRowCount", sqlStat.getFetchRowCountMax());
                    sqlStatMap.put("fetchRowHistogram", rtrim(sqlStat.getFetchRowHistogram()));
                }

                if (sqlStat.getUpdateCount() > 0) {
                    sqlStatMap.put("updateCount", sqlStat.getUpdateCount());
                    sqlStatMap.put("updateCountMax", sqlStat.getUpdateCountMax());
                    sqlStatMap.put("updateHistogram", rtrim(sqlStat.getUpdateHistogram()));
                }

                if (sqlStat.getInTransactionCount() > 0) {
                    sqlStatMap.put("inTransactionCount", sqlStat.getInTransactionCount());
                }

                if (sqlStat.getClobOpenCount() > 0) {
                    sqlStatMap.put("clobOpenCount", sqlStat.getClobOpenCount());
                }

                if (sqlStat.getBlobOpenCount() > 0) {
                    sqlStatMap.put("blobOpenCount", sqlStat.getBlobOpenCount());
                }

                sqlList.add(sqlStatMap);
            }

            map.put("sqlList", sqlList);
        }

        if (statValue.getKeepAliveCheckCount() > 0) {
            map.put("keepAliveCheckCount", statValue.getKeepAliveCheckCount());
        }

        String text = JSONUtils.toJSONString(map);

        log(text);
    }

}
可以看到Druid是以Json形式进行日志输出的,具体的数据处理在log(DruidDataSourceStatValue)方法中进行,这个方法也是后续我们需要用到的。
Druid默认的持久化方式是进行文件记录,如果我们想要自定义监控记录的持久化方式则需要自定义StatLogger,参考以上StatLogger的默认实现,我们可以定义一个简单的StatLogger,如下所示:
public class StatLogger extends DruidDataSourceStatLoggerAdapter implements DruidDataSourceStatLogger {
    private Logger logger = LoggerFactory.getLogger(StatLogger.class);

    @Override
    public void log(DruidDataSourceStatValue statValue) {
        logger.info("***************************************************");
        logger.info("                  监控数据持久化                    ");
        logger.info("***************************************************");
    }
}
在这里,我们重写了log(DruidDataSourceStatValue)方法,一个简单的StatLogger就定制完成了,下面我需要在dataSource中配置这个statLogger,我们在配置文件中druid节点下加上如下配置:
time-between-log-stats-millis: 60000
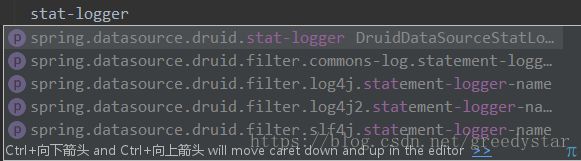
stat-logger:配置过程中发现 stat-logger 对应的是一个DruidDataSourceStatLoggerAdapter对象,而yml配置文件中仅支持基本数据类型和Map、List等类型,查看源码可以发现,在DruidAbstractDataSource类中有如下定义:
protected long timeBetweenLogStatsMillis;
protected DruidDataSourceStatLogger statLogger  = new DruidDataSourceStatLoggerImpl();

public void setStatLoggerClassName(String className) {
    Class clazz;
    try {
        clazz = Class.forName(className);
        DruidDataSourceStatLogger statLogger = (DruidDataSourceStatLogger) clazz.newInstance();
        this.setStatLogger(statLogger);
    } catch (Exception e) {
        throw new IllegalArgumentException(className, e);
    }
}

public void setStatLogger(DruidDataSourceStatLogger statLogger) {
    this.statLogger = statLogger;
}
支持直接设置statLogger对象和通过类名设置两种方式,回到配置文件中发现没有类名的这个配置项,这就比较尴尬了,如下:
既然通过配置文件不能够直接配置,那么我们就以配置类的方式来配置Druid数据源,新建一个Druid的配置类,如下所示:
@Configuration
public class DruidConfig {
    @Bean
    @ConfigurationProperties(prefix = "spring.datasource.druid")
    public DataSource druidDataSource() {
        DruidDataSource dataSource = new DruidDataSource();
        dataSource.setStatLogger(new StatLogger());
        return dataSource;
    }
}
这里用到了@Configuration和@Bean注解,@Configuration就相当于我们写在xml文件中的
其中@ConfigurationProperties表示配置的属性,这里会将配置文件中以spring.datasource.druid为前缀的值映射到DataSource对象的同名属性上,在这个方法中,我们将DatSource的statLogger设置为我们自定义的StatLogger,下面让我们来看一看效果(将时间间隔设置为了10秒):
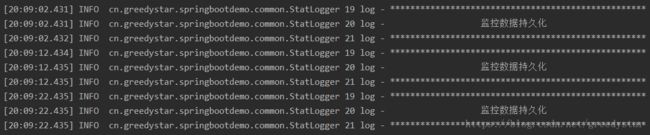
从图中可以看到,每隔10秒会执行一次StatLogger中的log方法。
这样,我们就可以参照Druid的默认实现来进行一系列的数据持久化操作了。
二、数据库密码加密
参考使用ConfigFilter 2.数据库密码加密,首先对数据库密码进行加密,得到私钥、公钥和加密后的密码,如下:
privateKey:MIIBVQIBADANBgkqhkiG9w0BAQEFAASCAT8wggE7AgEAAkEAjRDnoc5cjZnfeQ2mA7G8xtoTsFFTDSlkws9kDQ974n/pHsKr3sFQIPKCTMvt69R9CY+ms2HooppIpdXR0FWCFwIDAQABAkA0la6i5Hgf2NIzH+FY0zKZtcVNHqOk7l8/N2wGalU18wa1AGwJnPYnsHeTqqxv5AwA9ifqr/72xjmZjQXE9tRRAiEAxorHSILMWJzMwIEjOPA4RE+LfbPYotsfVAszPNR+3K0CIQC14/H89XZtBR2R9+X8kaRwK6Xh8TkSEXLyF2labXyOUwIgB+2YwZt/f3ZbcsB1YJuvE4M9pbpdxzsKyDdeR2qQ2k0CIQCuSePA7jwyLuqsygvYvn4A9fIX1JtJEus/yusquSrW/QIhAID7hqZmohMq/W75Ujkrf/YcQnGDq8e9iVpVFhiinll+
publicKey:MFwwDQYJKoZIhvcNAQEBBQADSwAwSAJBAI0Q56HOXI2Z33kNpgOxvMbaE7BRUw0pZMLPZA0Pe+J/6R7Cq97BUCDygkzL7evUfQmPprNh6KKaSKXV0dBVghcCAwEAAQ==
password:CaYks2C7nfXL0rYtFag29XiCaG//f4A/wPjoMvYQDEeZJo/Vr3ZpFHMdeg75CeFQ5dvplmbSU0rGNn4wNGhJtw==
然后修改配置文件(原配置文件请参考:SpringBoot学习笔记【一】),来支持数据库密码的加密,如下所示:
password: CaYks2C7nfXL0rYtFag29XiCaG//f4A/wPjoMvYQDEeZJo/Vr3ZpFHMdeg75CeFQ5dvplmbSU0rGNn4wNGhJtw==
filters: stat,wall,log4j2,config
connection-properties: config.decrypt=true;config.decrypt.key=MFwwDQYJKoZIhvcNAQEBBQADSwAwSAJBAI0Q56HOXI2Z33kNpgOxvMbaE7BRUw0pZMLPZA0Pe+J/6R7Cq97BUCDygkzL7evUfQmPprNh6KKaSKXV0dBVghcCAwEAAQ==
其中password为加密后的数据库密码,config.decrypt.key为公钥。
这里需要注意,一定要在filters中加上config的配置,用于通过别名启动插件,如下:
filters: stat,wall,log4j2,config这里表示启动了监控统计、SQL防火墙、日志记录和Config。
Druid的Wiki中指出:有两种配置Filter的方式,一种是配置filters属性,一种是配置proxyFilters属性,这两种配置是组合关系,不是替代关系。
但实际配置过程中发现,如果只配置proxyFilters,如下启动configFilter:
spring.datasource.druid.filter.config.enabled=true实际是无法启动configFilter的,需要在filters中通过Filter别名指定使用的插件。
经过以上配置,我们就已经完成了数据库密码加密的配置了,但我们发现,这样实际上是将密文和公钥都写在了配置文件中,这样的配置是否可用呢?
带着问题回到获得密文这一步,我们使用了druid-x.x.x.jar中的ConfigTools工具进行加密,同样的,我们也可以使用这个工具进行解密,如下所示:
String password = ConfigTools.decrypt("public key","cipher");这样一来,直接将公钥和密文写在配置文件中与明文就没有什么区别了,所以我们可以将公钥放在配置类中,如下:
@Configuration
public class DruidConfig {
    @Bean
    @ConfigurationProperties(prefix = "spring.datasource.druid")
    public DataSource druidDataSource() {
        DruidDataSource dataSource = new DruidDataSource();
        dataSource.setStatLogger(new StatLogger());
        Properties properties = new Properties();
        properties.setProperty("config.decrypt", "true");
        properties.setProperty("config.decrypt.key", "MFwwDQYJKoZIhvcNAQEBBQADSwAwSAJBAI0Q56HOXI2Z33kNpgOxvMbaE7BRUw0pZMLPZA0Pe+J/6R7Cq97BUCDygkzL7evUfQmPprNh6KKaSKXV0dBVghcCAwEAAQ==");
        dataSource.setConnectProperties(properties);
        return dataSource;
    }
}
经过以上的配置,我们就完成了数据库密码加密的配置,更具体的配置可以参照Druid的Wiki进行学习。
源码地址:https://github.com/GreedyStar/SpringBootDemo/tree/sample-2
最后,安利一下自己写的一个Java代码生成工具,能够方便的生成Spring、SpringMVC、Mybatis架构下的Java代码,希望能对大家有所帮助,地址:Java代码生成器:Generator