SpringCloud 入门笔记(七)Config配置中心
目录
1 概述
2 构建Config Server
2.1 创建Github配置仓库
2.2 创建config-server项目
2.3 测试访问配置数据
3 构建Config Client
3.1 添加依赖
3.2 配置bootstrap.yml
3.3 修改application.yml
3.4 创建配置类
3.5 测试配置数据拉取
4 动态配置更新
4.1 配置Actuator
4.2 添加@RefreshScope注解
4.3 测试配置更新
1 概述
在微服务架构中,一个系统划分为多个服务,每个服务有各自的配置,Spring Cloud Config提供了集中管理服务配置的功能,并且可以在服务运行时动态调整配置,不需要重启服务。
Spring Cloud Config包括Config Server和Config Client两部分。
Config Server是一个可横向扩展、集中式的配置服务器,默认使用Git存储配置内容,本篇中也将使用Git存储各服务的配置。
Config Client即为各个微服务。在服务启动时,会向Config Server请求所需的配置属性,并缓存在本地使用。
2 构建Config Server
2.1 创建Github配置仓库
在github创建一个配置仓库 yogurt-config,分别创建user-ms-dev.yml和role-ms-dev.yml,内容分别如下:
user-ms-dev.yml:
  datasource:
    driver-class-name: com.mysql.jdbc.Driver
    url: jdbc:mysql://localhost:3306/yogurt-user?useUnicode=true&characterEncoding=utf8
    username: root
    password:
role-ms-dev.yml
  datasource:
    driver-class-name: com.mysql.jdbc.Driver
    url: jdbc:mysql://localhost:3306/yogurt-role?useUnicode=true&characterEncoding=utf8
    username: root
    password:
可以看到在两个配置文件中分别配置了不同的数据源,当然也可以添加一些其他的配置,这里只是作为一个例子。
2.2 创建config-server项目
config-server作为配置中心,本身也是一个服务,因此也可以注册到服务注册中心中。在创建config-server项目时,勾选Eureka Discovery和Config Server两个依赖,创建成功的项目中将包括如下依赖:
        org.springframework.cloud
        spring-cloud-config-server


        org.springframework.cloud
        spring-cloud-starter-netflix-eureka-client


        org.springframework.boot
        spring-boot-starter-test
        test
编写配置文件,添加git仓库的地址和服务注册配置,如下:
server:
  port: 8010
spring:
  application:
    name: config-server
  cloud:
      config:
        server:
          git:
            uri: [email protected]:GreedyStar/yogurt-config.git
        label: master
eureka:
  client:
    service-url:
      defaultZone: http://admin:[email protected]:8000/eureka/
如果是私有项目的话,还需要在git节点下配置username和password。
修改config-server启动类,添加@EnableConfigServer和@EnableEurekaClient注解,如下:
@SpringBootApplication
@EnableConfigServer
@EnableEurekaClient
public class ConfigServerApplication {
    public static void main(String[] args) {
        SpringApplication.run(ConfigServerApplication.class, args);
    }
}
这样,config-server配置中心就构建完成了。
2.3 测试访问配置数据
我们可以在config-server通过http请求访问git仓库的配置数据,访问规则如下:
- /{name}/{profile}[/{label}]
- /{name}-{profile}.yml
- /{label}/{name}-{profile}.yml
- /{name}-{profile}.properties
- /{label}/{name}-{profile}.properties
name:表示服务名称,如user-ms、role-ms
profile:表示config-client配置的profile,如dev、test、prod等
label:表示git仓库的分支
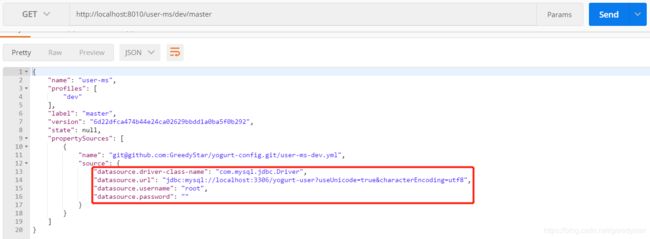
例如我们可以通过访问 http://localhost:8010/user-ms/dev/master 来获取github仓库中user-ms-dev.yml的配置内容,如下:
3 构建Config Client
3.1 添加依赖
以user-ms为例,配置Config Client。
首先,为user-ms工程添加如下依赖:
    org.springframework.cloud
    spring-cloud-starter-config
3.2 配置bootstrap.yml
bootstrap.yml用于配置config数据的拉取,在resources目录下新建bootstrap.yml,之所以使用bootstrap.yml而不是application.yml,是因为我们的配置数据大多是用来配置IOC容器的,而bootstrap.yml会在IOC容器启动前加载,以此可以实现配置数据的远端加载,bootstrap.yml内容如下:
spring:
  application:
    name: user-ms
  cloud:
    config:
      profile: dev
      label: master
#      uri: http://localhost:8010/   # 在不将config-server注册到eureka-server时需要用到
      discovery:
        enabled: true
        service-id: config-server
eureka:
  client:
    service-url:
      defaultZone: http://admin:[email protected]:8000/eureka/
这里有一点需要注意,前面的内容中,我们将config-server注册到了eureka-server,因此我们可以从eureka-server来发现config-server服务,然后拉取配置数据。如果没有将config-server注册到eureka-server,则可以直接在uri节点指定config-server的地址。
3.3 修改application.yml
在前面的章节中,我们在application.yml中为user-ms添加了Druid数据源的相关配置,现在这些配置已经放在了Github仓库中,我们需要修改user-ms的配置文件,修改后的application.yml内容如下:
server:
  port: 8800
mybatis:
  mapper-locations: classpath:mappers/*Mapper.xml
feign:
  hystrix:
    enabled: true
可以看到,在application.yml中已经移除了Druid数据源的相关配置。
3.4 创建配置类
首先,创建一个DruidProperty类,用于接收从config-server拉取的配置数据,如下所示:
@Component
public class DruidProperty {
    @Value("${datasource.driver-class-name}")
    private String driverClassName;
    @Value("${datasource.url}")
    private String url;
    @Value("${datasource.username}")
    private String username;
    @Value("${datasource.password}")
    private String password;

    public String getDriverClassName() {
        return driverClassName;
    }

    public String getUrl() {
        return url;
    }

    public String getUsername() {
        return username;
    }

    public String getPassword() {
        return password;
    }
}
@Value注解中的Key对应Github配置仓库中配置文件中的key。
然后,创建DruidDataSource的配置类,并引用上面的DruidProperty类,如下:
@Configuration
public class DruidConfig {
    @Autowired
    private DruidProperty druidProperty;

    @Bean
    public DataSource druidDataSource() {
        DruidDataSource dataSource = new DruidDataSource();
        dataSource.setDriverClassName(druidProperty.getDriverClassName());
        dataSource.setUrl(druidProperty.getUrl());
        dataSource.setUsername(druidProperty.getUsername());
        dataSource.setPassword(druidProperty.getPassword());
        return dataSource;
    }

}
这样,我们就实现了从config-server拉取Druid数据源的配置,并应用于user-ms服务中。
3.5 测试配置数据拉取
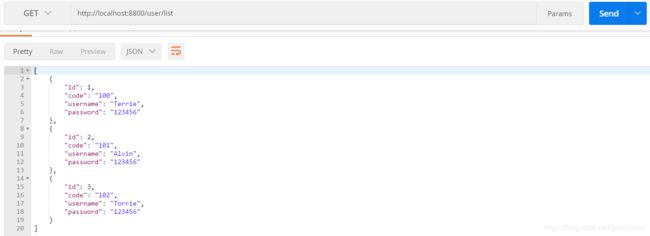
按顺序启动 eureka-server、config-server、user-ms,可以看到user-ms在启动时会向config-server拉取配置信息,并且可以正常访问yogurt-user数据库,如下:
4 动态配置更新
在一些情况下,我们可能需要对线上的服务进行配置修改,但我们在Git仓库修改配置信息后,config-server可以读取到新的配置,而config-client(各微服务)由于在本地缓存了配置而无法动态更新配置信息,我们可以借助Actuator实现在不重启服务的情况下更新服务的配置,下面对user-ms进行一些改造,让它支持动态配置更新。
4.1 配置Actuator
Actuator可以帮助我们监控和管理Spring Boot应用,并通过一些HTTP端点来进行健康检查、统计等操作。
为user-ms添加如下依赖:
    org.springframework.boot
    spring-boot-starter-actuator
修改application.yml,添加如下配置:
management:
  endpoints:
    web:
      exposure:
        include: refresh,health
上面的配置表示向外部暴露/actuator/refresh和/actuator/health接口,我们可以通过/actuator/refresh来通知client更新配置。
4.2 添加@RefreshScope注解
@RefreshScope注解是实现动态配置更新的重要注解。
当我们调用/actuator/refresh时,springboot会用新配置创建一个新的IOC容器,然后与原IOC容器的配置进行比较,找出那些修改了的配置,然后使用新配置重新创建由@RefreshScope注解的Bean。
修改DruidProperty类和DruidDataSource类,如下:
@RefreshScope
@Component
public class DruidProperty {
    @Value("${datasource.driver-class-name}")
    private String driverClassName;
    @Value("${datasource.url}")
    private String url;
    @Value("${datasource.username}")
    private String username;
    @Value("${datasource.password}")
    private String password;

    // 省略部分代码
}
@Configuration
public class DruidConfig {
@Autowired
private DruidProperty druidProperty;
@RefreshScope
@Bean
public DataSource druidDataSource() {
DruidDataSource dataSource = new DruidDataSource();
dataSource.setDriverClassName(druidProperty.getDriverClassName());
dataSource.setUrl(druidProperty.getUrl());
dataSource.setUsername(druidProperty.getUsername());
dataSource.setPassword(druidProperty.getPassword());
return dataSource;
}
}这里有一点需要注意,@RefreshScope注解不应与@Configuration注解同时使用,官方给出的说明是同时使用会出现意想不到的情况,@RefreshScope应当标注在那些需要重新创建的Bean上。
OK,到这里,动态配置更新就完成了,下面简单测试一下。
4.3 测试配置更新
首先,我们请求config-server看一下user-ms目前的配置:
然后,请求user-ms看一下数据库yogurt-user中的数据:
再然后,我们将Github中user-ms-dev.yml文件的数据库名由yogurt-user修改为yogurt-user-backup,如下:
  datasource:
    driver-class-name: com.mysql.jdbc.Driver
    url: jdbc:mysql://localhost:3306/yogurt-user-backup?useUnicode=true&characterEncoding=utf8
    username: root
    password:
yogurt-user中有三条数据,yogurt-user-backup数据库中只有一条数据。
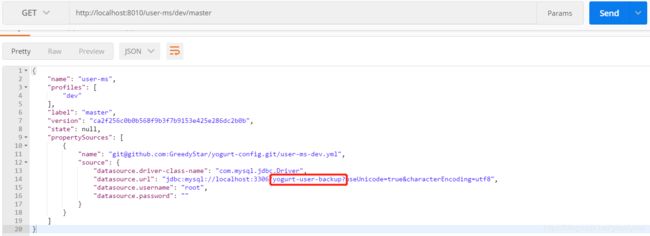
请求请求config-server看一下修改后的配置,可以看到配置信息已经修改了:
再请求user-ms可以看到user-ms依然是yogurt-user数据库中的数据:
访问user-ms的/actuator/refresh接口,通知user-ms刷新配置,从返回结果中可以看到,修改的数据是datasouce.url:
再次访问user-ms,可以看到只有一条数据了,即数据库切换至了yogurt-user-backup:
源码地址:https://github.com/GreedyStar/yogurt


