springboot中@ConfigurationProperties注解的工作原理
@ConfigurationProperties是springboot新加入的注解,主要用于配置文件中的指定键值对映射到一个java实体类上。那么它是怎么发挥作用的呢?下面我们将揭开@ConfigurationProperties的魔法。
版本:springboot-2.0.6.RELEASE
1 概述
ConfigurationPropertiesBindingPostProcessor这个bean后置处理器,就是来处理bean属性的绑定的,这个bean后置处理器后文将称之为properties后置处理器。你需要知道以下几件事:
- ioc容器context的
enviroment.propertySources记录着系统属性、应用属性以及springboot的默认配置文件application.properties中的配置属性等。properties后置处理器就是从其中找到匹配的配置项绑定到bean的属性上去的。 - 属性绑定是有覆盖性的,操作系统环境变量可以覆盖配置文件application.properties, java系统属性可以覆盖操作系统环境变量。更多的可以参考官网 https://docs.spring.io/spring-boot/docs/2.1.1.RELEASE/reference/htmlsingle/#boot-features-external-config
2 解析流程
2.1 属性资源有序性
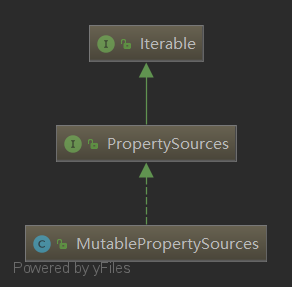
上面提到过属性资源具有优先级,优先级高的会覆盖优先级低的。这里主要涉及到MutablePropertySources 这个类,这个类的层级关系如下

从类名上可以看出,这是一个可迭代查询的多变的属性资源容器,就像一个动态可扩容的容器list一样。正如javadoc所描述的那样,这个类提供了addFirst,addLast等方法,为PropertyResolver进行有序的搜索属性资源提供了帮助。该类有一个非常重要的成员变量propertySourceList,如下
public class MutablePropertySources implements PropertySources {
	...
	private final List<PropertySource<?>> propertySourceList = new CopyOnWriteArrayList<>();
	...
}
在springboot的启动过程中,这个propertySourceList会按照规则增加元素,优先级越高的属性资源在list容器中的索引值越小,位置越靠前。最终的一个可能结果如下:

systemProperties > systemEnvironment > random > applicationConfig
springboot解析属性资源绑定到bean上,就是按照这个优先级顺序的。
2.2 解析基本类型属性
如文末参考文章描述的那样,如果现在有一个类People,只有一个基本属性name,那么配置文件中的值是如何绑定的。
public class People {
    private String name;
    //getter, setter方法略
}
最终会调用到Binder类的findProperty方法,如下
private ConfigurationProperty findProperty(ConfigurationPropertyName name,
		Context context) {
	if (name.isEmpty()) {
		return null;
	}
	//遍历属性资源文件,按照上文提到的属性资源顺序,直到根据name参数找到第一个不为空的属性
	//才返回。
	return context.streamSources()
			.map((source) -> source.getConfigurationProperty(name))
			.filter(Objects::nonNull).findFirst().orElse(null);
}
context.streamSource()返回一个流式对象Stream, ConfigurationPropertySource是属性资源的描述接口,提供了通过属性名称获取特定属性的接口方法。
我们接着看context.stream方法做了什么?
public Stream<ConfigurationPropertySource> streamSources() {
	if (this.sourcePushCount > 0) {
		return this.source.stream();
	}
	return StreamSupport.stream(Binder.this.sources.spliterator(), false);
}
springboot启动时,Binder.this.sources实际上就是SpringConfigurationPropertySources类。这个类有一个成员变量sources,存储着springboot启动过程中采集到的属性资源,就是2.1节讲到的MutablePropertySources。
/** 子类 MutablePropertySources**/
private final Iterable<PropertySource<?>> sources
lamda表达式真正流式遍历执行的时候,会调用到SpringConfigurationPropertySources$SourcesIterator的重写hasNext方法,而hasNext方法最终会调用到SpringConfigurationPropertySources这个类的adapt方法,这是一个适配器方法,它将PropertySource属性资源转化为ConfigurationPropertySource。
这样才能继续执行流式lamda表达式中的map方法,map((source) -> source.getConfigurationProperty(name))
我们先看一下这个接口的一些主要实现类:

这里着重关注一下SpringIterableConfigurationPropertySource类,看一下它的getConfigurationProperty(name)方法
@Override
public ConfigurationProperty getConfigurationProperty(
		ConfigurationPropertyName name) {
		// 调用父亲的方法
	ConfigurationProperty configurationProperty = super.getConfigurationProperty(
			name);
	if (configurationProperty == null) {
	    // 方法是在父类实现的
		configurationProperty = find(getPropertyMappings(getCache()), name);
	}
	return configurationProperty;
}
由lamda表达式的findFirst()可知,如果第一次在systemProperties属性资源中找不到name对应的属性,会再次遍历,还会进入hasNext方法,debug的时候发现最终的属性资源列表的存储模型是CopyOnWriteArrayList$COWIterator,它内部有一个指针cursor,记录着处理过的资源的位置,所以再次遍历时,不会从之前遍历过的属性资源中再去找name对应的属性。
个人感觉SpringConfigurationPropertySources这个类内容很丰富,对属性资源的优先级处理就在这个类的内部私有静态类SourcesIterator上,这里也依托了2.1章节提到的MutablePropertySources.propertySourceList保存的属性资源的有序性。
2.3 解析List
如果People类有一个List 属性,那么如何绑定呢?我们从调用栈上的bindObject方法讲起。如下:
// 此时name->"people.address",  target->"java.util.List"
private <T> Object bindObject(ConfigurationPropertyName name, Bindable<T> target,
		BindHandler handler, Context context, boolean allowRecursiveBinding) {
	ConfigurationProperty property = findProperty(name, context);
	if (property == null && containsNoDescendantOf(context.streamSources(), name)) {
		return null;
	}
	//会进入这里,获取聚合Binder
	AggregateBinder<?> aggregateBinder = getAggregateBinder(target, context);
	if (aggregateBinder != null) {
		// 执行绑定
		return bindAggregate(name, target, handler, context, aggregateBinder);
	}
	if (property != null) {
		try {
			return bindProperty(target, context, property);
		}
		catch (ConverterNotFoundException ex) {
			// We might still be able to bind it as a bean
			Object bean = bindBean(name, target, handler, context,
					allowRecursiveBinding);
			if (bean != null) {
				return bean;
			}
			throw ex;
		}
	}
	return bindBean(name, target, handler, context, allowRecursiveBinding);
}
如代码注释描述的那样,会进入getAggregateBinder方法获取聚合Binder,专门处理集合的一个Binder。在本例中将会返回一个CollectionBinder实现类,如下所示:
private AggregateBinder<?> getAggregateBinder(Bindable<?> target, Context context) {
	Class<?> resolvedType = target.getType().resolve(Object.class);
	if (Map.class.isAssignableFrom(resolvedType)) {
		return new MapBinder(context);
	}
	//在本例中,将返回一个CollectionBinder
	if (Collection.class.isAssignableFrom(resolvedType)) {
		return new CollectionBinder(context);
	}
	if (target.getType().isArray()) {
		return new ArrayBinder(context);
	}
	return null;
}
获取CollectionBinder后,将会执行bindAggregate方法,如下:
// 该方法直接返回绑定的list值,本例中直接返回address指代的java.util.list实例
private <T> Object bindAggregate(ConfigurationPropertyName name, Bindable<T> target,
		BindHandler handler, Context context, AggregateBinder<?> aggregateBinder) {
	AggregateElementBinder elementBinder = (itemName, itemTarget, source) -> {
		boolean allowRecursiveBinding = aggregateBinder
				.isAllowRecursiveBinding(source);
		Supplier<?> supplier = () -> bind(itemName, itemTarget, handler, context,
				allowRecursiveBinding);
		return context.withSource(source, supplier);
	};
	return context.withIncreasedDepth(
			() -> aggregateBinder.bind(name, target, elementBinder));
}
这里用了java8的lamda表达式,比较复杂,也是一个源码解读由易到难的分界点。我们直接进入到调用栈的核心部分,如下:
    // 方法1
	protected final void bindIndexed(ConfigurationPropertyName name, Bindable<?> target,
			AggregateElementBinder elementBinder, ResolvableType aggregateType,
			ResolvableType elementType, IndexedCollectionSupplier result) {
			// 遍历属性资源,直到找到匹配name的属性值
		for (ConfigurationPropertySource source : getContext().getSources()) {
			bindIndexed(source, name, target, elementBinder, result, aggregateType,
					elementType);
			if (result.wasSupplied() && result.get() != null) {
				return;
			}
		}
	}

	//方法2 被上一个方法调用,参数差别在于传递了个source
	private void bindIndexed(ConfigurationPropertySource source,
			ConfigurationPropertyName root, Bindable<?> target,
			AggregateElementBinder elementBinder, IndexedCollectionSupplier collection,
			ResolvableType aggregateType, ResolvableType elementType) {
		ConfigurationProperty property = source.getConfigurationProperty(root);
		if (property != null) {
			bindValue(target, collection.get(), aggregateType, elementType,
					property.getValue());
		}
		else {
			bindIndexed(source, root, elementBinder, collection, elementType);
		}
	}

	//方法3 被上一个方法调用,参数有所减少,root->"people.address"
	private void bindIndexed(ConfigurationPropertySource source,
			ConfigurationPropertyName root, AggregateElementBinder elementBinder,
			IndexedCollectionSupplier collection, ResolvableType elementType) {
		MultiValueMap<String, ConfigurationProperty> knownIndexedChildren = getKnownIndexedChildren(
				source, root);
		//循环过程中,people.address[0],people.address[1]等的值都会从属性资源中找到,
		//并填充到collection中
		for (int i = 0; i < Integer.MAX_VALUE; i++) {
			ConfigurationPropertyName name = root
					.append((i != 0) ? "[" + i + "]" : INDEX_ZERO);
			Object value = elementBinder.bind(name, Bindable.of(elementType), source);
			if (value == null) {
				break;
			}
			knownIndexedChildren.remove(name.getLastElement(Form.UNIFORM));
			collection.get().add(value);
		}
		assertNoUnboundChildren(knownIndexedChildren);
	}
细心的你,可能已经发现上面代码区中的方法3了,list的各个元素都是在一个属性资源中获取的。也就是说如下的一个list属性配置一定要放在一个属性资源中。
people.address[0]=beijing
people.address[1]=shanghai
people.address[2]=guangzhou
如果上面的属性键值对,你是放在application.properties中,ok,你是可以得到address有三个城市的people。但是如果你把people.address[0]=beijing放到systemProperty属性资源中或者操作系统环境变量中,不好意思,你一定只能得到address只有1个城市的people。因为这两种属性资源优先级高,springboot在这种属性资源中找到了address的一个城市,就认为address只有一个城市,结束了查找,直接包装成list数据类型返回了。
这算不算一个bug,每个人的理解方式也不一样。有的人认为address本身就是一个list,那它的配置肯定放在一个统一的属性资源中,有的人认为,我可能会在程序启动过程中出于某种特殊的目的去覆盖people.address[0]。仁者见仁,智者见智。
2.4 解析对象
继续补充,如果People有一个Phone类型的成员变量,Phone类只有一个number(String类型),该如何绑定呢?
如果你比较敏感的话,可能感觉到这里面应该有一个递归思想了。我们解析people的时候,发现其内部有一个phone,如果phone内部再有一个card呢?以此类推,就是一个逐步深入解析,再层层退出执行绑定的过程。
核心类JavaBeanBinder是BeanBinder接口的唯一实现类,旨在为Binder提供bean绑定的内部策略。只被Binder的bindBean方法所调用。
class JavaBeanBinder implements BeanBinder {
    // 方法1
    // 绑定属性name到目标target上,执行过程中
    // "people"->People, "people.phone"->Phone都会去调用该方法
	@Override
	public <T> T bind(ConfigurationPropertyName name, Bindable<T> target, Context context,
			BeanPropertyBinder propertyBinder) {
		boolean hasKnownBindableProperties = context.streamSources().anyMatch((
				s) -> s.containsDescendantOf(name) == ConfigurationPropertyState.PRESENT);
		Bean<T> bean = Bean.get(target, hasKnownBindableProperties);
		if (bean == null) {
			return null;
		}
		BeanSupplier<T> beanSupplier = bean.getSupplier(target);
		boolean bound = bind(propertyBinder, bean, beanSupplier);
		return (bound ? beanSupplier.get() : null);
	}

    // 方法2 逐个绑定bean的属性
    // eg: "People"->"People.name" + "People.address"
    // + "People.phone" + "People.age"
	private <T> boolean bind(BeanPropertyBinder propertyBinder, Bean<T> bean,
			BeanSupplier<T> beanSupplier) {
		boolean bound = false;
		for (Map.Entry<String, BeanProperty> entry : bean.getProperties().entrySet()) {
			bound |= bind(beanSupplier, propertyBinder, entry.getValue());
		}
		return bound;
	}
    // 方法3 针对每个属性property进行绑定
	private <T> boolean bind(BeanSupplier<T> beanSupplier,
			BeanPropertyBinder propertyBinder, BeanProperty property) {
		String propertyName = property.getName();
		ResolvableType type = property.getType();
		Supplier<Object> value = property.getValue(beanSupplier);
		Annotation[] annotations = property.getAnnotations();
		Object bound = propertyBinder.bindProperty(propertyName,
				Bindable.of(type).withSuppliedValue(value).withAnnotations(annotations));
		if (bound == null) {
			return false;
		}
		if (property.isSettable()) {
			property.setValue(beanSupplier, bound);
		}
		else if (value == null || !bound.equals(value.get())) {
			throw new IllegalStateException(
					"No setter found for property: " + property.getName());
		}
		return true;
	}
上面的三个方法,层层调用,方法内部的代码执行时,与Binder类中的匿名类(lamda表示)紧密相关,细节不再深入讲解。
3 调用链展示
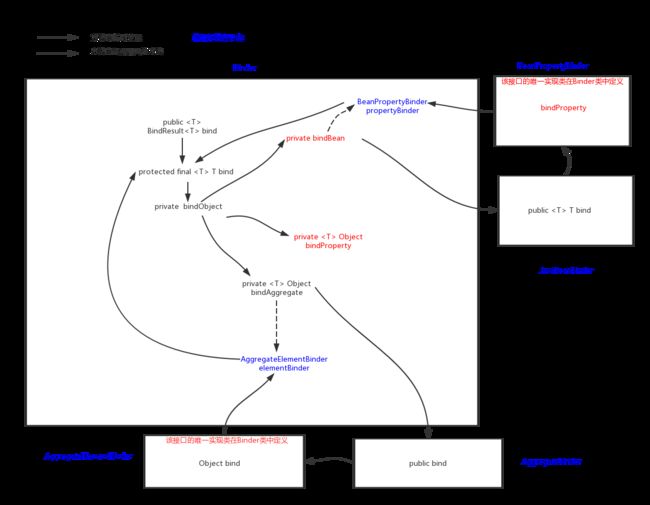
调用链的核心部分如果用一张图来表示,那么大概就是这样的。

对于上图,关注点有以下三个:
bindBean方法用于绑定bean,一个Bean(本例中是People),可能有多个属性,如int age; List。都会进入address; String name; People people JavaBeanBinder类,在该类中将会逐一解析属性进行绑定。- 对于集合类型的属性处理,会通过
AggregateBinder类来处理 - 每一个属性的最终处理是以
bindObject方法进入bindPropety分支为标志的。
4 总结
ConfigurationPropertiesBindingPostProcessorbean后置处理器是处理属性绑定bean的入口类。MutablePropertySources中的属性资源有序性是保障属性绑定优先级的基础。Binder是绑定bean与属性键值对之间的纽带,里面涉及到递归思想,java8 lamda 匿名类, 集合迭代器流式处理等。绑定思想比较简单,但实现比较复杂,值得深入解读。
参考文章
- spring boot 源码解析13-@ConfigurationProperties是如何生效的 https://blog.csdn.net/qq_26000415/article/details/78942494