QT 练习_TCP/IP通信窗口
本章节讨论TCP通信相关内容
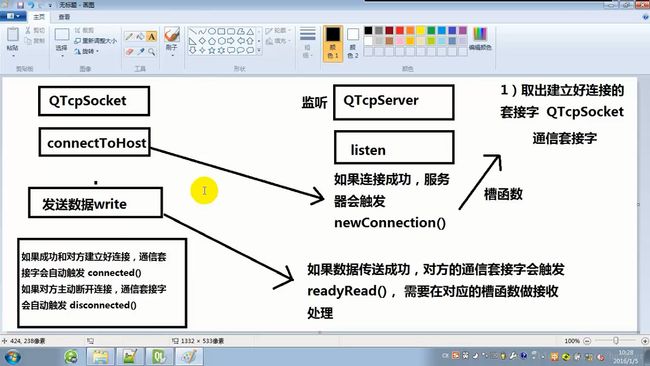
1:流程说明
QT网络通信与linux下异曲同工之妙。是基于linux通信使用的封装后的程序
2:程序代码部分
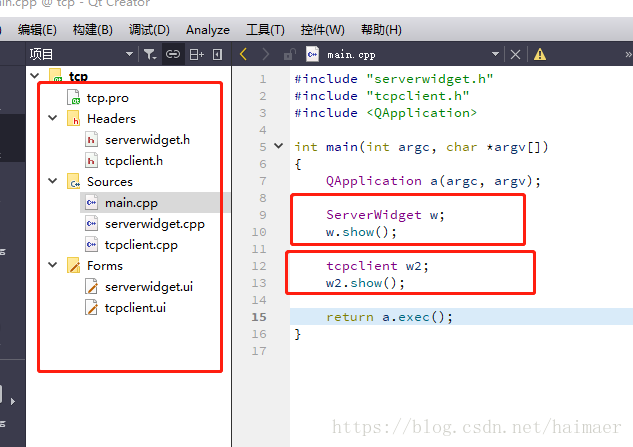
本次项目工程中包含2个窗口,分别为server服务器窗口,client客户端窗口。
故在主函数main.cpp中
要将后来添加的窗口显示出来:w2.show();

添加新窗口步骤:
step1:右击项目tcp,选择add new file.
step2:选择QT->QT设计师界面类
step3:重命名后一路next。
3:服务器端口程序说明
//------------头文件-----------------------
#ifndef SERVERWIDGET_H
#define SERVERWIDGET_H

#include
#include //监听套接字
#include //通信套接字

namespace Ui {
class ServerWidget;
}

class ServerWidget : public QWidget
{
    Q_OBJECT

public:
    explicit ServerWidget(QWidget *parent = nullptr);
    ~ServerWidget();

private slots:
    void on_buttonsend_clicked();

    void on_buttonclose_clicked();

private:
    Ui::ServerWidget *ui;

    QTcpServer *tcpServer;//监听套接字
    QTcpSocket *tcpSocket;//通信套接字  只有server会用到2个套接字


};

#endif // SERVERWIDGET_H
//--------------------主函数----------------------
#include "serverwidget.h"
#include "ui_serverwidget.h"


ServerWidget::ServerWidget(QWidget *parent) :

    QWidget(parent),

    ui(new Ui::ServerWidget)

{

    ui->setupUi(this);

    tcpServer=nullptr;//C++11中的空指针

    tcpSocket=nullptr;

//修改标题
    setWindowTitle("服务器(8888)");

    //监听套接字分配空间,指定父对象,让其自动回收空间

    tcpServer = new QTcpServer(this);

    //监听任意套接字,并定义端口8888

    tcpServer->listen(QHostAddress::Any,8888);

    connect(tcpServer,&QTcpServer::newConnection,

            [=]()

    {

        tcpSocket=tcpServer->nextPendingConnection();//取出建立好连接的套接字

        //获取对方的IP,端口

        QString ip= tcpSocket->peerAddress().toString();

        quint16 port=tcpSocket->peerPort();

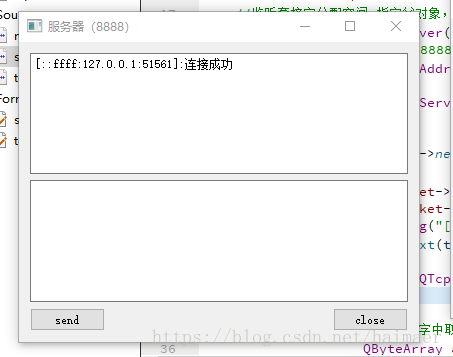
        QString temp=QString("[%1:%2]:连接成功").arg(ip).arg(port);

        ui->textread->setText(temp);
        connect(tcpSocket,&QTcpSocket::readyRead,
                [=]()

                {

                    //从套接字中取出内容

                    QByteArray arry = tcpSocket->readAll();

                    ui->textread->append(arry);

                }

                );

    }
    );

}

ServerWidget::~ServerWidget()
{
    delete ui;
}


//send按钮槽函数
void ServerWidget::on_buttonsend_clicked()
{

    if(tcpSocket==nullptr)

        return;

    //获取编辑区内容

    QString str = ui->textwrite->toPlainText();

   //给对方发送数据,套接字直接写入

    tcpSocket->write(str.toUtf8().data());


}


//close按钮槽函数
void ServerWidget::on_buttonclose_clicked()

{

    if(tcpSocket==nullptr)

        return ;

    tcpSocket->disconnectFromHost();//断开连接

    tcpSocket->close();

    tcpSocket=nullptr;

}
- 程序步骤:(对应程序设计步骤)
1:创建套接字并制定父对象。
2:监听套接字,并定义监听的地址和端口
3:等待连接信号触发,触发信号后–>获取新连接的信号套接字,及其IP和端口信号
4:通信套接字触发数据成功接收信号,读取并显示。
5:若需要发送数据,则通过对send按钮的槽函数进行处理,读取编辑窗口数据并发送。
server端需要2个套接字:监听套接字,通信套接字
监听套接字用来监听服务器的端口,是否有对象接入。
通信套接字则保存连接的通信端,通过对通信套接字的写入读取来发送和获取需要的内容。
tcpSocket=tcpServer->nextPendingConnection();//取出建立好连接的套接字
        //获取对方的IP,端口
        QString ip= tcpSocket->peerAddress().toString();
        quint16 port=tcpSocket->peerPort();
当然在获取连接成功的套接字的同时,也也需一并获取对方的IP,端口并打印出来

当接收到新的数据到来时,会触发readyRead信号,在此处使用兰姆达表达式来处理此信号,从套接字中取出数据,并显示出来。
当然此信号需要用到tcpsocket通信套接字,故需要将此信号函数放在获取通信套接字之后。
在使用套接字之前,因为定义的套接字为指针,需要事先判断该指针的值是否为NULL,当然此处使用的是C++11中空指针的形式nullptr。
- 客户端程序
//客户端头文件
#ifndef TCPCLIENT_H
#define TCPCLIENT_H

   #include
   #include
   #include
   #include

namespace Ui {
class tcpclient;
}

class tcpclient : public QWidget
{
    Q_OBJECT

public:
    explicit tcpclient(QWidget *parent = nullptr);
    ~tcpclient();

private slots:
    void on_buttonsend_clicked();

    void on_connect_clicked();

    void on_buttonclose_clicked();

private:
    Ui::tcpclient *ui;

    QTcpSocket *tcpsocket;
};

#endif // TCPCLIENT_H
//---------------------------------客户端主程序-----------------
#include "tcpclient.h"
#include "ui_tcpclient.h"

tcpclient::tcpclient(QWidget *parent) :
    QWidget(parent),
    ui(new Ui::tcpclient)
{
    ui->setupUi(this);

  setWindowTitle("客户端");

    tcpsocket=nullptr;

    //分配空间指定父对象

    tcpsocket =new QTcpSocket(this);

    connect(tcpsocket,&QTcpSocket::connected,
            [=]()
    {
       ui->textread->setText("成功和服务器建立连接");

    });

    connect(tcpsocket,&QTcpSocket::readyRead,
            [=]()
    {
       //获取对方发送的内容
        QByteArray arry=tcpsocket->readAll();
        //追加到文本框中
        ui->textread->append(arry);
    });
}


tcpclient::~tcpclient()
{
    delete ui;
}


void tcpclient::on_buttonsend_clicked()
{
  //  获取编辑框内容
    QString str=ui->textwrite->toPlainText();
    //发送
    tcpsocket->write(str.toUtf8().data());
}


void tcpclient::on_connect_clicked()
{
    QString ip= ui->ip->text();
    quint16 port=ui->port->text().toUInt();
   //主动和服务器建立连接
    tcpsocket->connectToHost(QHostAddress(ip),port);
}

void tcpclient::on_buttonclose_clicked()
{
    //主动和对方断开连接
    tcpsocket->disconnectFromHost();
    tcpsocket->close();

}
1:客户端相较于服务端,只需要一个套接字,通信套接字,通过对套接字设定端口,并连接服务器
这些步骤通过connect按钮的槽函数来实现。
2:当连接成功后,会触发connected信号,打印状态
3:读写过程和服务器端口一样。在此不重复说明,只需要自己研究程序即可。
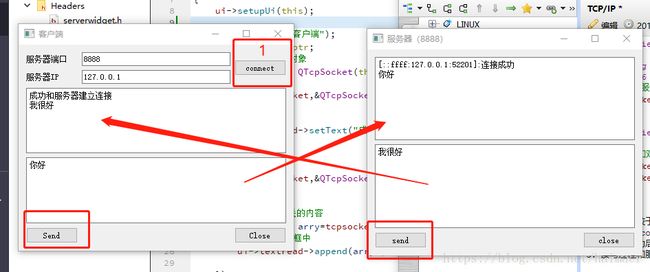
4:程序运行效果图

