Spring Cloud (四)、服务发现与服务消费
在这节以Ribbon来实现服务消费,后续还将会介绍使用Fegin的消费方式。
以服务注册中心(eureka-server)、服务提供者(HELLO-SERVICE) 为基础,接下来尝试构建一个服务消费者,它主要完成两个目标:发现服务以及消费服务。其中服务发现的任务由Eureka的客户端完成,而服务消费的任务由Ribbon完成。
Ribbon是一个基于HTTP和TCP的客户端负载均衡器,默认以轮询访问的方式达到均衡负载的作用。
下面我们通过构建一个简单的事例,看看在Eureka的服务治理体系下如何实现服务的发现与消费:
一、启动注册中心:eureka-server
二、改造HELLO-SERVICE:
2.1、在HELLO-SERVICE服务提供者的pom.xml中添加Ribbon的依赖:
   org.springframework.cloud
   spring-cloud-starter-netflix-ribbon
2.2、在HelloController的hello的方法中添加服务提供者的输出信息:
/**
 * @author HDN
 * @date 2019/6/16 14:34
 */
@RestController
public class HelloController {

    private static Logger logger = Logger.getLogger(String.valueOf(HelloController.class));

    @Qualifier("eurekaRegistration")
    @Autowired
    private Registration registration;


    @Autowired
    private DiscoveryClient client;

    @RequestMapping(value="/hello",method = RequestMethod.GET)
    public String hello(){
        /*参考书中这个getLocalServiceInstance()目前已过时,我们可以使用Registration根据服务名获取注册了该服务名的所有实例*/
        /*ServiceInstance instance = client.getLocalServiceInstance();*/
        List list = client.getInstances(registration.getServiceId());
        ServiceInstance instance = null;
        if (list != null && list.size() > 0) {
            for(ServiceInstance itm : list){
                instance =  itm;
            }
        }
        String result = "/hello, host:port=" + instance.getPort()  + ", "
                + "service_id:" + instance.getServiceId();
        logger.info(result);
        return "HELLO WORLD";
    }
}
2.3、通过java -jar命令行的方式来启动两个不同端口的hello-service,来实现Ribbon的轮询访问:
java -jar spring-boot-hello-0.0.1-SNAPSHOT.jar --server.port=8081
java -jar spring-boot-hello-0.0.1-SNAPSHOT.jar --server.port=8082
在成功启动两个hello-service服务之后,如下图所示,从Eureka信息面板中可以看到名为HELLO-SERVICE的服务中出现了两个实例单元,分别为8081和8082:
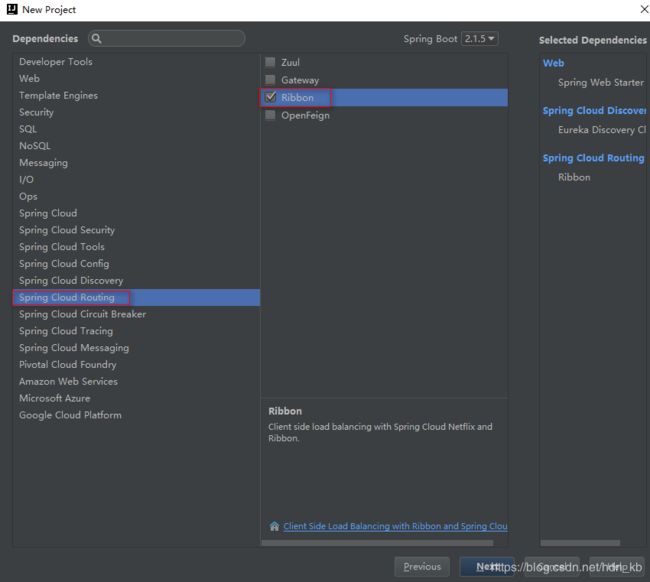
三、创建一个Spring Boot的基础工程来实现服务消费者,取名为ribbon-consumer:
创建项目的时候选择的依赖有三个:
生成的pom.xml如下:
   org.springframework.boot
   spring-boot-starter-parent
   2.1.5.RELEASE


com.example
ribbon_consume
0.0.1-SNAPSHOT
ribbon_consume
Demo project for Spring Boot


   1.8
   Greenwich.SR1


      org.springframework.boot
      spring-boot-starter-web


      org.springframework.cloud
      spring-cloud-starter-netflix-eureka-client


      org.springframework.cloud
      spring-cloud-starter-netflix-ribbon


      org.springframework.boot
      spring-boot-starter-test
      test


         org.springframework.cloud
         spring-cloud-dependencies
         ${spring-cloud.version}
         pom
         import


         org.springframework.boot
         spring-boot-maven-plugin
3.1、修改启动主类
(1)、通过@EnableDiscoveryClient注解让应用注册为Eureka客户端应用,以获得服务发现的能力;
(2)、创建RestTemplate的Spring Bean实例;
(3)、通过@LoadBalanced注解开启客户端负载均衡。
/**
 * @author HDN
 * @date 2019/6/16 14:29
 */
@EnableDiscoveryClient
@SpringBootApplication
public class RibbonConsumeApplication {

	@Bean
	@LoadBalanced
	RestTemplate restTemplate(){
		return new RestTemplate();
	}

	public static void main(String[] args) {
		SpringApplication.run(RibbonConsumeApplication.class, args);
	}

}
3.2、创建ConsumerController类并实现/ribbon-consumer接口。在该接口中,通过启动类中创建的RestTemplate来实现对HELLO-SERVICE服务提供者/hello接口进行调用。
/**
 * @author HDN
 * @date 2019/6/16 14:29
 */
@RestController
public class ConsumerController {

    @Autowired
    RestTemplate restTemplate;

    @RequestMapping(value="/ribbon-consumer",method= RequestMethod.GET)
    public String helloConsumer(){
        return restTemplate.getForEntity("http://HELLO-SERVICE/hello",String.class).getBody();
    }
}可以看到这里访问的地址是服务名HELLO-SERVICE,而不是一个具体的地址。这是通过Ribbon将这个接口调用,在不暴露真实服务提供者来获取服务提供者的服务。
3.3、在application.properties中配置Eureka服务注册中心的位置,需要与之前HELLO-SERVICE一样,不然是发现不了该服务的。
spring.application.name=ribbon-consumer
server.port=9000

eureka.client.service-url.defaultZone=http://localhost:1111/eureka/
3.4、启动ribbon-consumer应用,我们可以在Eureka信息面板中看到,当前除了HELLO-SERVICE之外,还多了我们实现的RIBBON-CONSUMER服务,如下图所示:
测试:
通过访问http://localhost:9000/ribbon-consumer,成功返回了”HELLO WORLD“。此时,我们可以在ribbon-consumer应用的控制台中看到如下信息,Ribbon输出了当前客户端维护的HELLO-SERVICE的服务列表情况:Servers=[DESKTOP-LTR8285:8082, DESKTOP-LTR8285:8081]。其中包含了各个实例的位置,Ribbon就是按照此信息进行轮询访问。
DynamicServerListLoadBalancer for client HELLO-SERVICE initialized: DynamicServerListLoadBalancer:{NFLoadBalancer:name=HELLO-SERVICE,current list of Servers=[DESKTOP-LTR8285:8082, DESKTOP-LTR8285:8081],Load balancer stats=Zone stats: {defaultzone=[Zone:defaultzone; Instance count:2; Active connections count: 0; Circuit breaker tripped count: 0; Active connections per server: 0.0;]
},Server stats: [[Server:DESKTOP-LTR8285:8082; Zone:defaultZone; Total Requests:0; Successive connection failure:0; Total blackout seconds:0; Last connection made:Thu Jan 01 08:00:00 CST 1970; First connection made: Thu Jan 01 08:00:00 CST 1970; Active Connections:0; total failure count in last (1000) msecs:0; average resp time:0.0; 90 percentile resp time:0.0; 95 percentile resp time:0.0; min resp time:0.0; max resp time:0.0; stddev resp time:0.0]
, [Server:DESKTOP-LTR8285:8081; Zone:defaultZone; Total Requests:0; Successive connection failure:0; Total blackout seconds:0; Last connection made:Thu Jan 01 08:00:00 CST 1970; First connection made: Thu Jan 01 08:00:00 CST 1970; Active Connections:0; total failure count in last (1000) msecs:0; average resp time:0.0; 90 percentile resp time:0.0; 95 percentile resp time:0.0; min resp time:0.0; max resp time:0.0; stddev resp time:0.0]
]}ServerList:org.springframework.cloud.netflix.ribbon.eureka.DomainExtractingServerList@269f26a8
再尝试发送几次请求,并观察两个HELLO-SERVICE的控制台,可以看到两个控制台会交替打印下面的日志。
![]()
![]()
至此,通过Ribbon实现的服务发现与服务消费就测试完成!!!


