Java注解代码生成
最近本着不求甚解的态度重温了一下主流框架的源码,所以趁热打铁的总结一下,学习框架或开发框架所必备的基础知识:
- Java反射
- Java注解
- 注解代码自动生成
- Java动态代理
- AOP
1、简介
在我们常用的框架中注解和自动生成代码的身影很常见,因为注解和自动生成的配合,从而简化和统一代码,使框架使用简单且容易扩展,典型且最熟悉的就是ButterKnife,主要功能利用注解省略了findViewById的过程,当然也提供了其他的监听、绑定等很多强大的操作符,熟悉ButterKnife源码的应该知道,ButterKnife的实现就是利用我们今天的要讲的内容,我们在文章的最后也会尝试编写一个简单的ButterKnife;
2、构建
2.1、创建Java Library
在Android项目中创建Java Library

2.2、配置build.gradle 文件
implementation 'com.squareup:javapoet:1.11.1'
implementation 'com.google.auto.service:auto-service:1.0-rc4'
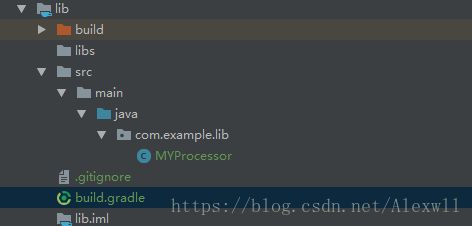
2.3、创建AbstractProcessor的子类
代码的自动生成使用的是AbstractProcessor类,所以第一步要添加AbstractProcessor的实现类
@AutoService(Processor.class)
public class MYProcessor extends AbstractProcessor {

    private Filer mFiler;
    private Elements mElements;
    private Messager mMessage;


    @Override
    public synchronized void init(ProcessingEnvironment processingEnv) {
        super.init(processingEnv);
        mFiler = processingEnv.getFiler();
        mElements = processingEnv.getElementUtils();
        mMessage = processingEnv.getMessager();

    }

    @Override
    public boolean process(Set annotations, RoundEnvironment roundEnv) {

        MethodSpec methodSpec = MethodSpec.methodBuilder("processMethod")   // 添加方法
                .addModifiers(Modifier.PUBLIC) // 添加方法修饰符
                .addParameter(String.class, "name") // 添加方法参数
                .build();

        TypeSpec typeSpec = TypeSpec.classBuilder("ProcessCreate")  // 设置要生成的类
                .addModifiers(Modifier.PUBLIC) // 添加类修饰符
                .addMethod(methodSpec)  // 将方法添加类中
                .build();

        JavaFile javaFile = JavaFile.builder("com.example.administrator.permission", typeSpec).build();   //设置JavaFile
        try {
            javaFile.writeTo(mFiler);  // 写入
        } catch (IOException e) {
            e.printStackTrace();
        }
        return true;
    }

    @Override
    public Set getSupportedAnnotationTypes() {
        Set types = new LinkedHashSet<>();
        types.add(Override.class.getCanonicalName());
        return types;
    }
}
上面是实现类的全部代码,作几点说明:
-
添加@AutoService(Processor.class)注解
-
主要方法介绍:
-
init(ProcessingEnvironment env): 每一个注解处理器类都必须有一个空的构造函数。然而,这里有一个特殊的init()方法,它会被注解处理工具调用,并输入ProcessingEnviroment参数。ProcessingEnviroment提供很多有用的工具类Elements,Types和Filer;
-
process(Set annoations, RoundEnvironment env):这相当于每个处理器的主函数main()。在这里写扫描、评估和处理注解的代码,以及生成Java文件。输入参数RoundEnviroment,可以让查询出包含特定注解的被注解元素。
-
getSupportedAnnotationTypes():这里必须指定,这个注解处理器是注册给哪个注解的。注意,它的返回值是一个字符串的集合,包含本处理器想要处理的注解类型的合法全称。换句话说,在这里定义你的注解处理器注册到哪些注解上。
-
getSupportedSourceVersion():用来指定你使用的Java版本
-
TypeSpec:设置生成类的配置
-
MethodSpec:设置方法的配置
2.4、 执行Make Project
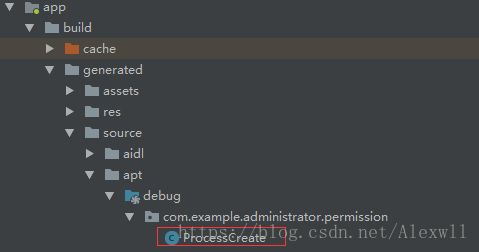
执行Make Project或Build程序就会自动生成代码,代码位于build/generated/source/apt/debug/package/…

查看类中的代码,与设置的函数、参数、修饰符一致;

2.5、 使用生成的类
创建的代码在Build过程中创建,所以在代码运行时可以像正常类一样使用
val p = ProcessCreate()
p.processMethod("Name")
上述的过程就是一个代码自动生成的过程,只不过是最简单的Demo,如果配合注解的使用就会更有针对性的生成代码,下面实现一个简单的ButterKnife框架。
3、手动实现一个BindView注解框架
-
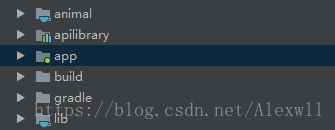
看看项目框架

项目中要使用Java Library放置注解和代码生成部分,所以将每个功能分开创建Library,每个Library智能如下: -
animal:Java Library 声明注解
-
apiLibrary:Android Library 提供必须的API支持
-
app:Module 项目的主体部分
-
lib:Java Library 根据注解自动生成代码部分
3.1、animal
首先是要跟剧注解完成代码和初始化的,所以第一步声明使用的注解@BindView,在View中声明int的属性值,此处的值就是资源的id
@Retention(RetentionPolicy.CLASS)
@Target(ElementType.FIELD)
public @interface BindView {
    int value();
}
3.2、apiLibrary
提供Api支持,因为框架的功能时绑定并获取View控件,所以声明两个功能接口如下:
// 根据ID获取控件
public interface ViewFinder {
    View findView(Object o,int resId);
}
//绑定Activity
public interface ViewBinder {

    void bindView(T host, Object o,ViewFinder viewFinder);

    void unBindView(T host);
}
ViewFinder和ViewBind的实现,先看看简单的一个ViewFinder,根据ID返回控件实例,就是一个FindViewbyId的过程:
public class ActivityViewFinder implements ViewFinder {
    @Override
    public View findView(Object o, int resId) {
        return ((Activity) o).findViewById(resId);
    }
}
3.3、lib
这部分是真个框架的主题部分,我们需要想一下我们想要什么效果和需要做哪些东西:
想要做什么:简化控件的初始化,代码自动生成,使用时添加注解就可以完成
需要做的事情:
- 代码生成——创建AbstractProcessor的实现类重写方法
- 注解——既然使用注解标注,首先眼获取标注注解的控件和资源Id
- 类——拼接生成的类名并实现ViewBinder接口
- 方法——重写ViewBinder的方法,在其中调用ViewFinder的findView方法
3.3.1、AbstractProcessor实现
@AutoService(Processor.class)
public class MYProcessor extends AbstractProcessor {
    private Filer mFiler;
    private Elements mElements;
    private Messager mMessage;
    private Map annotatedClassMap;

    @Override
    public synchronized void init(ProcessingEnvironment processingEnv) {
        super.init(processingEnv);
        mFiler = processingEnv.getFiler();
        mElements = processingEnv.getElementUtils();
        mMessage = processingEnv.getMessager();
        annotatedClassMap = new TreeMap<>();
    }

    @Override
    public boolean process(Set annotations, RoundEnvironment roundEnv) {
       ......
        return true;
    }

    @Override
    public SourceVersion getSupportedSourceVersion() {
        return SourceVersion.latestSupported();
    }

    @Override
    public Set getSupportedAnnotationTypes() {
        Set types = new LinkedHashSet<>();
        types.add(BindView.class.getCanonicalName()); // 声明使用的注解
        return types;
    }
}
上面创建了AbstractProcessor并完成了初始化的操作,在getSupportedAnnotationTypes()方法中设置了要使用的注解为BindView
3.3.2、注解的获取和解析
private void processBindView(RoundEnvironment roundEnv) {
        for (Element element : roundEnv.getElementsAnnotatedWith(BindView.class)) {
            AnnotatedClass annotatedClass = getAnnotatedClass(element);
            annotatedClass.addFields(new BindViewField(element));
        }
    }

    private AnnotatedClass getAnnotatedClass(Element element) {
        TypeElement typeElement = (TypeElement) element.getEnclosingElement();
        String fullName = element.getSimpleName().toString();
        AnnotatedClass annotatedClass = annotatedClassMap.get(fullName);
        if (annotatedClass == null) {
            annotatedClass = new AnnotatedClass(typeElement, mElements);
            annotatedClassMap.put(fullName, annotatedClass);
        }
        return annotatedClass;
    }
获取每个注解,将注解信息封装在AnnotatedClass中,将element封装在BindViewField对象中,同时使用Map缓存获取的信息,BindViewField保存了添加注解控件的名称和绑定资源的id:
public class BindViewField {
    private VariableElement variableElement;
    private int resId;
    BindViewField(Element element) {
        if (element.getKind() != ElementKind.FIELD) {
            return;
        }
        variableElement = (VariableElement) element;
        BindView bindView = variableElement.getAnnotation(BindView.class);
        resId = bindView.value();
    }
    Name getFiledName() {
        return variableElement.getSimpleName();
    }
    int getResId() {
        return resId;
    }
    TypeMirror getFieldType() {
        return variableElement.asType();
    }
}
AnnotatedClass保存了每个注解的typeElement, mElements和BindViewField 实例,即注解的所有信息都在其中,
 public AnnotatedClass(TypeElement mTypeElement, Elements mElements) {
        this.mTypeElement = mTypeElement;
        this.mElements = mElements;
        bindViewFields = new ArrayList<>();
    }

    public void addFields(BindViewField field) {
        bindViewFields.add(field);
    }
3.3.3、类文件
TypeSpec typeSpec = TypeSpec.classBuilder(mTypeElement.getSimpleName() + "$$ViewBinder")
                .addModifiers(Modifier.PUBLIC)
                .addSuperinterface(ParameterizedTypeName.get(TypeUtil.BINDER, TypeName.get(mTypeElement.asType())))
                .addMethod(bindViewMethod.build())
                .addMethod(unBindViewMethod.build())
                .build();

String packName = mElements.getPackageOf(mTypeElement).getQualifiedName().toString();
JavaFile.builder(packName, typeSpec).build();

private static class TypeUtil {
        static final ClassName BINDER = ClassName.get("com.example.apilibrary", "ViewBinder");
        static final ClassName VIEW_FINDER = ClassName.get("com.example.apilibrary", "ViewFinder");
    }
上面代码操作:
- 拼接类名
- 设置修饰符
- 添加实现的接口
- 添加方法
- 生成Java文件
3.3.4、方法实现
- 绑定注解的方法
 MethodSpec.Builder bindViewMethod = MethodSpec.methodBuilder("bindView")
                .addAnnotation(Override.class)
                .addModifiers(Modifier.PUBLIC)
                .addParameter(TypeName.get(mTypeElement.asType()), "host")
                .addParameter(TypeName.OBJECT, "source")
                .addParameter(TypeUtil.VIEW_FINDER, "finder");

for (BindViewField field : bindViewFields) {
            bindViewMethod.addStatement("host.$N = ($T)(finder.findView(source,$L))", field.getFiledName(),
                    ClassName.get(field.getFieldType()), field.getResId()
            );
        }
上面代码方法的基本配置外,主要的是添加参数和内部方法,“host. N = ( N = ( N=(T)(finder.findView(source,$L))”,使用控件名称、类型和id替换后的代码为 host.button = (Button)(finder.findView(source,2131165223));
- 解除绑定方法
 MethodSpec.Builder unBindViewMethod = MethodSpec.methodBuilder("unBindView")
                .addModifiers(Modifier.PUBLIC)
                .addParameter(TypeName.get(mTypeElement.asType()), "host")
                .addAnnotation(Override.class);
        for (BindViewField field : bindViewFields) {
            unBindViewMethod.addStatement("host.$N = null", field.getFiledName());
        }
到此根据注解生成代码部分就完成了,到此时只要你在Activity中使用@BindView注解就会生成相应的代码文件:
@BindView(R.id.button5)
Button button;
Rebuild项目后在build文件夹下就会生成代码了,查看生成的代码如下:

从类名和实现上与我们设置一致,在重写的bindView方法中,调用了ViewFinder实现类的findView方法,而在findView方法中使用了Android的findViewbyId(),所以控件的初始化就完成了。
3.4、绑定入口
public class BufferViewBinder {
    private static final ActivityViewFinder FINDER = new ActivityViewFinder(); // 创建ActivityViewFinder实例
    private static final Map BINDER_MAP = new HashMap<>();  // 创建缓存Map

    public static void bind(Activity activity) {
        bind(activity, activity, FINDER);
    } // 提供的绑定接口

    private static void bind(Object host, Object o, ViewFinder finder) {
        String className = host.getClass().getName();  // 获取绑定的类名
        ViewBinder viewBinder = BINDER_MAP.get(className);  // 查看是否有缓存
        if (viewBinder == null) {
            try {
                Class aClass = Class.forName(className + "$$ViewBinder"); // 根据类名反射获取自动生成的类
                try {
                    viewBinder = (ViewBinder) aClass.newInstance(); // 创建自动生成的类的实例
                    BINDER_MAP.put(className, viewBinder);  // 添加到缓存
                    if (viewBinder != null) {
                        viewBinder.bindView(host, o, finder); // 调用绑定的方法
                    }
                } catch (IllegalAccessException e) {
                    e.printStackTrace();
                } catch (InstantiationException e) {
                    e.printStackTrace();
                }
            } catch (ClassNotFoundException e) {
                e.printStackTrace();
            }
        }
    }
    public static void unBind(Object host) {
        String classname = host.getClass().getName();
        ViewBinder viewBinder = BINDER_MAP.get(classname);
        if (viewBinder != null) {
            viewBinder.unBindView(host); // 解除绑定
        }
    }
}
执行操作如下:
- 使用注解标注要初始化的控件,并传入初始化的Id
- 调用bind(activity) 绑定注解
- 跟剧绑定的Activity获取生成的类名,使用反射获取类并创建实例
- 调用bindView()方法,完成控件的初始化
3.5、使用
public class BindActivity extends AppCompatActivity {
    @BindView(R.id.button5)
    Button button;
    @Override
    protected void onCreate(@Nullable Bundle savedInstanceState) {
        super.onCreate(savedInstanceState);
        setContentView(R.layout.activity_bind);
        BufferViewBinder.bind(this);
        button.setOnClickListener(new View.OnClickListener() {
            @Override
            public void onClick(View v) {
                Toast.makeText(BindActivity.this,"Button",Toast.LENGTH_SHORT).show();
            }
        });
    }
    @Override
    protected void onDestroy() {
        super.onDestroy();
        BufferViewBinder.unBind(this);
    }
}
运行效果:

关于注解和代码生成的介绍和实例到此结束了,希望可以利用这些知识在平常的开发中构造更方便使用的快捷工具。
点击获取Demo地址,欢迎Star