LNMP环境搭建与wordpress的安装
刚开始一直在尝试自己源代码一步一步搭建LNMP环境,但是不知道为什么,在php与nginx交互上一直出错,前前后后也解决了好多个问题,最终访问localhost时,出现的还是welcome to nginx 的画面,虽然安装环境用了三四天,也遇到了很多问题,所以在这里向大家分享一下快速搭建的经验,小编使用的是CentOS7.2的Linux系统,在VirtualBox上运行,理由很简单,免费,开源,稳定。
系统需求:
- CentOS/RHEL/Fedora/Debian/Ubuntu/Raspbian Linux系统
- 需要5GB以上硬盘剩余空间
- 需要128MB以上内存(如果为128MB的小内存VPS,Xen的需要有SWAP,OpenVZ的至少要有128MB以上的vSWAP或突发内存),注意小内存请勿使用64位系统!
- 安装MySQL 5.6或5.7及MariaDB 10必须1G以上内存!。
- VPS或服务器必须已经联网,且必须设置的是网络源不能是光盘源,同时VPS/服务器 DNS要正常!
- Linux下区分大小写,输入命令时请注意!
安装步骤:
1、使用putty或类似的SSH工具登陆VPS或服务器;
登陆后运行:
screen -S lnmp如果提示screen: command not found 命令不存在可以执行:
yum install screen 2、下载并安装LNMP一键安装包:
您可以选择使用下载版(推荐美国及海外VPS或空间较小用户使用)或者完整版(推荐国内VPS使用,国内用户可用在 下载中找国内下载地址替换),两者没什么区别,只是完整版把一些需要的源码文件预先放到安装包里。
安装LNMP稳定版
wget -c http://soft.vpser.net/lnmp/lnmp1.3-full.tar.gz && tar zxf lnmp1.3-full.tar.gz && cd lnmp1.3-full && ./install.sh lnmp安装LNMP测试版
wget -c http://soft.vpser.net/lnmp/lnmp1.4beta.tar.gz && tar zxf lnmp1.4beta.tar.gz && cd lnmp1.4 && ./install.sh lnmp默认安装lnmp可不写,如需要安装LNMPA或LAMP,将./install.sh 后面的参数替换为 lnmpa或 lamp即可。如需更改网站和数据库目录先修改 lnmp.conf 文件。
如下载速度慢请更换其他下载节点,详情请看 下载页面。 LNMP下载节点具体替换方法。
按上述命令执行后,会出现如下提示:

需要设置MySQL的root密码(不输入直接回车将会设置为root)如果输入有错误需要删除时,可以按住Ctrl再按Backspace键进行删除。输入后回车进入下一步,如下图所示:
询问是否需要启用MySQL InnoDB,InnoDB引擎默认为开启,一般建议开启,直接回车或输入 y ,如果确定确实不需要该引擎可以输入 n,输入完成,回车进入下一步
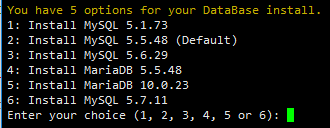
选择MySQL版本,目前提供了较多版本的MySQL和MariaDB,需要注意的是MySQL 5.6,5.7及MariaDB 10必须在1G以上内存的更高配置上才能选择:

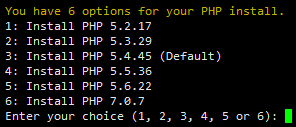
输入对应MySQL或MariaDB版本前面的序号,回车进入下一步,选择PHP版本:
注意:选择PHP7等高版本时需要自行确认是否与自己的程序兼容。

输入要选择的PHP版本的序号,回车进入下一步,选择是否安装内存优化:

可以选择不安装、Jemalloc或TCmalloc,输入对应序号回车,直接回车为默认为不安装。
如果是LNMPA或LAMP的话还会提示“Please enter Administrator Email Address:”,需要设置管理员邮箱,该邮箱会在报错时显示在错误页面上。
再选择Apache版本

按提示输入对应版本前面的数字序号,回车。
提示"Press any key to install...or Press Ctrl+c to cancel"后,按回车键确认开始安装。
LNMP脚本就会自动安装编译Nginx、MySQL、PHP、phpMyAdmin、Zend Optimizer这几个软件。
安装时间可能会几十分钟到几个小时不等,主要是机器的配置网速等原因会造成影响。
3、安装完成
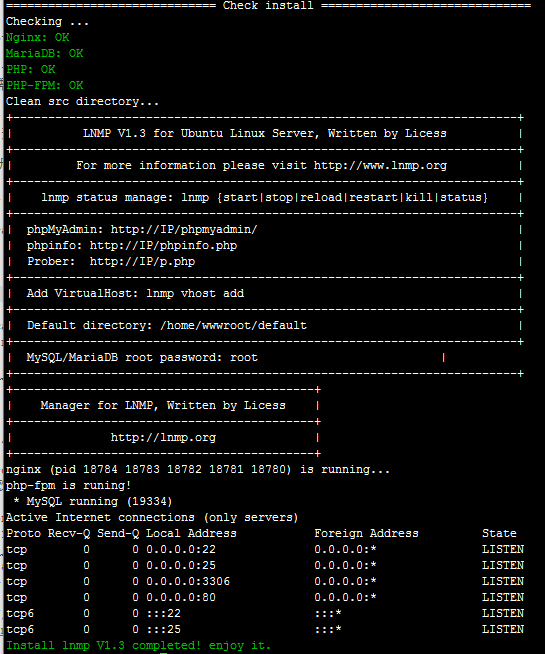
如果显示Nginx: OK,MySQL: OK,PHP: OK

并且Nginx、MySQL、PHP都是running,80和3306端口都存在,并提示Install lnmp V1.3 completed! enjoy it.的话,说明已经安装成功。
接下来按 添加虚拟主机教程,添加虚拟主机后上传网站代码,可以使用 sftp或 ftp服务器上传网站,将域名解析到VPS或服务器的IP上,解析生效即可使用。
*********************************************************************************分割线*******************************************************************************************************
以上安装教程来自
https://lnmp.org/install.html接下来打开Linux上默认安装的火狐浏览器
输入
localhost
出来的界面如下(因为该一键安装包由lnmp.org提供,所以默认的localhost界面如下,如果你看到了这个界面,就松一口气吧,lnmp环境已搭建成功)
尝试访问一下
localhost/p.php
如果是刚安装好Lnmp环境,访问php文件时,肯定会出现一个提示你下载的界面,这时不要怀疑你安装了假的lnmp环境,而是因为lnmp一键安装包中默认没有在nginx.conf配置文件中设置好,碰到php文件时,要传递到后方的php解释器。
此时需要对nginx.conf(使用lnmp安装包的,nginx.conf的路径为:/usr/local/nginx/conf)添加
location ~ .*\.php$ {
fastcgi_pass   127.0.0.1:9000;
		}
上面的意思,就是说,碰到.php结尾的文件,传递给后方127.0.0.1的9000端口上。
下面贴上我nginx.conf的全部内容供参考(请大家在修改nginx.conf前做好备份)
user  www www;

worker_processes auto;

error_log  /home/wwwlogs/nginx_error.log  crit;

pid        /usr/local/nginx/logs/nginx.pid;

#Specifies the value for maximum file descriptors that can be opened by this process.
worker_rlimit_nofile 51200;

events
    {
        use epoll;
        worker_connections 51200;
        multi_accept on;
    }

http
    {
        include       mime.types;
        default_type  application/octet-stream;

        server_names_hash_bucket_size 128;
        client_header_buffer_size 32k;
        large_client_header_buffers 4 32k;
        client_max_body_size 50m;

        sendfile   on;
        tcp_nopush on;

        keepalive_timeout 60;

        tcp_nodelay on;

        fastcgi_connect_timeout 300;
        fastcgi_send_timeout 300;
        fastcgi_read_timeout 300;
        fastcgi_buffer_size 64k;
        fastcgi_buffers 4 64k;
        fastcgi_busy_buffers_size 128k;
        fastcgi_temp_file_write_size 256k;

        gzip on;
        gzip_min_length  1k;
        gzip_buffers     4 16k;
        gzip_http_version 1.1;
        gzip_comp_level 2;
        gzip_types     text/plain application/javascript application/x-javascript text/javascript text/css application/xml application/xml+rss;
        gzip_vary on;
        gzip_proxied   expired no-cache no-store private auth;
        gzip_disable   "MSIE [1-6]\.";

        #limit_conn_zone $binary_remote_addr zone=perip:10m;
        ##If enable limit_conn_zone,add "limit_conn perip 10;" to server section.

        server_tokens off;
        access_log off;

server
    {
        listen 80 default_server;
        #listen [::]:80 default_server ipv6only=on;
        server_name www.lnmp.org;
        index index.php index.html index.htm;
        root  /home/wwwroot/default;

        #error_page   404   /404.html;
        include enable-php.conf;

        location /nginx_status
        {
            stub_status on;
            access_log   off;
        }

        location ~ .*\.(gif|jpg|jpeg|png|bmp|swf)$
        {
            expires      30d;
        }

        location ~ .*\.(js|css)?$
        {
            expires      12h;
        }

	location ~ .*\.php$
        {
            fastcgi_pass 127.0.0.1:9000;
        }


        location ~ /\.
        {
            deny all;
        }

        access_log  /home/wwwlogs/access.log;
    }
include vhost/*.conf;
}
接下来重启nginx以载入配置
service nginx restart此时再访问
localhost/p.phpwget https://cn.wordpress.org/wordpress-4.7.1-zh_CN.tar.gz解压:
tar xf wordpress-4.7.1-zh_CN.tar.gz -C /home/wwwroot/default/wordpresschown www.www -R /home/wwwroot/default/wordpressmysql -u root -p;
create user ‘mywordpress'@'%' identified by '0000';
create database wordpress ;
grant all privileges on wordpress.* to 'mywordpress'@'%' identified by '0000';
flush privileges;
\q;修改wordpress配置文件(重命名):
mv /data/www/wordpress/wp-config-sample.php/data/www/wordpress/wp-config.phpvim /www/data/wordpress/wp-config.php// ** MySQL 设置 - 具体信息来自您正在使用的主机 ** //
/** WordPress数据库的名称 */
define('DB_NAME', 'wordpress');
/** MySQL数据库用户名 */
define('DB_USER', 'mywordpress');
/** MySQL数据库密码 */
define('DB_PASSWORD', '0000');
/** MySQL主机 */
define('DB_HOST', 'localhost');localhost/wordpress/wp-config.php