PCL中点云滤波器的使用(Filtering In PCL)
1 开发环境配置
(1) VS2015 & PCL1.8.1
(2) 配置PCL头文件及库目录
Include:
$(PCL_ROOT);
$(PCL_ROOT)\include\pcl-1.8;
$(PCL_ROOT)\3rdParty\Eigen\eigen3;
$(PCL_ROOT)\3rdParty\FLANN\include;
$(PCL_ROOT)\3rdParty\VTK\include\vtk-8.0;
$(PCL_ROOT)\3rdParty\Boost\include\boost-1_64;

lib:
$(PCL_ROOT)\lib\*.lib
$(PCL_ROOT)\3rdParty\VTK\lib\*.lib
$(PCL_ROOT)\3rdParty\FLANN\lib\*.lib
$(PCL_ROOT)\3rdParty\Boost\lib\*.lib
2 PCL 滤波器介绍
PCL中基本滤波器主要有以下六种:
(1)PassThrough filter
PassThrough filter是在特定的维度(x, y, z坐标轴中的某一个)对点云进行滤波,即移除给定范围的内部点云或外部点云。使用方式如下代码所示,
	// Create the filtering object
	pcl::PassThrough pass;
	pass.setInputCloud(cloud);
	pass.setFilterFieldName("z");
	pass.setFilterLimits(580.0, 900.0);
	//pass.setFilterLimitsNegative (true);
	pass.filter(*cloud_filtered);
以上代码主要是创建PassThrough filter对象并设置其参数,此处滤波坐标系设置为Z轴,通过setFilterLimits来选取( 580
官方示例给出结果为:
Cloud before filtering:
	0.352222 -0.151883 -0.106395
	-0.397406 -0.473106 0.292602
	-0.731898 0.667105 0.441304
	-0.734766 0.854581 -0.0361733
	-0.4607 -0.277468 -0.916762
Cloud after filtering:
	-0.397406 -0.473106 0.292602
	-0.731898 0.667105 0.441304
但是在我电脑上运行时,得到的点云值均比较大,重新设置阈值为0~200后,得到结果如下:
D:\asher\project\FiltersInPCL\bin>FiltersInPCL.exe
Cloud before filtering:
    1.28125 577.094 197.938
    828.125 599.031 491.375
    358.688 917.438 842.563
    764.5 178.281 879.531
    727.531 525.844 311.281
Cloud after filtering:
    1.28125 577.094 197.938
原因是官方例子中的Rand()返回的数值与我的电脑上返回数值不一致,我的返回数值参考http://www.cplusplus.com/reference/cstdlib/rand/可知结果正确的,但是官方例子Rand()返回的为0到1之间小数,调用的为excel函数,可参考https://baike.baidu.com/item/rand%28%29。
对原始代码稍作修改,读入一ply文件测试结果,
原始点云:
没有调用setFilterLimitsNegative(true)时结果:
调用setFilterLimitsNegative(true)后:
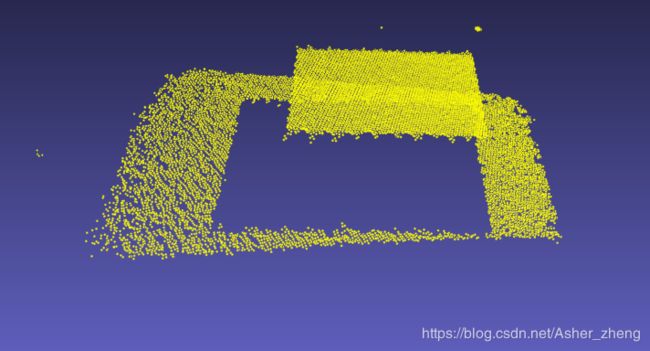
可以看到在我的ply文件中有两个平面,当我设置一个合适的阈值时,就可以得到其中的一个平面,这是其中的一种垂直于坐标轴较极端情况。
源码和具体工程请参考https://github.com/yazhouzheng/FilteringInPCL.git 中的 passthrough.cpp 文件。
(2)VoxelGrid filter
VoxelGrid filter 是通过体素化网格方法对点云数据集进行降采样(即减少点云的个数)。体素网格类在输入点云上创建一个三维体素网格。我们可以把每个体素网格想象成空间中一组微小的三维立方体。然后在每个体素中(即每个三维立方体中),所有存在的点都近似其质心(即,向下采样)。这种方法比用体素的中心来近似要慢一些,但它更准确地表示了点云所处的潜在曲面。VoxelGrid filter 使用方式如下:
  // Create the filtering object
  pcl::VoxelGrid sor;
  sor.setInputCloud (cloud);
  sor.setLeafSize(10.0f, 10.0f, 10.0f);//leaf size is 10m
  sor.filter (*cloud_filtered);
以上代码创建了一个leaf size为10m的 pcl::voxelgrid 过滤器,通过setInputCloud 传入原始点云数据,计算后输出降采样后的点云并存储在cloud_filtered中。
官网示例中读取的为PCD文件,由于不易查看,因此在我工程里改为读取ply文件。
当设置leaf size 设置为1cm时,由于leaf size太小不能采样,会有以下错误
PointCloud before filtering: 16454 data points (x y z).
[pcl::VoxelGrid::applyFilter] Leaf size is too small for the input dataset. Integer indices would overflow.PointCloud after filtering: 16454 data points (x y z).
因此,这里leaf size 设置为10m,结果如下:
D:\asher\project\FiltersInPCL\bin>FiltersInPCL.exe test.ply
PointCloud before filtering: 16454 data points (x y z).
PointCloud after filtering: 5153 data points (x y z).
读入ply文件结果如下,可以明显的看到点云减少到原来的1/3左右。
D:\asher\project\FiltersInPCL\bin>FiltersInPCL.exe test.ply
PointCloud before filtering: 16454 data points (x y z).
PointCloud after filtering: 5153 data points (x y z).
具体点云结果如下,左边为原始点云,右边为降采样后的点云:
源码和具体工程请参考https://github.com/yazhouzheng/FilteringInPCL.git 中的 voxel_grid.cpp 文件。
(3)StatisticalOutlierRemoval
StatisticalOutlierRemoval filter是运用统计分析的方法从点云中去除测量中造成的噪声,比如说点云中的一些离群点。
背景知识
由激光扫描得到的点云的点密度通常是不确定的,3D结构光解码出来的每一帧点云数量也是不一样的,此外,测量误差也会有一些稀疏的异常值,这会对结果造成更大的破坏。这使得对局部点云特征(如表面法线或曲率变化)的估计变得复杂,从而导致错误的值,进而可能导致点云registration失败。类似于这样的部分反常点可以通过对每个点的邻域进行统计分析来解决,然后移除这些不符合某个标准的点。
StatisticalOutlierRemoval是基于输入数据集中点到邻域中点距离的分布。对于每个点,我们计算从它到所有相邻点的平均距离。假设结果是有一个平均值和一个标准偏差的高斯分布,则所有平均距离大于由全局均值和标准偏差距离定义的间隔的点都可以被视为离群点(即超过K近邻平均距离达到某一阈值时,就被认为是离群点),并从数据集中去除。
PCL中使用方式如下:
  // Create the filtering object
  pcl::StatisticalOutlierRemoval sor;
  sor.setInputCloud (cloud);
  sor.setMeanK (50);
  sor.setStddevMulThresh (1.0);
  sor.filter (*cloud_filtered);
以上代码创建了pcl::StatisticalOutlierRemoval滤波器对象,setMeanK设置对每一个点所要分析的近邻点的个数, setStddevMulThresh设置标准差乘数,这里设置为1,这意味着,当近邻点到当前点的均值距离大于一个标准差时,则当前点就会被标记为离群点并移除,最终点云保存在cloud_filtered中。
输入一ply文件,运行程序结果如下:
D:\asher\project\FiltersInPCL\bin>FiltersInPCL.exe test.ply
Cloud before filtering:
points[]: 16454
width: 16454
height: 1
is_dense: 0
sensor origin (xyz): [0, 0, 0] / orientation (xyzw): [0, 0, 0, 1]

Cloud after filtering:
points[]: 15933
width: 15933
height: 1
is_dense: 0
sensor origin (xyz): [0, 0, 0] / orientation (xyzw): [0, 0, 0, 1]
通过点云个数可以看到,我们移除了521个离群点。
原始点云:
滤波后点云:
使用同样的参数调用滤波器,但是通过设置setNegative传入true得到负向输出,
  sor.setNegative (true);
  sor.filter (*cloud_filtered);
则可以得到离群点的点云,如下图所示:
源码和具体工程请参考https://github.com/yazhouzheng/FilteringInPCL.git 中的 statistical_removal.cpp 文件。
(4)Project points onto a parametric model
ProjectInliers可以把点云映射到参数化的模型里面(比如平面,球体等等),参数模型是通过一组系数给出的,比如说可以通过ax + by + cz + d = 0来表示一个平面,则a, b, c, d即可表示一个平面。
ProjectInliers使用方式:
  // Create a set of planar coefficients with X=Y=0,Z=1
  pcl::ModelCoefficients::Ptr coefficients (new pcl::ModelCoefficients ());
  coefficients->values.resize (4);
  coefficients->values[0] = coefficients->values[1] = 0;
  coefficients->values[2] = 1.0;
  coefficients->values[3] = 0;

  // Create the filtering object
  pcl::ProjectInliers proj;
  proj.setModelType (pcl::SACMODEL_PLANE);
  proj.setInputCloud (cloud);
  proj.setModelCoefficients (coefficients);
  proj.filter (*cloud_projected);
以上代码首先指定了平面的a = b = d = 0, c=1, 即 z = 0 平面(x, y轴所在的平面),然后创建ProjectInliers对象,并指定z = 0时的模型系数作为将要映射的平面,最后把结果点云保存在cloud_projected中。结果如下:
D:\asher\project\FiltersInPCL\bin>FiltersInPCL.exe test.ply
Cloud before projection:
    1.28125 577.094 197.938
    828.125 599.031 491.375
    358.688 917.438 842.563
    764.5   178.281 879.531
    727.531 525.844 311.281
Cloud after projection:
    1.28125 577.094 0
    828.125 599.031 0
    358.688 917.438 0
    764.5   178.281 0
    727.531 525.844 0
原始点云:
映射到xy平面后结果:
源码和具体工程请参考https://github.com/yazhouzheng/FilteringInPCL.git 中的 project_inliers.cpp 文件。
(5)Extracting indices from a PointCloud
pcl::ExtractIndices可根据分割算法得到的索引从点云中提取点的子集,使用方式如下:
1、定义分割对象,并设置参数
	pcl::ModelCoefficients::Ptr coefficients(new pcl::ModelCoefficients());
	pcl::PointIndices::Ptr inliers(new pcl::PointIndices());
	// Create the segmentation object
	pcl::SACSegmentation seg;
	// Optional
	seg.setOptimizeCoefficients(true);
	// Mandatory
	seg.setModelType(pcl::SACMODEL_PLANE);
	seg.setMethodType(pcl::SAC_RANSAC);
	seg.setMaxIterations(1000);
	seg.setDistanceThreshold(10.0);
2、实例化ExtractIndices,并以分割算法得到的点索引从原点云中提取点云的子集。为了处理多个模型,在while循环中运行这个过程,在提取每个模型之后,就返回获取剩余的点,再次迭代
	// Create the filtering object
	pcl::ExtractIndices extract;

	int i = 0, nr_points = (int)cloud_filtered->points.size();
	// While 30% of the original cloud is still there
	while (cloud_filtered->points.size() > 0.3 * nr_points)
	{
		// Segment the largest planar component from the remaining cloud
		seg.setInputCloud(cloud_filtered);
		seg.segment(*inliers, *coefficients);

		std::cerr << "Model coefficients: " << coefficients->values[0] << " "
			<< coefficients->values[1] << " "
			<< coefficients->values[2] << " "
			<< coefficients->values[3] << std::endl;

		if (inliers->indices.size() == 0)
		{
			std::cerr << "Could not estimate a planar model for the given dataset." << std::endl;
			break;
		}

		// Extract the inliers
		extract.setInputCloud(cloud_filtered);
		extract.setIndices(inliers);
		extract.setNegative(false);
		extract.filter(*cloud_p);
		std::cerr << "PointCloud representing the planar component: " << cloud_p->width * cloud_p->height << " data points." << std::endl;

		std::stringstream ss;
		ss << "table_scene_lms400_plane_" << i << ".ply";
		pcl::io::savePLYFile(ss.str(), *cloud_p);


		// Create the filtering object
		extract.setNegative(true);
		extract.filter(*cloud_f);
		cloud_filtered.swap(cloud_f);
		i++;
	}
运行程序,结果如下,可以看到这里进行了2次迭代,每次迭代所得到的模型系数也不同,最后把原点云分成了2个平面:
D:\asher\project\FiltersInPCL\bin>FiltersInPCL.exe test.ply
PointCloud before filtering: 16454 data points.
PointCloud after filtering: 5153 data points.
Model coefficients: 0.249878 -0.000696688 0.968277 -672.713
PointCloud representing the planar component: 3520 data points.
Model coefficients: 0.245069 -0.00356539 0.969499 -470.963
PointCloud representing the planar component: 1530 data points.
原点云:
第一次迭代:
第二次迭代:
源码和具体工程请参考https://github.com/yazhouzheng/FilteringInPCL.git 中的 extract_indices.cpp 文件。
(6)Removing outliers using a Conditional or RadiusOutlier removal
此处主要介绍两种移除离群点的方式:ConditionalRemoval和RadiusOutlierRemoval,ConditionalRemoval用来删除点云中不满足一个或多个给定条件的所有索引,RadiusOutlierRemoval指在给定半径范围内,邻近点个数少于一定数量的点就会被移除。
ConditionalRemoval的使用方式如下:
// build the condition
pcl::ConditionAnd::Ptr range_cond(new pcl::ConditionAnd());
range_cond->addComparison(pcl::FieldComparison::ConstPtr(new
        pcl::FieldComparison("z", pcl::ComparisonOps::GT, 600.0)));
range_cond->addComparison(pcl::FieldComparison::ConstPtr(new
        pcl::FieldComparison("z", pcl::ComparisonOps::LT, 900.0)));

// build the filter
pcl::ConditionalRemoval condrem;
condrem.setCondition(range_cond);
condrem.setInputCloud(cloud);
condrem.setKeepOrganized(true);
// apply filter
condrem.filter(*cloud_filtered);
首先需要通过pcl::ConditionAnd
RadiusOutlierRemoval背景知识
以下图片有助于RadiusOutlierRemoval的理解,用户来指定点云中每个点在特定半径范围内必须有的邻近点个数,如果指定邻近点个数为1则灰色的点会被移除,假定指定邻近点个数为3则灰色和红色的点均会被移除
RadiusOutlierRemoval的使用方式如下:
pcl::RadiusOutlierRemoval outrem;
// build the filter
outrem.setInputCloud(cloud);
outrem.setRadiusSearch(50.0);
outrem.setMinNeighborsInRadius(50);
// apply filter
outrem.filter(*cloud_filtered);
以上代码中实例化了一个RadiusOutlierRemoval对象,setRadiusSearch设置邻域搜索半径,setMinNeighborsInRadius设置邻近点个数。
原始点云:
ConditionalRemoval滤波后结果:
RadiusOutlierRemoval滤波后结果:
源码和具体工程请参考https://github.com/yazhouzheng/FilteringInPCL.git 中的 remove_outliers.cpp 文件。
3 Filters 总结
本文介绍了PCL官方文档中的六种基本的Filter,分别是高/低通(passthrough), 降采样(voxelgrid), 基于统计学的离群点移除(statistical-outlier-removel), 映射点云到平面或曲面(project-inliers), 分割并提取点云(extract-indices), 基于条件或半径移除点云(remove-outliers), 这些基本的Filter主要用于点云的预处理,然后为之后的点云算法提供更加规范的输入,本文所有示例代码均可可以顺利编译运行且可以在https://github.com/yazhouzheng/FilteringInPCL找到。
4 Reference:
1. http://www.pointclouds.org/documentation/tutorials/passthrough.php#passthrough
2. http://www.pointclouds.org/documentation/tutorials/voxel_grid.php#voxelgrid
3. http://www.pointclouds.org/documentation/tutorials/statistical_outlier.php#statistical-outlier-removal
4. http://www.pointclouds.org/documentation/tutorials/project_inliers.php#project-inliers
5. http://www.pointclouds.org/documentation/tutorials/extract_indices.php#extract-indices
6. http://www.pointclouds.org/documentation/tutorials/remove_outliers.php#remove-outliers


