小纪--maven项目打包发布到linux
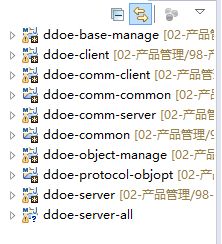
0.项目结构
ddoe-server-all是将前面的项目都集成在一起,并提供配置文件server.xml以及主启动类启动项目。
1.maven打包
采用maven-assembly自定义包结构。详见之前的blog:
maven install:maven-assembly-plugin的使用
使用Java配置装配Spring
依赖的项目需要先打包,最后再把ddoe-server-all打包。
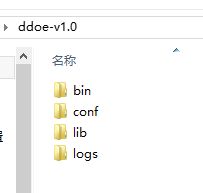
最终的结构图:
bin 放置脚本
conf 配置文件(server.xml/log4j.properties)
lib 所有jar包
logs 输出日志
2.安装linux环境
由于项目是纯java项目,所以只安装了jdk8,以及mysql。
总结–安装linux测试环境
通过Windows上的Navicat远程连接数据库连接不上,是因为防火墙没关。永久关闭防火墙的指令:
systemctl stop firewalld.service #停止firewall
systemctl disable firewalld.service #禁止firewall开机启动
firewall-cmd --state #查看默认防火墙状态(关闭后显示notrunning,开启后显示running)
3..sh脚本编写
网上找的例子,把配置项改成自己的。
#!/bin/sh
#author:wangchengwei
#date:2015-7-7
#desc:mainTest

#Java的安装目录
JAVA_HOME=/usr/local/jdk1.8.0_121
#运行程序所使用的用户
OWNER=root
#Java程序的目录
APP_HOME=/usr/local/ddoe-v1.0
#Main方法的类
APP_MAINCLASS=com.sitech.ddoe.server.all.MainTest
#日志文件
LOG_FILE=$APP_HOME/logs/socket.log
#设置CLASSPATH
CLASSPATH=$CLASSPATH:$APP_HOME/lib/ddoe-server-all-1.0-SNAPSHOT.jar
#循环将lib文件夹下所有的jar添加到CLASSPATH
for i in "$APP_HOME"/lib/*.jar; do
    CLASSPATH="$CLASSPATH":"$i"
done

#设置运行参数
JAVA_OPTS="-Xms512m -Xmx512m -Xmn256m -Djava.awt.headless=true -XX:MaxPermSize=128m -Duser.timezone=GMT+08 -Duser.timezone=Asia/shanghai"

#echo $CLASSPATH;
psid=0

#检查Java程序是否运行
checkpid(){
    javaps=`$JAVA_HOME/bin/jps -l | grep $APP_MAINCLASS`

    if [ -n "$javaps" ];then
        psid=`echo $javaps | awk '{print $1}'`
    else
        psid=0
    fi
}

#运行程序
start(){
    checkpid

    if [ $psid -ne 0 ];then
        echo "WARN:$APP_MAINCLASS already started!(pid=$psid)"
    else
        echo "Starting $APP_MAINCLASS..."
        JAVA_CMD="nohup $JAVA_HOME/bin/java $JAVA_OPTS -classpath $CLASSPATH $APP_MAINCLASS >> $LOG_FILE 2>&1 &"
        su - $OWNER -c "$JAVA_CMD"
        checkpid
        if [ $psid -ne 0 ];then
            echo "Started $APP_MAINCLASS (pid=$psid)[OK]"
        else
            echo "Started $APP_MAINCLASS [FAILED]"
        fi
    fi
}

#停止程序
stop(){
    checkpid
    if [ $psid -ne 0 ];then
        echo "Stoping $APP_MAINCLASS...(pid=$psid)"
        su - $OWNER -c "kill $psid"

        checkpid
        if [ $psid -ne 0 ];then
            echo "Stoping use kill -9"
            su - $OWNER -c "kill -9 $psid"
        fi

        checkpid
        if [ $psid -eq 0 ];then
            echo "Stoped $APP_MAINCLASS [OK]"
        else
            echo "Stoped $APP_MAINCLASS [Failed]"
            stop
        fi

    else
        echo "WARN:$APP_MAINCLASS is not runing"
    fi
}

#查看状态
status(){
    checkpid

    if [ $psid -ne 0 ];then
        echo "$APP_MAINCLASS is runing (pid=$psid)"
    else
        echo "$APP_MAINCLASS is not runing"
    fi
}

#帮助信息
info() {
    echo "System Information:"
    echo "****************************"
    echo `head -n 1 /etc/issue`
    echo `uname -a`
    echo
    echo "JAVA_HOME=$JAVA_HOME"
    echo `$JAVA_HOME/bin/java -version`
    echo
    echo "APP_HOME=$APP_HOME"
    echo "APP_MAINCLASS=$APP_MAINCLASS"
    echo "****************************"
}

#$1表示接收第一个参数,如 ./run.sh start 。则$1就是start
case "$1" in
    'start')
        start
        ;;
    'stop')
        stop
        ;;
    'restart')
        stop
        start
        ;;
    'info')
        info
        ;;
    'status')
        status
        ;;
    *)
    echo "Usage: $0 {start|stop|restart|status|info}"
    exit 1
esac
exit 0;
启动脚本命令有两种:
a) ./start.sh start 【start.sh必须有x权限 chmod 777 start.sh】
b) sh start.sh start【start.sh可以没有x权限】
启动的时候如果报错:
都是因为脚本是在window的环境下编写的,window和linux的字符编码不同,linux无法识别。
/bin/sh^M: bad interpreter: No such file or directory
vi start.sh
:set ff=unix
:wq
syntax error:unexpected end of file
vi start.sh
:set fileformat=unix
:wq
改正后重新启动即可。
清空日志:
> logFileName4.java项目访问jar包外的配置文件
启动后查看日志文件,报错,server.xml文件找不到。之前在项目中是用
File file = new File("src/main/resources/server.xml");打成包后只会到target下找,所以找不到。需要改成
InputStream in = ServerReader.class.getClass().getResourceAsStream("/server.xml");但是我们的配置文件要从/ddoe-v1.0/conf下读取。
可以抽取出工具类,方便复用。
public class PathUtil {

    public static String getProjectPath(Class clazz) {

        URL url = clazz.getProtectionDomain().getCodeSource().getLocation();
        String filePath = null;
        try {
            filePath = URLDecoder.decode(url.getPath(), "utf-8");
        } catch (Exception e) {
            e.printStackTrace();
        }
        if (filePath.endsWith(".jar"))
            filePath = filePath.substring(0, filePath.lastIndexOf(File.separator) + 1);

        File file = new File(filePath);
        filePath = file.getAbsolutePath();
        return filePath.substring(0, filePath.lastIndexOf(File.separator));
    }
}
最终拼成路径
String path = PathUtil.getProjectPath(ServerReader.class) + File.separator + "conf" + File.separator + "server.xml";补充一些路径的获取。
public class Run {
    public static void main(String args[]) {
        System.out.println("java_vendor:" + System.getProperty("java.vendor"));
        System.out.println("java_vendor_url:" + System.getProperty("java.vendor.url"));
        System.out.println("java_home:" + System.getProperty("java.home"));
        System.out.println("java_class_version:" + System.getProperty("java.class.version"));
        System.out.println("java_class_path:" + System.getProperty("java.class.path"));
        System.out.println("os_name:" + System.getProperty("os.name"));
        System.out.println("os_arch:" + System.getProperty("os.arch"));
        System.out.println("os_version:" + System.getProperty("os.version"));
        System.out.println("user_name:" + System.getProperty("user.name"));
        System.out.println("user_home:" + System.getProperty("user.home"));
        System.out.println("user_dir:" + System.getProperty("user.dir"));
        System.out.println("java_vm_specification_version:" + System.getProperty("java.vm.specification.version"));
        System.out.println("java_vm_specification_vendor:" + System.getProperty("java.vm.specification.vendor"));
        System.out.println("java_vm_specification_name:" + System.getProperty("java.vm.specification.name"));
        System.out.println("java_vm_version:" + System.getProperty("java.vm.version"));
        System.out.println("java_vm_vendor:" + System.getProperty("java.vm.vendor"));
        System.out.println("java_vm_name:" + System.getProperty("java.vm.name"));
        System.out.println("java_ext_dirs:" + System.getProperty("java.ext.dirs"));
        System.out.println("file_separator:" + System.getProperty("file.separator"));
        System.out.println("path_separator:" + System.getProperty("path.separator"));
        System.out.println("line_separator:" + System.getProperty("line.separator"));
    }

}
5.mysql插入中文乱码
推荐阅读:
linux下mysql中文乱码(中文问号)解决办法
我的解决办法是:
?useUnicode=true&characterEncoding=utf8&autoReconnect=true&rewriteBatchedStatements=TRUE注意&一定要改成&,因为xml解析不认识&。
最终项目成功启动!!!!!!!!!!!!!!
6.各种发布问题
6.1 客户端访问不到虚拟机ip
2017-12-06
昨天将项目发布出去,访问正常。今天同事说访问不到虚拟机。看了看防火墙已经禁止启动,项目也没有问题。我本机连虚拟机测试没有问题(虚拟机装在本机上)。最终得出的问题在网络通信上。问了组长,他说是网络连接的问题。
之前安装的时候是仅主机模式,需要改成桥接模式。
查看ip,本来想用ifconfig,但是报错找不到指令。
也可以用ip addr
[root@localhost bin]# ip addr
1: lo: <LOOPBACK,UP,LOWER_UP> mtu 65536 qdisc noqueue state UNKNOWN qlen 1
    link/loopback 00:00:00:00:00:00 brd 00:00:00:00:00:00
    inet 127.0.0.1/8 scope host lo
       valid_lft forever preferred_lft forever
    inet6 ::1/128 scope host
       valid_lft forever preferred_lft forever
2: ens33: <BROADCAST,MULTICAST,UP,LOWER_UP> mtu 1500 qdisc pfifo_fast state UP qlen 1000
    link/ether 00:0c:29:c6:fa:b8 brd ff:ff:ff:ff:ff:ff
    inet 172.21.143.45/22 brd 172.21.143.255 scope global dynamic ens33
       valid_lft 2590788sec preferred_lft 2590788sec
    inet6 fe80::7495:1356:e69f:f245/64 scope link
       valid_lft forever preferred_lft forever
172.21.143.45/22
就是虚拟机新的ip,可以发现和同事的电脑ip都是172.21开头,这次访问正常。
具体可以看blog:
Vmware虚拟机下三种网络模式配置
6.2 linux系统时间和日志输出时间不正确
2017-12-14
安装的时间选择的时间是Asia/ShangHai,但是不知道为什么时间还是不正确。
## 修改时区
[root@localhost ddoe-v1.0]# date
Thu Dec 14 06:08:12 CST 2017
[root@localhost ~]# cp /usr/share/zoneinfo/UTC /etc/localtime
cp: overwrite ‘/etc/localtime’? y
[root@localhost ~]# date
Wed Dec 13 22:08:38 UTC 2017
## 修改时间
[root@localhost ~]# date -s "2017-12-14 13:23:00"
Thu Dec 14 13:23:00 UTC 2017
[root@localhost ~]# date
Thu Dec 14 13:23:04 UTC 2017
log4j打出的日志时间不正确,启动脚本中添加
#设置运行参数
JAVA_OPTS="-Xms512m -Xmx512m -Xmn256m -Djava.awt.headless=true -XX:MaxPermSize=128m -Duser.timezone=GMT+08 -Duser.timezone=Asia/shanghai"
重启启动脚本,打印时间正常
Java HotSpot(TM) 64-Bit Server VM warning: ignoring option MaxPermSize=128m; support was removed in 8.0
2017-12-14 13:44:02 INFO [com.sitech.ddoe.om.cache.LocalCache] initCache -- OK
2017-12-14 13:44:02 INFO [com.sitech.ddoe.om.cache.LocalCache] startGCDaemonThread -- OK
2017-12-14 13:44:02 INFO [com.sitech.ddoe.om.cache.LocalCache] init -- OK
2017-12-14 13:44:02 INFO [com.sitech.ddoe.om.cache.LocalCache] [localCache-gcThread]start...
2017-12-14 13:44:02 INFO [com.sitech.ddoe.comm.server.netty.NettyServer] server started sucessfully.
7.项目启动
清除日志的脚本
#!/bin/bash

LOG_DIR=/ddoe/ddoe-test-starter-boot/logs
cd $LOG_DIR
> performance-analysis.log
> ddoe.log
echo "Logs cleaned up"
后台启动springboot
nohup java -jar /ddoe/ddoe-test-starter-boot/ddoe-test-starter-1.0-SNAPSHOT.jar &
