ambari 离线部署
Ambari介绍
Ambari 是 Apache Software Foundation 的一个顶级开源项目,是一个集中部署、管理、监控 Hadoop 分布式集群的工具。但是这里的 Hadoop 是一个广义概念,并不仅仅指的是 Hadoop(HDFS、MapReduce),而是指 Hadoop 生态圈(包括 Spark、Hive、Hbase,Sqoop,Zookeeper、Flume 等),Ambari 可以使 Hadoop 大数据软件更容易使用,且可以方便的集成我们自己的服务让 Ambari 统一管理。
- 部署:自动化部署 Hadoop 软件,能够自动处理服务、组件之间的依赖(比如 HBase 依赖 HDFS,DataNode 启动的时候,需要 NameNode 先启动等)。
- 管理:Hadoop 服务组件的启动、停止、重启,配置文件的多版本管理。
- 监控:Hadoop 服务的当前状态(组件节点的存活情况、YARN 任务执行情况等),当前主机的状态(内存、硬盘、CPU、网络等),而且可以自定义报警事件。
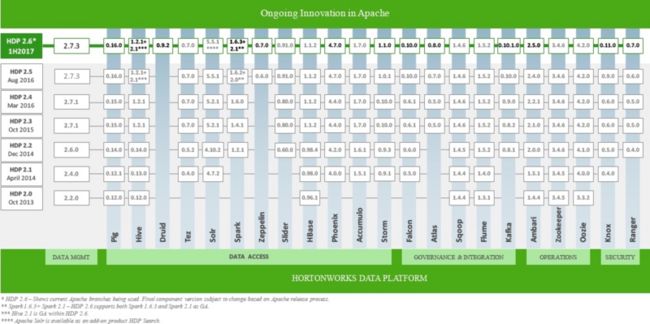
ambari版本对应表
此次采用HDP2.5版本
集群规划
| 集群hostname | 软件安装 |
|---|---|
| nn1 | ambari-agent,namenode,datanode,zookeeper |
| nn2 | ambari-agent,namenode,datanode,zookeeper |
| rm | ambari-server,resourcemanager,historyserver,datanode |
安装Ambari-Server
前提先下载好需要的离线包。
并将这些包上传到节点rm上。
需要的离线包介绍:
- HDP-UTILS-1.1.0.21-centos7.tar.gz(HDP工具包)
- ambari-2.4.1.0-centos7.tar.gz(ambari离线包)
- HDP-2.5.0.0-centos7-rpm.tar.gz(官方下载链接地址)
- CentOS-7-x86_64-DVD-1503-01.iso(Centos7离线包)
- jdk
Centos7 64 系统软件要求
- yum and rpm
- scp,curl,unzip,tar,and wget
- openSSL
- Python 2.7.x
- jdk 1.8.0_77(官方建议,不过我用的1.8.0_11也可以)
- 建议修改最大打开文件描述为10000,临时改变
ulimit -n 10000
永久更改,需要修改配置文件,且需要重启,建议和selinux关闭一起做完了,再做重启动作。
vi /etc/security/limits.conf
添加
* soft nofile 10000
* hard nofile 10000- 语言必须是默认的英文
安装ansible(自选)
注意:后续步骤,使用的是ansible的命令,如果没有安装ansible,则请使用原始命令。
例: ansible all -m command -a 'systemctl stop firewalld'
等同于在每台主机上执行命令 systemctl stop firewalld
ansible安装与操作
配置ssh免密
修改hosts,增加你的集群信息,每台配置一样
192.168.0.135   nn1.ambari      nn1
192.168.0.136   nn2.ambari      nn2
192.168.0.137 rm.ambari rm在rm节点上,执行命令ssh-keygen,直接敲enter键四次,然后再执行
ssh-copy-id nn1
ssh-copy-id nn2
ssh-copy-id rm
关闭防火墙
ansible all -m command -a 'systemctl stop firewalld' ansible all -m command -a 'systemctl disable firewalld'
关闭Selinux
修改/etc/selinux/config,改为SELINUX=disable,需要重启
安装jdk
1、解压包
cd /opt
tar -zxvf  jdk-8u111-linux-x64.tar.gz
2、在/etc/profile添加配置
export JAVA_HOME=/opt/jdk1.8.0_111
export PATH=$JAVA_HOME/bin:$PATH
export CLASSPATH=.:$JAVA_HOME/lib/dt.jar:$JAVA_HOME/lib/tools.jar
3、复制jdk包和配置文件到nn1、nn2节点
scp -r jdk1.8.0_111 nn2:/opt/
scp /etc/profile nn2:/etc/
scp -r jdk1.8.0_111 nn1:/opt/
scp /etc/profile nn1:/etc/
4、验证一下 java -version
离线挂载Centos7源
1、新建一个准备挂载的目录(为了后面方便httpd源,直接创建在httpd的默认目录上) mkdir -p /var/www/html/centos7
2、挂载镜像文件 mount -t iso9660 -o loop /opt/CentOS-7-x86_64-DVD-1511.iso /var/www/html/centos7
3、备份其他repo文件,构建离线源
cd /etc/yum.repos.d
mkdir backup
mv Centos-* backup
touch centos-media.repo
在centos-media.repo写入以下内容
[centos7-media]
name=Centos linux 7.0
baseurl=file:///var/www/html/centos7
enabled=1
gpgcheck=0
4、验证离线源是否可用。
yum clean all
yum makecache
配置ambari,HDP离线源
1、配置路径
cd /var/www/html
mkdir ambari
mkdir hdp
2、解压包到相应路径
 tar -zxvf /opt/Ambari/ambari-2.4.1.0-centos7.tar.gz -C /var/www/html/ambari/
 tar -zxvf /opt/Ambari/HDP-2.5.0.0-centos7-rpm.tar.gz -C /var/www/html/hdp/
 tar -zxvf /opt/Ambari/HDP-UTILS-1.1.0.21-centos7.tar.gz -C /var/www/html/hdp/
3、构建离线源
3.1、 在rm节点上构建
ambari离线源 vi /etc/yum.repos.d/ambari.repo
[ambari-2.4.1.0]
name=ambari-2.4.1.0 - Updates
baseurl=http://rm/ambari/AMBARI-2.4.1.0/centos7/2.4.1.0-22
gpgcheck=0
#gpgkey=http://public-repo-1.hortonworks.com/ambari/centos7/RPM-GPG-KEY/RPM-GPG-KEY-Jenkins
enabled=1
priority=1
hdp离线源 vi /etc/yum.repos.d/hdp.repo
[HDP-2.5]
name=HDP-2.5
baseurl=http://rm/hdp/HDP/centos7
enabled=1
gpgcheck=0
hdp-utils离线源 vi /etc/yum.repos.d/hdp-utils.repo
[HDP-UTILS-1.1.0.21]
name=HDP-UTILS-1.1.0.21
baseurl=http://rm/hdp/HDP-UTILS-1.1.0.21/repos/centos7
enabled=1
gpgcheck=0
安装Apache Httpd
1、安装 yum install httpd -y
2、修改配置 vi /etc/httpd/conf/httpd.conf
将图中标示的红色,分别修改为 ServerName rm:80
3、启动httpd systemctl start httpd systemctl enable httpd
4、验证一下,离线源是否可用了
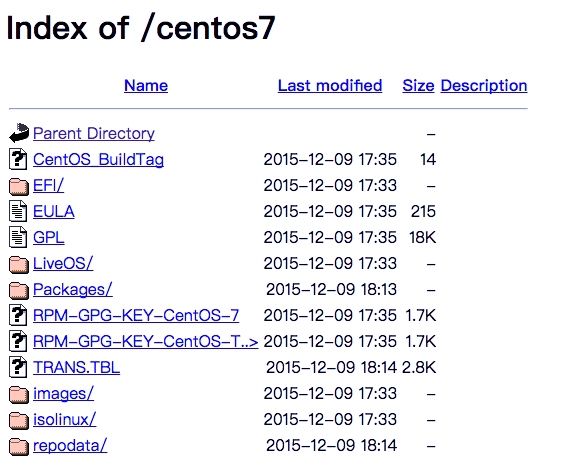
在自己电脑打开浏览器,输入rm/centos7(前提本机需要配置好hosts),出现如下图,表示成功了。
安装时间同步工具chrony
ansible all -m yum -a "name=chrony"
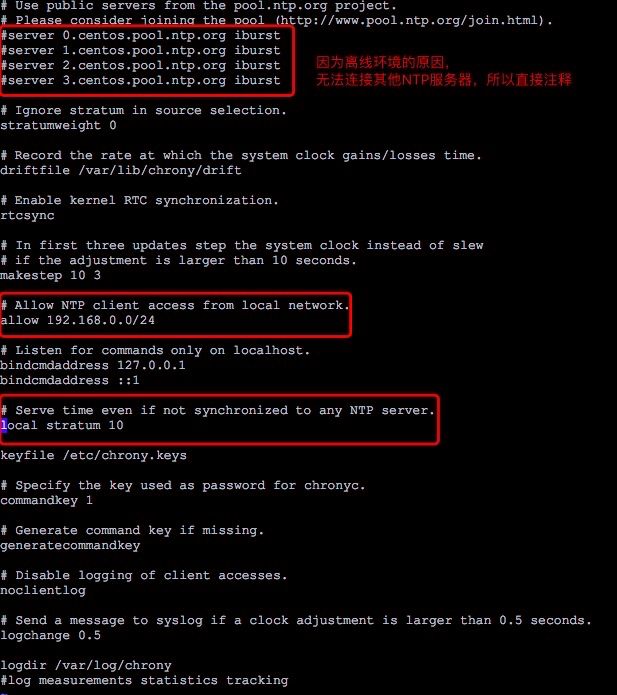
在rm节点修改chrony的配置文件
在nn1和nn2节点上修改配置文件,只需要增加要同步的服务器即可
启动chrony服务 ansible all -m command -a 'systemctl start chronyd'
自行检查时间是否已经同步了。
安装ambari-server
1、安装 yum install ambari-server -y
2、配置 ambari-server setup
大多数照着默认往下走就好了。
[root@rm ~]# ambari-server setup
Using python  /usr/bin/python
Setup ambari-server
Checking SELinux...
SELinux status is 'disabled'
Customize user account for ambari-server daemon [y/n] (n)? y
Enter user account for ambari-server daemon (root):root
Adjusting ambari-server permissions and ownership...
Checking firewall status...
Checking JDK...
[1] Oracle JDK 1.8 + Java Cryptography Extension (JCE) Policy Files 8
[2] Oracle JDK 1.7 + Java Cryptography Extension (JCE) Policy Files 7
[3] Custom JDK
==============================================================================
Enter choice (1): 3
WARNING: JDK must be installed on all hosts and JAVA_HOME must be valid on all hosts.
WARNING: JCE Policy files are required for configuring Kerberos security. If you plan to use Kerberos,please make sure JCE Unlimited Strength Jurisdiction Policy Files are valid on all hosts.
Path to JAVA_HOME: /opt/jdk1.8.0_111
Validating JDK on Ambari Server...done.
Completing setup...
Configuring database...
Enter advanced database configuration [y/n] (n)? y
Configuring database...
==============================================================================
Choose one of the following options:
[1] - PostgreSQL (Embedded)
[2] - Oracle
[3] - MySQL / MariaDB
[4] - PostgreSQL
[5] - Microsoft SQL Server (Tech Preview)
[6] - SQL Anywhere
[7] - BDB
==============================================================================
Enter choice (1): 1
Database name (ambari): ambari
Postgres schema (ambari): ambari
Username (ambari): ambari
Enter Database Password (bigdata):
Invalid characters in password. Use only alphanumeric or _ or - characters
Enter Database Password (bigdata):
Default properties detected. Using built-in database.
Configuring ambari database...
Checking PostgreSQL...
Running initdb: This may take up to a minute.
Initializing database ... OK


About to start PostgreSQL
Configuring local database...
Connecting to local database...done.
Configuring PostgreSQL...
Restarting PostgreSQL
Extracting system views...
ambari-admin-2.4.1.0.22.jar
...........
Adjusting ambari-server permissions and ownership...
Ambari Server 'setup' completed successfully.
3、启动 ambari-server start
安装ambari-agent
作为ambari-agent的条件:
- 防火墙关闭
- selinux关闭
- jdk安装
- chrony安装
- 因为此次是离线环境,还需要配置好离线源
因为前面四个条件,在安装ambari-server的时候已经安装好了。
要做的工作只有配置离线源
离线源配置
删除默认repo rm -f /etc/yum.repos.d/*.repo
复制rm的离线源到其他节点
scp /etc/yum.repos.d/ambari.repo nn1:/etc/yum.repos.d/
scp /etc/yum.repos.d/ambari.repo nn2:/etc/yum.repos.d/
scp /etc/yum.repos.d/hdp.repo nn2:/etc/yum.repos.d/
scp /etc/yum.repos.d/hdp.repo nn1:/etc/yum.repos.d/
scp /etc/yum.repos.d/hdp-utils.repo nn1:/etc/yum.repos.d/
scp /etc/yum.repos.d/hdp-utils.repo nn2:/etc/yum.repos.d/
3.3 在nn1和nn2上验证一下
yum makecache新的一台ambari-agent
你需要重新配置前面提到的前置环境。
另外需要修改ambari-server的/etc/hosts,把新的机子加进来,并且执行ssh-copy-id $new_hostname
在ambari-web上安装集群
打开浏览器,输入ambari-server所在节点的IP/HostName:8080,接下来就是直接在界面上操作了。
注意一些坑就好了。
由于界面这边忘记截屏了,所以给个链接-部署一个Hadoop2.X集群作为参考。
安装的时候,会报错snappy包不对
resource_management.core.exceptions.Fail: Execution of '/usr/bin/yum -d 0 -e 0 -y install snappy-devel' returned 1. Error: Package: snappy-devel-1.0.5-1.el6.x86_64 (HDP-UTILS-1.1.0.21)
           Requires: snappy(x86-64) = 1.0.5-1.el6
           Installed: snappy-1.1.0-3.el7.x86_64 (@anaconda)
               snappy(x86-64) = 1.1.0-3.el7
           Available: snappy-1.0.5-1.el6.x86_64 (HDP-UTILS-1.1.0.21)
               snappy(x86-64) = 1.0.5-1.el6
 You could try using --skip-broken to work around the problem
 You could try running: rpm -Va --nofiles --nodigest
卸载自带的snappy ansible all -m yum -a 'name=snappy state=removed'
安装snappy-devel ansible all -m yum -a 'name=snappy-devel'
网上现有资源docker安装ambari
这个很方便,基本10分钟就可以搭建一个测试集群,但美中不足的是,作者的源不是离线的,要搭建集群需要有网络环境。
1、安装docker
2、下载github docker ambari
github docker-ambari
3、根据网址上的readme文档,进行简单部署就好了
3.1 解压包
3.2 进入解压包目录
`. ambari-functions or source ambari-functions`
3.3 启动集群
`amb-start-cluster 3`

问题残留
作者在readme中提到
Ambari containers started by ambari-function are using bridge networking. This means that you will not be able to communicate with containers directly from host unless you specify the route to containers. You can do this with:
# Getting the IP of docker-machine or boot2docker
docker-machine ip
# or
boot2docker ip

# Setting up the
sudo route add -net 172.17.0.0/16
# e.g:
sudo route add -net 172.17.0.0/16 192.168.99.100
大体的意思就是可以通过本机可以通过配置路由来连通172.17.0.0的网络,也就是说作者并没有把端口映射出来,我配置了自己的网络路由,但并不能连通。
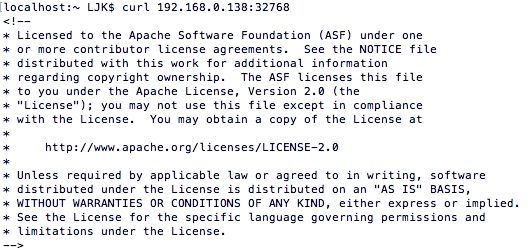
后面是通过修改docker启动ambari-server的命令来启动ambari-server,然后输入宿主机IP:映射端口号,就可以访问作者创建的ambari-server镜像了。如图:
![]()
docker离线搭建ambari
1、 先把ambari和HDP离线源放在宿主机上,并解压出来
2、 开始构建Dockerfile
准备文件如下
ambari.repo
Dockerfile
hdp.repo
hdp-utils.repo
httpd.conf
jdk-8u111-linux-x64.tar.gz
supervisord.conf
Dockerfile内容
FROM centos

MAINTAINER linjk

# 安装JDK
ADD jdk-8u111-linux-x64.tar.gz /usr/local/src/
ENV JAVA_HOME=/usr/local/src/jdk1.8.0_111
ENV PATH=$PATH:$JAVA_HOME/bin
ENV CLASSPATH=.:$JAVA_HOME/jre/lib/rt.jar:$JAVA_HOME/lib/dt.jar:$JAVA_HOME/lib/tools.jar

# 安装httpd以及其他必要工具
RUN yum makecache Fast \
        && yum install httpd openssh-server net-tools chrony -y
# 安装supervisor
RUN yum -y install python-setuptools \
                && easy_install supervisor \
                && mkdir -p /etc/supervisor
COPY supervisord.conf /etc/supervisor/
COPY httpd.conf /etc/httpd/conf/httpd.conf

RUN mkdir -p /var/www/html/centos/ \
        && mkdir -p /var/www/html/ambari/ \
        && mkdir -p /var/www/html/hdp/
COPY *.repo /etc/yum.repos.d/

# 安装mariadb和mariadb-server
yum install -y mariadb mariadb-server mysql-connector-java

EXPOSE 22 80 9001 8080 3306

CMD supervisord -c /etc/supervisor/supervisord.conf
ambari.repo内容
[ambari-2.4.1.0]
name=ambari-2.4.1.0 - Updates
baseurl=http://ambari-server/ambari/AMBARI-2.4.1.0/centos7/2.4.1.0-22
gpgcheck=0
#gpgkey=http://public-repo-1.hortonworks.com/ambari/centos7/RPM-GPG-KEY/RPM-GPG-KEY-Jenkins
enabled=1
priority=1
hdp.repo内容
[HDP-2.5]
name=HDP-2.5
baseurl=http://ambari-server/hdp/HDP/centos7
enabled=1
gpgcheck=0
hdp-utils.repo内容
[HDP-UTILS-1.1.0.21]
name=HDP-UTILS-1.1.0.21
baseurl=http://ambari-server/hdp/HDP-UTILS-1.1.0.21/repos/centos7
enabled=1
gpgcheck=0
httpd.conf修改的内容
ServerName ambari-server:80
#
# Deny access to the entirety of your server's filesystem. You must
# explicitly permit access to web content directories in other
# blocks below.
#
supervisor内容
unix_http_server]
file=/var/run/supervisor.sock

[supervisord]
nodaemon=true

[rpcinterface:supervisor]
supervisor.rpcinterface_factory = supervisor.rpcinterface:make_main_rpcinterface

[supervisorctl]
serverurl=unix:///var/run/supervisor.sock

[inet_http_server]
port=*:9001

[program:sshd]
command=/usr/sbin/sshd -D

[program:httpd]
command=/usr/sbin/httpd
3、 构建镜像ambari-server(之前压缩包放在/opt/ambari和/opt/hdp/下) docker run -d -P -v /opt/ambari/:/var/www/html/ambari/ -v /opt/hdp/:/var/www/html/hdp/ -h ambari-server --name as ambari-server /usr/sbin/init
4、 进入容器启动和配置mariaDB
4.1、 启动 systemctl start mariadb
4.2、 设置开机启动 systemctl enable mariadb
4.3、 配置 mysql_secure_installation
会出现一个交互界面,基本一路回车,设置密码界面
首先是设置密码,会提示先输入密码
Enter current password for root (enter for none):<–初次运行直接回车

设置密码
Set root password? [Y/n] <– 是否设置root用户密码,输入y并回车或直接回车
New password: <– 设置root用户的密码
Re-enter new password: <– 再输入一次你设置的密码

其他配置
Remove anonymous users? [Y/n] <– 是否删除匿名用户,回车
Disallow root login remotely? [Y/n] <–是否禁止root远程登录,回车,
Remove test database and access to it? [Y/n] <– 是否删除test数据库,回车
Reload privilege tables now? [Y/n] <– 是否重新加载权限表,回车
4.4、 (自选)配置mariadb的字符集 vi /etc/my.cnf
4.5、 添加用户设置权限
create database ambari;
use ambari;
CREATE USER 'ambari'@'%' IDENTIFIED BY 'bigdata';
GRANT ALL PRIVILEGES ON *.* TO 'ambari'@'%';
CREATE USER 'ambari'@'ambari-server' IDENTIFIED BY 'bigdata';
GRANT ALL PRIVILEGES ON *.* TO 'ambari'@'ambari-server';
5、 安装ambari-server并配置和启动
5.1、 安装 yum install ambari-server
5.2、 配置 ambari-server setup
出现交互界面
Using python  /usr/bin/python
Setup ambari-server
Checking SELinux...
WARNING: Could not run /usr/sbin/sestatus: OK
Customize user account for ambari-server daemon [y/n] (n)? y
Enter user account for ambari-server daemon (root):root
Adjusting ambari-server permissions and ownership...
Checking firewall status...
Checking JDK...
Do you want to change Oracle JDK [y/n] (n)? y
[1] Oracle JDK 1.8 + Java Cryptography Extension (JCE) Policy Files 8
[2] Oracle JDK 1.7 + Java Cryptography Extension (JCE) Policy Files 7
[3] Custom JDK
==============================================================================
Enter choice (1): 3
WARNING: JDK must be installed on all hosts and JAVA_HOME must be valid on all hosts.
WARNING: JCE Policy files are required for configuring Kerberos security. If you plan to use Kerberos,please make sure JCE Unlimited Strength Jurisdiction Policy Files are valid o
Path to JAVA_HOME: /usr/local/src/jdk1.8.0_111
Validating JDK on Ambari Server...done.
Completing setup...
Configuring database...
Enter advanced database configuration [y/n] (n)? y
Configuring database...
==============================================================================
Choose one of the following options:
[1] - PostgreSQL (Embedded)
[2] - Oracle
[3] - MySQL / MariaDB
[4] - PostgreSQL
[5] - Microsoft SQL Server (Tech Preview)
[6] - SQL Anywhere
[7] - BDB
==============================================================================
Enter choice (3): 3
Hostname (ambari-server):
Port (3306):
Database name (ambari):
Username (ambari):
Enter Database Password (bigdata):
Configuring ambari database...
Copying JDBC drivers to server resources...
Configuring remote database connection properties...
WARNING: Before starting Ambari Server, you must run the following DDL against the database to create the schema: /var/lib/ambari-server/resources/Ambari-DDL-MySQL-CREATE.sql
Proceed with configuring remote database connection properties [y/n] (y)? y
Extracting system views...
ambari-admin-2.4.1.0.22.jar
...........
Adjusting ambari-server permissions and ownership...
Ambari Server 'setup' completed successfully.
根据警告到mysql去执行sql语句,注意use ambari;
use ambari;
source  /var/lib/ambari-server/resources/Ambari-DDL-MySQL-CREATE.sql
验证一下,是否有生成一些ambari配置表
show tables;6、 启动 ambari-server start
7、 验证
在浏览器打开 $宿主机IP:映射端口


