python爬虫实战:利用scrapy,短短50行代码下载整站短视频
点击上方“
何俊林
”,马上关注,每天早上
8:50
准时推送
真爱,请置顶或星标
 近日,有朋友向我求助一件小事儿,他在一个短视频app上看到一个好玩儿的段子,想下载下来,可死活找不到下载的方法。这忙我得帮,少不得就抓包分析了一下这个app,找到了视频的下载链接,帮他解决了这个小问题。
因为这个事儿,勾起了我另一个念头,这不最近一直想把python爬虫方面的知识梳理梳理吗,干脆借机行事,正凑着短视频火热的势头,做一个短视频的爬虫好了,中间用到什么知识就理一理。我喜欢把事情说得很直白,如果恰好有初入门的朋友想了解爬虫的技术,可以将就看看,或许对你的认识会有提升。如果有高手路过,最好能指点一二,本人不胜感激。 在一些书上会把爬虫的基本抓取流程概括为UR2IM,意思是数据爬取的过程是围绕URL、Request(请求)、Response(响应)、Item(数据项)、MoreUrl(更多的Url)展开的。上图的绿色箭头 体现的正是这几个要素的流转过程。图中涉及的四个模块正是用于处理这几类对象的:
 spiders文件夹下,自动生成了名为DfVideoSpider.py的文件。
 爬虫项目创建之后,我们来确定需要爬取的数据。在items.py中编辑:

五、最后
今天讲了爬虫的一些基础的概念,不深也不透,主要是通过一个案例给大家一个直观的认识。一些细节上的点后续会专门开文细讲,喜欢的朋友可以关注,一起探讨。本文所公布代码仅作为学习交流之用,请勿用于非法用途。
本文作者:
马鸣谦
,原文链接:https://www.cnblogs.com/mamingqian/p/9867697.html
推荐阅读
 近日,有朋友向我求助一件小事儿,他在一个短视频app上看到一个好玩儿的段子,想下载下来,可死活找不到下载的方法。这忙我得帮,少不得就抓包分析了一下这个app,找到了视频的下载链接,帮他解决了这个小问题。
因为这个事儿,勾起了我另一个念头,这不最近一直想把python爬虫方面的知识梳理梳理吗,干脆借机行事,正凑着短视频火热的势头,做一个短视频的爬虫好了,中间用到什么知识就理一理。我喜欢把事情说得很直白,如果恰好有初入门的朋友想了解爬虫的技术,可以将就看看,或许对你的认识会有提升。如果有高手路过,最好能指点一二,本人不胜感激。
一、撕开爬虫的面纱——爬虫是什么,它能做什么
爬虫是什么
爬虫就是一段能够从互联网上高效获取数据的程序。我们每天都在从互联网上获取数据。当打开浏览器访问百度的时候,我们就从百度的服务器获取数据,当拿起手机在线听歌的时候,我们就从某个app的服务器上获取数据。简单的归纳,这些过程都可以描述为:我们提交一个Request请求,服务器会返回一个Response数据,应用根据Response来渲染页面,给我们展示数据结果。爬虫最核心的也是这个过程,提交Requests——〉接受Response。就这样,很简单,当我们在浏览器里打开一个页面,看到页面内容的时候,我们就可以说这个页面被我们采集到了。只不过当我们真正进行数据爬取时,一般会需要采集大量的页面,这就需要提交许多的Requests,需要接受许多的Response。数量大了之后,就会涉及到一些比较复杂的处理,比如并发的,比如请求序列,比如去重,比如链接跟踪,比如数据存储,等等。于是,随着问题的延伸和扩展,爬虫就成为了一个相对独立的技术门类。但它的本质就是对一系列网络请求和网络响应的处理。爬虫能做什么
爬虫的作用和目的只有一个,获取网络数据。我们知道,互联网是个数据的海洋,大量的信息漂浮在其中,想把这些资源收归己用,爬虫是最常用的方式。特别是最近几年大树据挖掘技术和机器学习以及知识图谱等技术的兴盛,更是对数据提出了更大的需求。另外也有很多互联网创业公司,在起步初期自身积累数据较少的时候,也会通过爬虫快速获取数据起步。二、python爬虫框架scrapy——爬虫开发的利器
如果你刚刚接触爬虫的概念,我建议你暂时不要使用scrapy框架。或者更宽泛的说,如果你刚刚接触某一个技术门类,我都不建议你直接使用框架,因为框架是对许多基础技术细节的高级抽象,如果你不了解底层实现原理就直接用框架多半会让你云里雾里迷迷糊糊。在入门爬虫之初,看scrapy的文档,你会觉得“太复杂了”。当你使用urllib或者Requests开发一个python的爬虫脚本,并逐个去解决了请求头封装、访问并发、队列去重、数据清洗等等问题之后,再回过头来学习scrapy,你会觉得它如此简洁优美,它能节省你大量的时间,它会为一些常见的问题提供成熟的解决方案。scrapy数据流程图
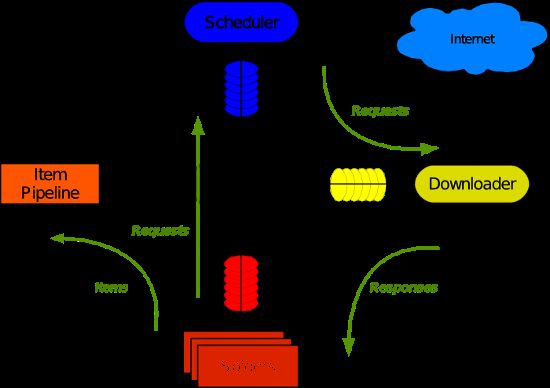
这张图是对scrapy框架的经典描述,一时看不懂没有关系,用一段时间再回来看。或者把本文读完再回来看。 在一些书上会把爬虫的基本抓取流程概括为UR2IM,意思是数据爬取的过程是围绕URL、Request(请求)、Response(响应)、Item(数据项)、MoreUrl(更多的Url)展开的。上图的绿色箭头 体现的正是这几个要素的流转过程。图中涉及的四个模块正是用于处理这几类对象的:
Spider模块:负责生成Request对象、解析Response对象、输出Item对象
Scheduler模块:负责对Request对象的调度
Downloader模块:负责发送Request请求,接收Response响应
ItemPipleline模块:负责数据的处理
scrapy Engine负责模块间的通信
各个模块和scrapy引擎之间可以添加一层或多层中间件,负责对出入该模块的UR2IM对象进行处理。
scrapy的安装
参考官方文档,不再赘述。官方文档:https://scrapy-chs.readthedocs.io/zh_CN/0.24/intro/install.html三、scrapy实战:50行代码爬取全站短视频
python的优雅之处在于能够让开发者专注于业务逻辑,花更少的时间在枯燥的代码编写调试上。scrapy无疑完美诠释了这一精神。开发爬虫的一般步骤是:确定要爬取的数据(item)
找到数据所在页面的url
找到页面间的链接关系,确定如何跟踪(follow)页面
那么,我们一步一步来。
1 scrapy startproject DFVideo紧接着,我们创建一个爬虫:
scrapy genspider -t crawl DfVideoSpider eastday.com
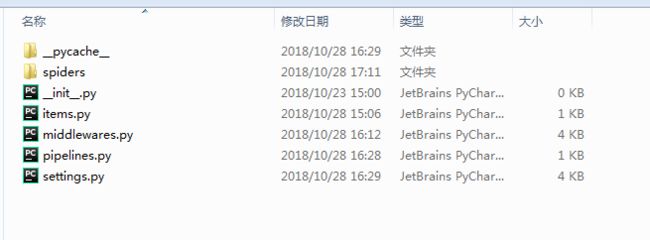
这是我们发现在当前目录下已经自动生成了一个目录:DFVideo目录下包括如图文件:
 spiders文件夹下,自动生成了名为DfVideoSpider.py的文件。
 爬虫项目创建之后,我们来确定需要爬取的数据。在items.py中编辑:
 import scrapy


 class DfvideoItem(scrapy.Item):
     # define the fields for your item here like:
     # name = scrapy.Field()
     video_url = scrapy.Field()#视频源url
     video_title = scrapy.Field()#视频标题
     video_local_path = scrapy.Field()#视频本地存储路径
接下来,我们需要确定视频源的url,这是很关键的一步。现在许多的视频播放页面是把视频链接隐藏起来的,这就使得大家无法通过右键另存为,防止了视频别随意下载。但是只要视频在页面上播放了,那么必然是要和视频源产生数据交互的,所以只要稍微抓下包就能够发现玄机。这里我们使用fiddler抓包分析。发现其视频播放页的链接类似于:video.eastday.com/a/180926221513827264568.html?index3lbt视频源的数据链接类似于:mvpc.eastday.com/vyule/20180415/20180415213714776507147_1_06400360.mp4有了这两个链接,工作就完成了大半:在DfVideoSpider.py中编辑
# -*- coding: utf-8 -*-
import scrapy
from scrapy.loader import ItemLoader
from scrapy.loader.processors import MapCompose,Join
from DFVideo.items import DfvideoItem
from scrapy.linkextractors import LinkExtractor
from scrapy.spiders import CrawlSpider, Rule
import time
from os import path
import os


class DfvideospiderSpider(CrawlSpider):
    name = 'DfVideoSpider'
    allowed_domains = ['eastday.com']
    start_urls = ['http://video.eastday.com/']

    rules = (
        Rule(LinkExtractor(allow=r'video.eastday.com/a/\d+.html'),
             callback='parse_item', follow=True),
    )

    def parse_item(self, response):
        item = DfvideoItem()
        try:
            item["video_url"] = response.xpath('//input[@id="mp4Source"]/@value').extract()[0]
            item["video_title"] = response.xpath('//meta[@name="description"]/@content').extract()[0]
            #print(item)
            item["video_url"] = 'http:' + item['video_url']
            yield scrapy.Request(url=item['video_url'], meta=item, callback=self.parse_video)
        except:
            pass


    def parse_video(self, response):

        i = response.meta
        file_name = Join()([i['video_title'], '.mp4'])
        base_dir = path.join(path.curdir, 'VideoDownload')
        video_local_path = path.join(base_dir, file_name.replace('?', ''))
        i['video_local_path'] = video_local_path

        if not os.path.exists(base_dir):
            os.mkdir(base_dir)

        with open(video_local_path, "wb") as f:
            f.write(response.body)

        yield i
至此,一个简单但强大的爬虫便完成了。如果你希望将视频的附加数据保存在数据库,可以在pipeline.py中进行相应的操作,比如存入mongodb中:
from scrapy import log
import pymongo

class DfvideoPipeline(object):
    def __init__(self):

        self.mongodb = pymongo.MongoClient(host='127.0.0.1', port=27017)
        self.db = self.mongodb["DongFang"]

        self.feed_set = self.db["video"]
        # self.comment_set=self.db[comment_set]

        self.feed_set.create_index("video_title", unique=1)
        # self.comment_set.create_index(comment_index,unique=1)

    def process_item(self, item, spider):
        try:
            self.feed_set.update({"video_title": item["video_title"]}, item, upsert=True)
        except:
            log.msg(message="dup key: {}".format(item["video_title"]), level=log.INFO)
        return item

    def on_close(self):
        self.mongodb.close()
当然,你需要在setting.py中将pipelines打开:
ITEM_PIPELINES = {
    'TouTiaoVideo.pipelines.ToutiaovideoPipeline': 300,
}
四、执行结果展示
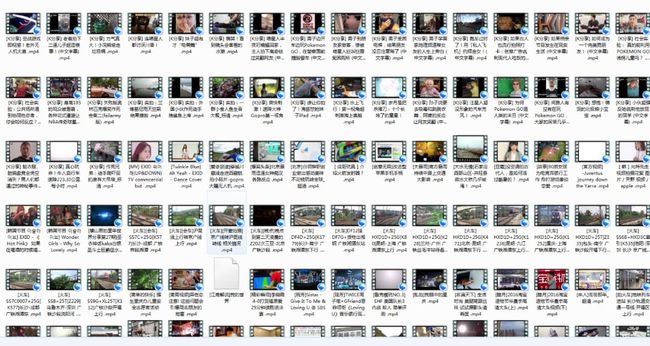
视频文件:
