企业级 ##MySQL-proxy搭建数据库读写分离##
1.读写分离的概念:
读写分离,基本的原理是让主数据库处理事务性增、改、删操作(INSERT、UPDATE、DELETE),而从数据库处理SELECT查询操作。数据库复制被用来把事务性操作导致的变更同步到集群中的从数据库。
2.读写分离的作用:
因为数据库的“写”(写10000条数据到oracle可能要3分钟)操作是比较耗时的。
但是数据库的“读”(从oracle读10000条数据可能只要5秒钟)。
所以读写分离,解决的是数据库的写入数据,影响了查询的效率。
3.主从复制与读写分离:
在实际的生产环境中,对数据库的读和写都在同一个数据库服务器中,是不能满足实际需求的。无论是在安全性、高可用性还是高并发等各个方面都是完全不能满足实际需求的。因此,通过主从复制的方式来同步数据,再通过读写分离来提升数据库的并发负载能力。有点类似于前面我们学习过的rsync,但是不同的是rsync是对磁盘文件做备份,而mysql主从复制是对数据库中的数据、语句做备份。
4.实验环境:
【server1】 172.25.48.1 master端
【server2】 172.25.48.2 slave端
【server3】 172.25.48.3 MySQL-proxy端
【serve1】主库与【server2】从库之间搭建GTID主从复制,使主库与从库相互连接并且数据相同
【server3】上安装配置mysql-proxy,实现master/slave架构读写分离。
1.【server3】中解压安装包:
[root@server3 ~]# ls
anaconda-ks.cfg  install.log.syslog
install.log      mysql-proxy-0.8.5-linux-el6-x86-64bit.tar.gz
[root@server3 ~]# tar zxf  mysql-proxy-0.8.5-linux-el6-x86-64bit.tar.gz
[root@server3 ~]# mv mysql-proxy-0.8.5-linux-el6-x86-64bit /usr/local/mysql-proxy
[root@server3 ~]# cd /usr/local/mysql-proxy/
[root@server3 mysql-proxy]# ls
bin  include  lib  libexec  licenses  share
[root@server3 mysql-proxy]# mkdir conf
[root@server3 mysql-proxy]# ls
bin  conf  include  lib  libexec  licenses  share
2.【server3】编辑配置文件:
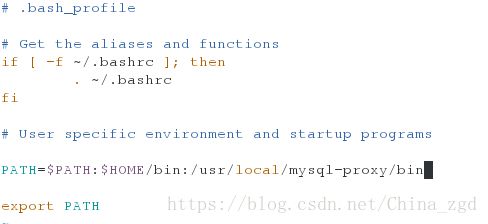
【1】[root@server3 bin]# vim ~/.bash_profile

[root@server3 bin]# source ~/.bash_profile ##刷新【2】[root@server3 conf]# vim mysql-proxy.conf
[root@server3 conf]# pwd
/usr/local/mysql-proxy/conf
##建立日志目录
[root@server3 mysql-proxy]# ls
bin  conf  include  lib  libexec  licenses  share
[root@server3 mysql-proxy]# mkdir logs
【3】[root@server3 mysql-proxy]# vim rw-splitting.lua
[root@server3 mysql-proxy]# pwd
/usr/local/mysql-proxy/share/doc/mysql-proxy[root@server3 conf]# chmod 660 /usr/local/mysql-proxy/conf/mysql-proxy.conf ##增加权限
[root@server3 conf]# mysql-proxy --defaults-file=/usr/local/mysql-proxy/conf/mysql-proxy.conf ##启动服务
[root@server3 conf]# netstat -antlp ##查看端口
tcp 0 0 0.0.0.0:3306 0.0.0.0:* LISTEN 1120/mysql-proxy
4.在真机通过mysql-proxy(代理)登陆数据库:
(1)给root用户授权:
【server1】master:
mysql> grant all privileges on *.* to 'root'@'%' identified by 'Xa85215295##';
Query OK, 0 rows affected, 1 warning (0.00 sec)
(2)真机登陆:
[root@foundation39 ~]# mysql -h 172.25.39.3 -u root -p
Enter password:
Welcome to the MariaDB monitor.  Commands end with ; or \g.
Your MySQL connection id is 16
Server version: 5.7.17-log MySQL Community Server (GPL)

Copyright (c) 2000, 2016, Oracle, MariaDB Corporation Ab and others.

Type 'help;' or '\h' for help. Type '\c' to clear the current input statement.

MySQL [(none)]> use test
Reading table information for completion of table and column names
You can turn off this feature to get a quicker startup with -A

Database changed
MySQL [test]> select * from userlist;
+----------+----------+
| username | password |
+----------+----------+
| user1    | 123      |
| user2    | 344      |
| user3    | 789      |
+----------+----------+
3 rows in set (0.00 sec)
(3)在【server1】中查看3306端口连接的主机:
[root@server1 ~]# lsof -i :3306
COMMAND  PID  USER   FD   TYPE DEVICE SIZE/OFF NODE NAME
mysqld  1491 mysql   34u  IPv6  10253      0t0  TCP *:mysql (LISTEN)
mysqld  1491 mysql   59u  IPv6  10314      0t0  TCP 172.25.39.1:mysql->172.25.39.2:54744 (ESTABLISHED)
mysqld  1491 mysql   62u  IPv6  10360      0t0  TCP 172.25.39.1:mysql->172.25.39.3:49305 (ESTABLISHED)
(4)再打开一台真机的shell,重复(2)(3)动作
[root@server1 ~]# lsof -i :3306
COMMAND  PID  USER   FD   TYPE DEVICE SIZE/OFF NODE NAME
mysqld  1491 mysql   34u  IPv6  10253      0t0  TCP *:mysql (LISTEN)
mysqld  1491 mysql   50u  IPv6  10922      0t0  TCP 172.25.39.1:mysql->172.25.39.3:49306 (ESTABLISHED)
mysqld  1491 mysql   59u  IPv6  10314      0t0  TCP 172.25.39.1:mysql->172.25.39.2:54744 (ESTABLISHED)
mysqld  1491 mysql   62u  IPv6  10360      0t0  TCP 172.25.39.1:mysql->172.25.39.3:49305 (ESTABLISHED)
(5)在打开第三台真机连接mysql-proxy调度器时,超过我们在文件里编辑master最大连接数2,直接被调度到【server2】slave库
[root@server2 ~]# lsof -i :3306
COMMAND  PID  USER   FD   TYPE DEVICE SIZE/OFF NODE NAME
mysqld  1726 mysql   32u  IPv6  10589      0t0  TCP *:mysql (LISTEN)
mysqld  1726 mysql   48u  IPv6  11279      0t0  TCP 172.25.39.2:mysql->172.25.39.3:49980 (ESTABLISHED)
mysqld  1726 mysql   58u  IPv4  10682      0t0  TCP 172.25.39.2:54744->172.25.39.1:mysql (ESTABLISHED)
5.测试:
【真机】建立新的数据表:
Database changed
MySQL [test]> insert into userlist values ('user5','12390');
Query OK, 1 row affected (0.07 sec)
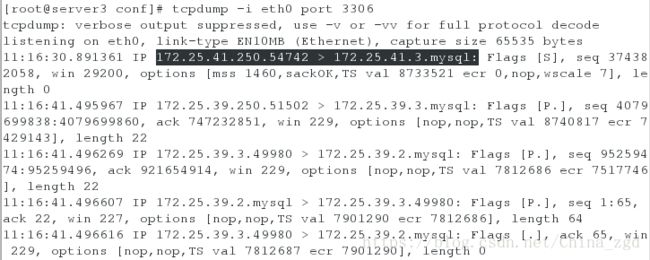
【server3】查看端口连接信息:
[root@server3 conf]# yum install -y tcpdump


