纯命令行配置scst向windows提供iSCSI存储资源
这篇文章主要介绍如何搭建SCST环境,并通过命令行和修改配置文件的方式将Linux下的存储挂载到Windows主机端,对涉及到的主要知识点进行了拓展讲解。
一、SCST安装
1.1简介
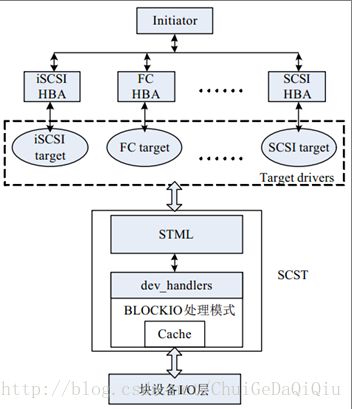
SCST是Generic SCST Target Subsystem forLinux的简称,意为Linux通用SCSI目标子系统,是Linux SCSI目标子系统的一种实现。它为SCST Target Driver和Linux内核之间提供了一个统一的接口,同时提供Linux内核与存储后端的句柄连接,连接真实或模拟的存储后端与目标驱动程序。
SCST由三部分构成:scst、iscsi-scst和scstadmin。我选择的是2.0.0版本的SCST,其源码包形式如下:
iscsi-scst-2.0.0.tar.gz
scst-2.0.0.1.tar.gz
scstadmin-2.0.0.tar.gz
【scst】在SCSI目标驱动层和Linux内核层之间提供统一的、持久的接口,它尽可能地简化了目标驱动的开发。SCST支持如下几种I/O模式。
Ø pass-through模式:在该种模式下,来自客户端initiators的SCSI命令将不被修改地直接传给target端的SCSI硬件。在该种模式下,必须保证initiators端max_sectors_kb的值小于target端的值。原因是在本地的SCSI硬件不能处理超过一定大小的数据。
Ø fileio模式:默认情况下SCST的导出模式是fileio。它允许使用文件系统上的文件或者块设备作为虚拟的SCSI设备或光驱,该模式可以充分利用linux的cache。默认情况下,由于性能的原因,VDISK FILEIO device使用write-back caching(写回) 策略,对于一个稳定的日志文件系统来说这样通常情况一是安全的。但是一旦出现电源、软\硬件的故障时,那些cache上还没来得及保存的数据将会丢失,在这种情况下,必须有良好的UPS或者是用WRITE_THROUGH代替write-back caching。NV_CACHE是fileio的一种模式,在该种模式下,将提供最好的性能,但前提是必须有良好的UPS做保证,这样在电源出现故障时能及时停掉target。O_DIRECT也是fileio的一种模式:write和read caching都被disabled。该模式通常不会使用。
注: write through:CPU向cache写入数据时,同时也向memory写一份,使cache和memory的数据保持一致。优点是比较简单,缺点是每次都要访问memory,速度比较慢。
注:write-back caching: cpu更新cache时,只是把更新的cache区标记一下,并不同步更新到memory。只有当cache区要被新进入的数据取代时,才更新到memory。这样做的原因是考虑到很多时候cache存入的是中间结果,没有必要同步更新memory。优点是CPU执行的效率提高,缺点是实现起来技术比较复杂。
Ø blockio模式:绕开系统的page-cache(页面缓存)直接bio。该模式适用于后端存储设备比较高端或者不需要caching的应用或者需要大量块级吞吐的环境。
Ø user space 模式:在SCST环境中使用用户空间的虚拟SCSI设备模拟执行
Ø performance模式:不会与底层的SCSI设备发生实际数据传输,仅提供直接的性能改进措施方法。
其中后两种只有调试和测试的意义,在实际应用中为前三种模式。
【iscsi-scst】目标驱动,它由IET(iSCSI Enterprise Target)发展而来。目标驱动与设备驱动程序一起工作,主要是负责接收主机命令,维护目标端和启动端的传输通道,并根据命令处理状态向主机返回信息。在发起端(Initiator)看来,Target就是一个专属的SCSIHost,它将用户分配的LUN或者DISK映射为远程可访问的虚拟设备。
SCST目前支持多种类型Target驱动:
1) iSCSI-SCST:这是对IET iSCSI Target的改进版,解决了IET Target Driver的BUG并进行了升级。IDE驱动在很多方面中忽略了错误处理,严重影响了内存分配等性能,SCST对其内核模块进行了90%以上的重构和改进。Iscsi-scst相对IET Driver,有着90%的性能提升,并且支持Pass-Through模式,自动加载配置而不需要Initiator端进行任何重启操作,高级设备管理,使得不同的Initiator发现同一Target下的不同的设备组。
2) FC Target,全面支持2、4、8Gbps 光纤通道接口,兼容标准的FC协议,支持NPIV。目前仅支持Qlogic和Emulex两个厂家生产的HBA卡。加载后,能够使得绑定的HBA作为FCP Target。对Qlogic HBA的支持更为丰富一些,支持设备分组管理,仅让允许的发起端发现和使用target设备。FC Target能够支持多种工作模式:仅Target模式和Initiator和Target模式协同工作模式,后一种模式默认启动为发起端模式,当Target模式启用后,会自动禁用Initiator模式,而当Target模式禁用后,Initiator模式又会被开启。
3) FCoE Target,目前尚在测试阶段,未来将全面支持FCoE,提供高性能存储解决方案。
4) SCST其他的Target驱动有SRP、SAS、Local Target等,用途范围有限,技术更新也比较缓慢,将来大范围应用时,会进行更多的支持。
Target驱动作为存储操作系统中不可缺少的组成部分,它的性能直接影响到系统的性能和用户体验,因此,大多高性能的Target驱动,都是工作在内核态。SCSTTarget驱动也不例外,所有支持的Target的驱动均工作在内核态,减少了系统调用,提高了资源利用率,能够支持比较高的数据吞吐率。当发起端命令到来时,Target驱动会首先进行处理和过滤,并传递给SCST中间层驱动,接收状态并返回给发起端。
【scstadmin】scst的配置和管理脚本,它可以接收命令行输入或者直接读取配置文件/etc/scst.conf来配置和管理scst。
1.2 安装
各组成模块的安装相当简单,从各自README文件了解到只需要进入各主目录下执行make all和make install就可以了。但是在这之前,SCST还有几个补丁要打,针对不同的linux内核版本,SCST都有与之对应的补丁。我所用的电脑安装的是CentOS5.4,其原装内核为.2.6.18,我要升级的内核版本为.2.6.29。
【打补丁】
[root@localhost linux-2.6.29]#patch -p1 < ../scst-2.0.0.1/kernel/readahead-2.6.29.patch
patching file mm/readahead.c
[root@localhost linux-2.6.29]#patch -p1 < ../scst-2.0.0.1/kernel/readahead-context-2.6.29.patch
patching file mm/readahead.c
patching file lib/radix-tree.c
patching fileinclude/linux/radix-tree.h
[root@localhost linux-2.6.29]#patch -p1 < ../scst-2.0.0.1/kernel/scst_exec_req_fifo-2.6.29.patch
patching filedrivers/scsi/scsi_lib.c
patching fileinclude/scsi/scsi_device.h
[root@localhost linux-2.6.29]#patch -p1 < ../iscsi-scst-2.0.0/kernel/patches/put_page_callback-2.6.29.patch
patching file include/linux/mm_types.h
patching file include/linux/net.h
patching file net/core/skbuff.c
patching file net/ipv4/ip_output.c
patching file net/ipv4/Makefile
patching file net/ipv4/tcp.c
patching file net/ipv4/tcp_output.c
patching file net/ipv4/tcp_zero_copy.c
patching file net/ipv6/ip6_output.c
patching file net/Kconfig
【SCST安装】
打完补丁后,完成内核的升级,并以新内核重新启动。然后,直接进入各SCST各组成目录下编译、安装相应的模块。
【配置文件】
从./iscsi-scst/etc/目录下拷贝配置文件scst.conf到/etc目录下,当然你也可以自己在/etc目录下新建一个scst.conf文件,如果你熟悉scst.conf中内容的格式的话。/etc/init./scst脚本会在启动的时候加载scst.conf文件。
1.3 启动
[root@localhost /]#chkconfig --add scst
[root@localhost /]# chkconfig --level 2355 scst on
[root@localhost /]# chkconfig --list scst
scst 0:off 1:off 2:on 3:on 4:on 5:on 6:off
[root@localhost /]# chkconfig --addiscsi-scst
[root@localhost /]# chkconfig --level 2355 iscsi-scston
[root@localhost /]# chkconfig --list iscsi-scst
iscsi-scst 0:off 1:off 2:on 3:on 4:on 5:on 6:off
注:chkconfig命令主要用来更新(启动或停止)和查询系统服务的运行级信息。谨记chkconfig不是立即自动禁止或激活一个服务,它只是简单的改变了符号连接。
此时scst还没有启动,你调用lsmod查看已加载模块的情况会发现暂时没有任何scst相关的模块。
[root@localhost ~]# lsmod | grep scst
现在,我通过service命令来分别启动scst和iscsi-scst,然后再调用lsmod来查看一番。
[root@localhost ~]# serviceiscsi-scst start
Starting iSCSI target service: [ OK ]
Collecting current configuration: done.
-> Checking configuration file '/etc/scst.conf'for errors.
…… //这里暂且省略对配置文件/etc/scst.conf的检查信息
All done.
[root@localhost ~]# service scststart
Loading and configuring the mid-level SCSI targetSCST [ OK ]
[root@localhost ~]# lsmod | grep scst
scst_vdisk 57704 0
scst_disk 6456 0
iscsi_scst 67812 4
scst 473204 3 scst_vdisk,scst_disk,iscsi_scst
scsi_mod 163064 7scst_disk,scst,scsi_dh,sg,sr_mod,libata,sd_mod
现在来看,SCST最为关键的几个模块:scst、iscsi_scst、scst_vdisk、scst_disk已经启动了。
二、iSCSI存储挂载
在正式利用SCST向Windows主机挂载iSCSI存储之前,我们有必要好好地来应该会吧一下SCST的配置文件/etc/scst.conf。scst.conf默认存在/etc目录下,但在SCST安装完成后并没有自动创建该文件,因此我们要新建此文件。默认情况下/etc/init.d/scst脚本文件在启动时要检查此配置文件,在上面的代码段中我省略了这部分信息,因为此时还没有创建该文件,而这正是我们紧接着要做的事情。我们可以使用#scstadmin -check_config /etc/scst.conf命令测试配置文件是否正确,然后使用#scstadmin -config/etc/scst.conf命令加载配置文件。
[root@localhost ~]# touch /etc/scst.conf
好了,我们现在有了一个空的配置文件,用“scstadmin –check_config”命令检查一下看会发生什么。
[root@localhost ~]# scstadmin -check_config/etc/scst.conf
Collecting current configuration: done.
-> Checking configuration file '/etc/scst.conf'for errors.
->WARNING: No TARGET_DRIVER section defined. No target drivers will beconfigured.
->WARNING: No HANDLER section defined. Only physical media will be configured fortargets.
FATAL: No target drivers orhandlers defined, aborting!
->Done, 1 errors found.
All done.
每次修改完scst.conf文件,我们都可以用上面的指令检查一遍,以排除错误和警告。以上的错误提示告诉我们,没有定义“drivers”或“handlers”。这里自然而然地引出了一个问题:什么是“drviers”和“handlers”?下面这段文字摘抄自scstadmin的README文档。
* DEVICES *
Devices are defined by their handler. Commonly usedhandlers are dev_disk,
dev_cdrom, vdisk_fileio, vdisk_blockio and vcdrom.
To list all the available handlers, type:
scstadmin -list_handler
[root@localhost ~]# scstadmin-list_handler
Collecting current configuration:done.
Handler
-------------
dev_disk
dev_disk_perf
vdisk_fileio
vdisk_blockio
vdisk_nullio
vcdrom
All done.
When we want to assign a device to a target driver,wecan get a list of available drivers,type:
scstadmin –list_driver
[root@localhost ~]# scstadmin-list_driver
Collecting current configuration: done.
Driver
-----
iscsi //思:在我当前的系统中只有iscsi可用
All done.
现在我们来修改scst.conf文件,在其中增加关于HANDLER定义。
[root@localhost~]# vim /etc/scst.conf
1 HANDLER vdisk_fileio{
2
3 }
[root@localhost ~]# scstadmin-check_config /etc/scst.conf
Collecting current configuration: done.
-> Checking configuration file '/etc/scst.conf'for errors.
->WARNING: No TARGET_DRIVER section defined. No target drivers will beconfigured.
->Done, 1 warnings found.
All done.
给SCST增加一个TARGET,并将定义写入/etc/scst.conf文件。
[root@localhost ~]# scstadmin-add_target iqn.2012.2013.edu.cuc.storagelab.mpx.target -driver iscsi
Collecting current configuration: done.
-> Making requested changes.
->Creating target 'iqn.2012.2013.edu.cuc.storagelab.mpx.target' for driver'iscsi': done.
->Done.
All done.
写入配置文件。
[root@localhost ~]# scstadmin-write_config /etc/scst.conf
Collecting current configuration: done.
Writing current configuration to file'/etc/scst.conf'..
All done.
可以通过“scstadmin –list_target”指令检验一下是否有新添加的TARGET。
[root@localhost ~]# scstadmin -list_target
Collecting current configuration: done.
DriverTarget
-------------------------------------------------
iscsiiqn.2012.2013.edu.cuc.storagelab.mpx.target
All done.
查看一下/etc/scst.conf文件,可以看到多出的几行是关于新添加的TARGET的定义内容。
[root@localhost~]# vim /etc/scst.conf
1 # Automatically generated by SCSTConfigurator v2.0.0.
2
3 HANDLER vdisk_fileio {
4
5 }
6
7 TARGET_DRIVER iscsi {
8 enabled 0
9
10 TARGET iqn.2012.2013.edu.cuc.storagelab.mpx.target {
11
12 enabled 0
13 }
14 }
现在向SCST中添加设备。
[root@localhost ~]# scstadmin-open_dev disk01 -handler vdisk_fileio -attributes filename=/dev/sdb4,nv_cache
Collecting current configuration: done.
-> Making requested changes.
->Opening device 'disk01' using handler 'vdisk_fileio': done.
->Done.
All done.
写入配置文件。
[root@localhost ~]# scstadmin-write_config /etc/scst.conf
Collecting current configuration: done.
Writing current configuration to file'/etc/scst.conf'..
All done.
[root@localhost~]# cat /etc/scst.conf
#Automatically generated by SCST Configurator v2.0.0.
HANDLERvdisk_fileio {
DEVICE disk01 {
t10_dev_id "disk01b8ceed65"
usn b8ceed65
filename /dev/sdb4
nv_cache 1
}
}
TARGET_DRIVERiscsi {
enabled 1
TARGETiqn.2012.2013.edu.cuc.storagelab.mpx.target {
rel_tgt_id 1
enabled 1
}
}
为设备指定TARGET,并分配LUN号。
[root@localhost ~]# scstadmin-add_lun 0 -driver iscsi -target iqn.2012.2013.edu.cuc.storagelab.mpx.target-device disk01
Collecting current configuration: done.
-> Making requested changes.
->Adding device 'disk01' at LUN 0 to driver/target 'iscsi/iqn.2012.2013.edu.cuc.storagelab.mpx.target':done.
->Done.
All done.
写入配置文件。
[root@localhost ~]# scstadmin-write_config /etc/scst.conf
Collecting current configuration: done.
Writing current configuration to file'/etc/scst.conf'..
All done.
[root@localhost~]# cat /etc/scst.conf
#Automatically generated by SCST Configurator v2.0.0.
HANDLERvdisk_fileio {
DEVICE disk01 {
t10_dev_id "disk01b8ceed65"
usn b8ceed65
filename /dev/sdb4
nv_cache 1
}
}
TARGET_DRIVERiscsi {
enabled 1
TARGETiqn.2012.2013.edu.cuc.storagelab.mpx.target {
rel_tgt_id 1
enabled 1
LUN 0 disk01
}
}
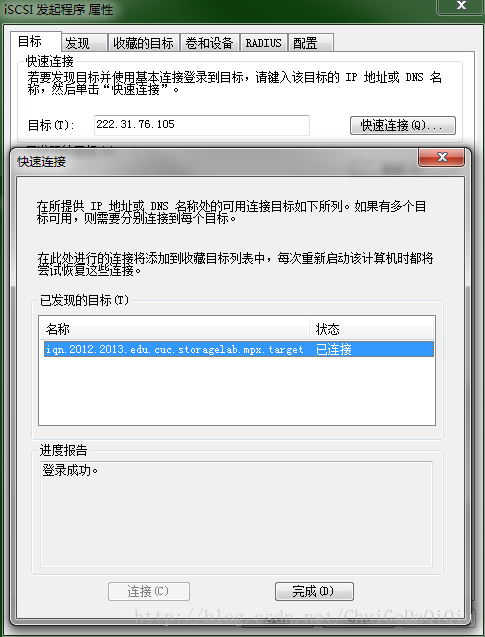
【Window主机连接iSCSI存储】
图.windows主机发起iscsi连接
图.磁盘管理器中查看到的连接的iSCSI存储资源(磁盘1:9.23G未分配)


