UEFI Bare Bones 和 EDKII的编译运行
参考链接:编译UEFI基本系统 、EDK快速入门-GIT
I 安装需要的软件包
$ sudo apt-get install qemu binutils-mingw-w64 gcc-mingw-w64 xorriso mtools
$ wget http://www.tysos.org/files/efi/mkgpt-latest.tar.bz2
$ tar jxf mkgpt-latest.tar.bz2
$ cd mkgpt && ./configure && make && sudo make install && cd       ..
II EDKII需要的软件包,gcc必须是gcc-5
$ sudo apt-get install build-essential uuid-dev iasl git gcc-5 nasm其中:
build-essential - Informational list of build-essential packages
uuid-dev - Universally Unique ID library (headers and static libraries)
iasl - Intel ASL compiler/decompiler (also provided by acpica-tools)
git - support for git revision control system
gcc-5 - GNU C compiler (v5.4.0 as of Ubuntu 16.04 LTS)
nasm - General-purpose x86 assembler
III 克隆git上的EDKII工程:
$ git clone https://github.com/tianocore/edk2
IV 编译EDKII工具链:build、GenFv、GenFw等工具
$ cd ./edk2
$ make -C BaseTools
$ . ./edksetup.sh
V 修改Conf/target.txt文件
ACTIVE_PLATFORM       = Nt32Pkg/Nt32Pkg.dsc
TOOL_CHAIN_TAG        = MYTOOLS
改成:
ACTIVE_PLATFORM       = MdeModulePkg/MdeModulePkg.dsc
TOOL_CHAIN_TAG = GCC5- 1.后面的值不能有任何其他的东西,不要用#当注释
- 2.还记得之前装的gcc5吗?这里就是指定为gcc5,也可以用GCC44->gcc4.4.* GCC45->gcc4.5.*等等
- 3.这些编译器的名称和路径定义在Conf\tools_def.txt当中
然后修改
TARGET_ARCH = IA32
为
TARGET_ARCH = IA32 X64
VI 然后就可以编译了:
$ build
b编译完成之后,查看生成的文件:
ls Build/MdeModule/DEBUG_*/*/HelloWorld.efi
结果为:
Build/MdeModule/DEBUG_GCC5/IA32/HelloWorld.efi
Build/MdeModule/DEBUG_GCC5/X64/HelloWorld.efi
VII 编译运行OVMF固件
像上面那样修改Conf/target.txt,然后编译即可
ACTIVE_PLATFORM       = OvmfPkg/OvmfPkgIa32X64.dsc
TARGET_ARCH           = IA32 X64
TOOL_CHAIN_TAG        = GCC5
$ build
ls Build/Ovmf3264/DEBUG_GCC5/FV/*.fd
可以从下面的输出看到OVMF.fd文件,说明生成成功:-)
Build/Ovmf3264/DEBUG_GCC5/FV/MEMFD.fd
Build/Ovmf3264/DEBUG_GCC5/FV/OVMF_CODE.fd
Build/Ovmf3264/DEBUG_GCC5/FV/OVMF.fd
Build/Ovmf3264/DEBUG_GCC5/FV/OVMF_VARS.fd
现在我们已经有了OVMF固件,先测试一下我们的固件把。
$ cp edk2/Build/Ovmf3264/DEBUG_GCC5/FV/OVMF.fd ./bios.bin
$ emu-system-x86_64 -bios  ./bios.bin
网上的教程包括EDK官网都是用的qemu-system-x86_64 -L 路径,这样的命令,但是我这里没有成功,参考了戴正华老师的UEFI原理与编程,使用了-bios选项,成功启动了。
然后会启动到UEFI shell环境:

其实也可以从这里下载OVEF的包,选择好自己的系统架构就可以了。
VIII 编译UEFI Bare Bones
创建hello.c
#include 然后去下载gnu-efi的工程,然后把gnu-efi/lib/data.c和gnu-efi/lib/lib.h都考出来,和hello.c放到同一个地方。
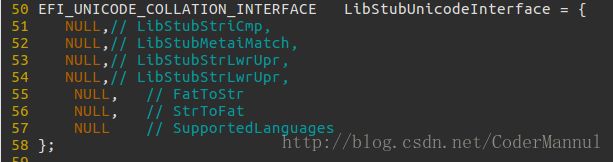
编辑data.c文件:
将结构体LibStubUnicodeInterface的成员变量全部设置为NULL
然后编译我们自己的EFI启动文件:
x86_64-w64-mingw32-gcc -ffreestanding -Ignu-efi/inc -Ignu-efi/inc/x86_64 -Ignu-efi/inc/protocol -c -o hello.o hello.c

x86_64-w64-mingw32-gcc -ffreestanding -Ignu-efi/inc -Ignu-efi/inc/x86_64 -Ignu-efi/inc/protocol -c -o data.o data.c

x86_64-w64-mingw32-gcc -nostdlib -Wl,-dll -shared -Wl,--subsystem,10 -e efi_main -o BOOTX64.EFI hello.o data.o -lgcc
编辑好了之后制作我们自己的启动镜像
dd if=/dev/zero of=fat.img bs=1k count=1440
mformat -i fat.img -f 1440 ::
mmd -i fat.img ::/EFI
mmd -i fat.img ::/EFI/BOOT
mcopy -i fat.img BOOTX64.EFI ::/EFI/BOOT
然后把这个镜像运行起来把:
qemu-system-x86_64 --bios "bios.bin" -usbdevice disk::fat.img
osdev网站上提供了三种运行的方法,我只用了当作USB-device的一种方法。
当作USB设备来运行 – 直接写入USB设备或者运行:
qemu-system-x86_64 -L OVMF_dir/ -bios OVMF.fd -usb -usbdevice disk::fat.img当作本地磁盘的方法 :
mkgpt -o hdimage.bin --image-size 4096 --part fat.img --type system
 qemu-system-x86_64 -L OVMF_dir/ -bios OVMF.fd -hda hdimage.bin
如果你不使用这种方法的话,可以不安装开头提到的mkgpt。
当作CD-ROM的方法 – 烧入CD或者运行:
mkdir iso
 cp fat.img iso
 xorriso -as mkisofs -R -f -e fat.img -no-emul-boot -o cdimage.iso iso
 qemu-system-x86_64 -L OVMF_dir/ -bios OVMF.fd -cdrom cdimage.iso
