springBoot(四)整合之MyBatis整合
单独的一个springBoot好像有那么一点单调,那么现在开始玩整合,在这之前呢,先分享一个当初遇到的小问题,就是当你的启动器的与mapper使用的包路径并不为父子关系时,读取配置mapper可能会失败,我就遇到了。郁闷了老久,然后经过测试发现。
如果不同包,可以用@MapperScan("com.linge.springboot.mapper"),这个扫描器来定位mapper的包路径,就可以成功获取映射
MyBatis整合走起
第一步、加入MyBatis的启动器
博主不喜欢看到那个图标,所以关闭了面板,如果个人喜欢,可以直接启动的说。
@SpringBootApplication // 代表为SpringBoot应用的运行主类
public class Application {

   public static void main(String[] args) {
      /** 创建SpringApplication应用对象 */
      SpringApplication springApplication =
new SpringApplication(Application.class);
      /** 设置横幅模式(设置关闭) */
      springApplication.setBannerMode(Banner.Mode.OFF);
      /** 运行 */
      springApplication.run(args);
   }
}
第二步:添加所需依赖
       org.mybatis.spring.boot
       mybatis-spring-boot-starter
       1.3.0


    mysql
    mysql-connector-java


    com.mchange
    c3p0
    0.9.5.2
第三步:添加配置
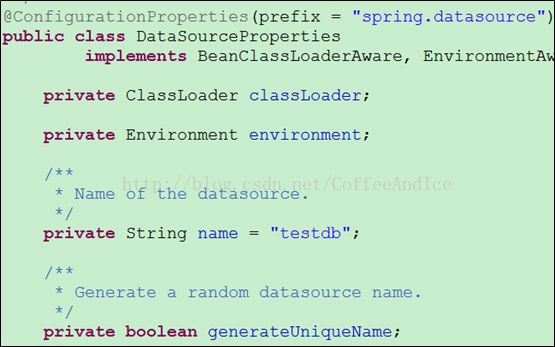
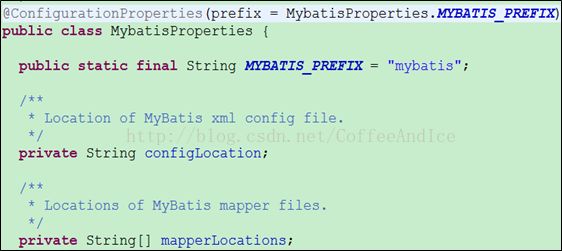
我们可以参考依赖中的类来配置基本属性
参考spring-boot-autoconfigure-1.5.6.RELEASE.jar中jdbc包中属性文件类
DataSourceProperties
参考mybatis-spring-boot-autoconfigure-1.3.0.jar中属性文件类
MybatisPropertis
在src/main/resources 下添加application.properties 配置文件,内容如下:
application.properties
# 配置数据源
spring.datasource.driverClassName=com.mysql.jdbc.Driver
spring.datasource.url=jdbc:mysql://localhost:3306/springboot_db
spring.datasource.username=root
spring.datasource.password=root
spring.datasource.type=com.mchange.v2.c3p0.ComboPooledDataSource

# 配置MyBatis3
# 配置类型别名扫描基础包
mybatis.typeAliasesPackage=com.linge.springboot.pojo
# 配置SQL语句映射文件
mybatis.mapperLocations=classpath:mappers/**/*Mapper.xml
# 配置核心配置文件
mybatis.configLocation=classpath:mybatis-config.xml
logging.level.com.linge=debug
//注意:其中logging.level.com.你的Mapper包=日志等级
mybatis-config.xml
第四步:整合开发
需求理解:
l 使用Spring Boot + Spring MVC + MyBatis实现查询所有公告
l 使用Spring Boot + Spring MVC + MyBatis + EasyUI 实现公告分页查询
1、编写pojo类
public class Notice implements Serializable {
private static final long serialVersionUID = 5679176319867604937L;
private Long id;
private String title;
private String content;
/** setter and getter method */
public Long getId() {
return id;
}
public void setId(Long id) {
this.id = id;
}
public String getTitle() {
return title;
}
public void setTitle(String title) {
this.title = title;
}
public String getContent() {
return content;
}
public void setContent(String content) {
this.content = content;
}
}
2、编写mapper接口
和之前的方式一样,只是多了@Mapper个注解
@Mapper:声明Mapper接口
@Mapper
public interface NoticeMapper {
    /** 查询所有公告 */
    @Select("select * from notice")
    public List findAll();

    /** 统计查询 */
    public Long count();
    /** 分页查询公告 */
    public List findByPage(@Param("page")Integer page, @Param("rows")Integer rows);
}
3、编写mappe.xml配置文件
4、编写Service与实现类
@Service
@Transactional
public class NoticeServiceImpl implements NoticeService {
    @Autowired
    private NoticeMapper noticeMapper;
    /** 查询所有的公告 */
    public List findAll(){
       return noticeMapper.findAll();
    }
    /** 分页查询公告 */
    public Map findByPage(Integer page, Integer rows){
       /** 创建Map集合封装响应数据 */
       Map data = new HashMap<>();
       /** 统计查询 */
       long count = noticeMapper.count();
       data.put("total", count);
       /** 分页查询 */
       List notices = noticeMapper.findByPage(page, rows);
       data.put("rows", notices);
       return data;
    }
}
5、编写controller
@Controller
public class NoticeController {
    @Autowired
    private NoticeService noticeService;
    /** 查询全部公告 */
    @GetMapping("/findAll")
    @ResponseBody
    public List findAll(){
       return noticeService.findAll();
    }
    /** 跳转分页查询公告页面 */
    @GetMapping("/show")
    public String show(){
       return "/html/notice.html";
    }
    /** 分页查询公告 */
    @PostMapping("/findByPage")
    @ResponseBody
    public Map findByPage(@RequestParam(value="page",
                         defaultValue="1",required=false)Integer page,
                         @RequestParam(value="rows",
                         defaultValue="15",required=false)Integer rows){
       return noticeService.findByPage((page - 1) * rows, rows);
    }
}
6、加入静态资源
src/main/resources/public/html/notice.html
src/main/resources/static/js
src/main/resources/static/css
src/main/resources/static/images
启动测试
浏览器地址栏输入:http://localhost:8080/findAll |show
完成,如果有什么问题,可以一起讨论一下


