Android App的更新
前言
基本上什么App都会有的功能,在此列举一个之前项目使用的,请求是Rxjava+Retrofit,显示进度是通知栏进度条。
大纲
1.判断是否需要更新部分
2.请求下载apk
3.进度条更新
4.下载后自动安装
5.其他问题
正文
测试demo请参考QingFrame中的相关测试模块:
https://github.com/UncleQing/QingFrame
1.判断是否需要更新部分
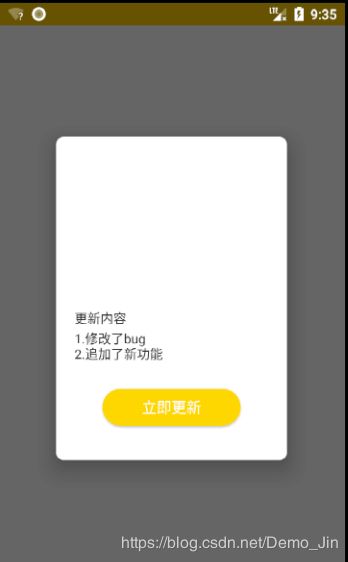
这部分很简单,基本就是请求自己服务器相关接口,服务器根据我们上传的版本号返回信息,如果没有返回信息则不需更新,如果有再判定是否需要强制更新(进入首页自动获取),只要需要更新则显示一个dialog,显示出更新细节以及一个Button,点击进行下载apk
下面是请求后的回调,如果beans不为空则需要更新,根据beans中带有url请求下载
public void onLoadingVersionSucceed(final List beans) {
    if (beans == null || beans.size() == 0) {
        MyToast.showToast(getContext(), "当前已是最新版本");
    } else {
        //更新询问对话框
        DialogFragmentHelper.showUpdateDialog(getFragmentManager(), beans.get(0).getCopywriting()
                , true, new View.OnClickListener() {
                    @Override
                    public void onClick(View view) {
                        //下载apk
                        mPresenter.downLoadApk(beans.get(0).getDownload_url());
                    }
                });
    }

}
"copywriting": "更新内容:...",
"forced_update": "是否强制更新 1 是,2 否",
"download_url": "下载地址"
2.请求下载apk
这部分根据使用的网络框架不同实现不同,只介绍Rxjava+Retrofit这种的
Presenter:
public class UpdatePresenter {
    //路径:data/包名/file/,保证app卸载后不会残留垃圾
    private final static String DOWNLOAD_DIR = AppUtils.getApp().getExternalFilesDir(Environment.DIRECTORY_DOWNLOADS)
            + File.separator;
    //下载后的apk文件名字,保证后缀.apk就行
    private static String APP_FILE = "qingFrame.apk";
    //相关的activity
    private UpdateActivity mView;

    UpdatePresenter(IBaseView view) {
        mView = (UpdateActivity) view;
    }

    /**
     * 根据url下载apk
     *
     * @param url
     */
    public void downLoadApk(String url) {
        if (AppConfig.isDownLoad) {
            mView.showToast("已有相同任务");
            return;
        }
        RetrofitApiService.getInstance().downloadApk(url).subscribeOn(Schedulers.io())
                .unsubscribeOn(Schedulers.io())
                .subscribe(new Observer() {
                    @Override
                    public void onSubscribe(Disposable d) {
                        mView.showToast("已添加到下载任务");
                        AppConfig.isDownLoad = true;
                    }

                    @Override
                    public void onNext(ResponseBody responseBody) {
                        File file = FileUtils.get().writeFile(responseBody.byteStream(), DOWNLOAD_DIR, APP_FILE);
                        mView.onDownloadSucceed(file);
                        AppConfig.isDownLoad = false;
                    }

                    @Override
                    public void onError(Throwable e) {
                        if (!TextUtils.isEmpty(e.getMessage())) {
                            mView.showToast(e.getMessage());
                        }
                        AppConfig.isDownLoad = false;
                    }

                    @Override
                    public void onComplete() {
                        AppConfig.isDownLoad = false;
                    }
                });
    }
}
Retrofit调用接口
RetrofitApiService /**
* 下载apk
*
* @return
*/
public Observable downloadApk(String url) {
//传入头信息"upgrade"是为了触发自定义的下载拦截器
return mApiService.download(url, "upgrade");
} IApiService /**
* 下载apk, 不使用缓存,因为配置OKhttp配置缓存了,如果此部分依然使用缓存则只会下载一次
* @param url
* @param head
* @return
*/
@Streaming
@GET
@Headers({"Accept-Encoding:identity","Cache-Control:no-store"})
Observable download(@Url String url, @Header("Upgrade") String head); 请求方式Get以流形式获取,获取成功后在presenter的onNext方法写入到相关文件
writeFile/**
* 将输入流写入文件
*
* @param inputString
* @param fileDir
* @param fileName
*/
public File writeFile(InputStream inputString, String fileDir, String fileName) {
File dir = new File(fileDir);
if (!dir.exists()) {
dir.mkdirs();
}
File file = new File(fileDir, fileName);
if (file.exists()) {
file.delete();
}
FileOutputStream fos = null;
try {
fos = new FileOutputStream(file);
byte[] b = new byte[1024];
int len;
while ((len = inputString.read(b)) != -1) {
fos.write(b, 0, len);
}
inputString.close();
fos.close();
} catch (Exception e) {
e.printStackTrace();
LogUtils.e("Exception: " + e.getMessage());
}
return file;
}3.进度条更新
上一步完成后就可以获取到apk文件了,但是下载过程UI没有任何显示,因此需要在下载过程中显示在通知栏上。
首先,配置OKHttp时需要配置一个自定义的下载拦截器
/**
 * 下载拦截器,用于进度条显示
 */
public class DownloadInterceptor implements Interceptor {


    @Override
    public Response intercept(Chain chain) throws IOException {
        Request request = chain.request();
        Response response = chain.proceed(request);
        String value = request.header("Upgrade");
        if (!TextUtils.isEmpty(value) || "upgrade".equals(value)) {
            //只有是下载的时候会包含这个Upgrade头信息
                return response.newBuilder()
                        .body(new ProgressResponseBody(response.body()))
                        .build();
        }
        return response;
    }

}
然后在第二步Retrofit接口请求要带入这个头信息,这样下载的时候就可以出发我们自定义的body了
ProgressResponseBody
public class ProgressResponseBody extends ResponseBody {
    private final ResponseBody responseBody;
    private BufferedSource bufferedSource;

    public ProgressResponseBody(ResponseBody responseBody) {
        this.responseBody = responseBody;
    }

    @Override
    public MediaType contentType() {
        return responseBody.contentType();
    }


    @Override
    public long contentLength() {
        return responseBody.contentLength();
    }

    @Override
    public BufferedSource source() {
        if (bufferedSource == null) {
            bufferedSource = Okio.buffer(source(responseBody.source()));
        }
        return bufferedSource;
    }

    private Source source(Source source) {
        return new ForwardingSource(source) {
            long totalBytesRead = 0L;

            @Override
            public long read(Buffer sink, long byteCount) throws IOException {
                long bytesRead = super.read(sink, byteCount);
                totalBytesRead += bytesRead != -1 ? bytesRead : 0;
                Intent mIntent = new Intent(AppConfig.DOWNLOAD_PROGRESS);
                mIntent.putExtra("totalBytesRead", totalBytesRead);
                mIntent.putExtra("total", responseBody.contentLength());
                //将下载进度通过广播发送出去
                AppUtils.getApp().sendBroadcast(mIntent);
                return bytesRead;
            }
        };
    }

}
发出了广播,在相关activity注册广播接收即可
UpdateActivityprivate void registerReceiver() {
//下载进度条
if (null == mReceiver) {
mReceiver = new BroadcastReceiver() {
@Override
public void onReceive(Context context, Intent intent) {
String action = intent.getAction();
if (AppConfig.DOWNLOAD_PROGRESS.equals(action)) {
double total = (double) intent.getLongExtra("total", 0);
double current = (double) intent.getLongExtra("totalBytesRead", 0);
if (!isCreat) {
builder = UIUtils.creatNotification(notificationManager);
isCreat = true;
pro = 0;
}
pro = (int) (current / total * 100);
if (pro < 100) {
builder.setContentText(pro + "%");
builder.setProgress(100, pro, false);
notificationManager.notify(UIUtils.notifyID, builder.build());
} else {
UIUtils.cancleNotification(notificationManager);
isCreat = false;
}
}
}
};
IntentFilter filter = new IntentFilter();
filter.addAction(AppConfig.DOWNLOAD_PROGRESS);
AppUtils.getApp().registerReceiver(mReceiver, filter);
}
}UIUtils/**
* 下载apk通知栏
* @param notificationManager
* @return
*/
public static final int notifyID = 99;
public static final String CHANNEL_ID = "111";
public static Notification.Builder creatNotification(NotificationManager notificationManager) {
if (notificationManager == null) {
notificationManager = (NotificationManager) AppUtils.getApp().getSystemService(Context.NOTIFICATION_SERVICE);
}
Notification.Builder builder = null;
if (Build.VERSION.SDK_INT >= Build.VERSION_CODES.O) {
//8.0新增通知渠道
CharSequence name = "QingFrame";
int importance = NotificationManager.IMPORTANCE_LOW; //优先级
NotificationChannel mChannel = new NotificationChannel(CHANNEL_ID, name, importance);
mChannel.enableLights(false); //闪灯开关
mChannel.enableVibration(false); //振动开关
mChannel.setShowBadge(false); //通知圆点开关
notificationManager.createNotificationChannel(mChannel);
builder = new Notification.Builder(AppUtils.getApp(), CHANNEL_ID);
} else {
builder = new Notification.Builder(AppUtils.getApp());
}
builder.setSmallIcon(R.drawable.ic_app_ntfc)
.setLargeIcon(BitmapFactory.decodeResource(AppUtils.getApp().getResources(), R.mipmap.share_qq))
.setContentText("0%")
.setContentTitle("青结构")
.setProgress(100, 0, false);
if (Build.VERSION.SDK_INT >= Build.VERSION_CODES.LOLLIPOP) {
//小图标背景
builder.setColor(AppUtils.getApp().getResources().getColor(R.color.colorPrimary));
}
notificationManager.notify(notifyID, builder.build());
return builder;
}
public static void cancleNotification(NotificationManager notificationManager) {
if (notificationManager == null) {
notificationManager = (NotificationManager) AppUtils.getApp().getSystemService(Context.NOTIFICATION_SERVICE);
}
notificationManager.cancel(notifyID);
}值得注意的是,在8.0Notification行为变更,需要有渠道相关信息,另外如果notification的小图标是需要一个没有颜色切图。
4.下载后自动安装
上面设置完后就可以完整下载一个apk到本地了,接下来是自动安装。
CommonUtil //自动安装apk
public static void installApk(Context context, File apkPath) {
//提升文件读写权限
String command = "chmod " + "777" + " " + apkPath.getPath();
Runtime runtime = Runtime.getRuntime();
try {
runtime.exec(command);
} catch (IOException e) {
e.printStackTrace();
}
//安装跳转
Intent intent = new Intent(Intent.ACTION_VIEW);
if (Build.VERSION.SDK_INT > Build.VERSION_CODES.N) {
intent.setFlags(Intent.FLAG_ACTIVITY_NEW_TASK);
//这块不要写错了,一定要是你自己Manifest注册的fileprovider
Uri apkUri = FileProvider.getUriForFile(context, "com.zidian.qingframe.fileprovider", apkPath);
intent.addFlags(Intent.FLAG_GRANT_READ_URI_PERMISSION);
intent.setDataAndType(apkUri, "application/vnd.android.package-archive");
} else {
intent.setDataAndType(Uri.fromFile(apkPath),
"application/vnd.android.package-archive");
}
context.startActivity(intent);
}设置完成去应用市场找个apk链接试下吧,为了排除非代码原因的安卓失败,建议链接先从浏览器下载后手动安装,确认无误再使用代码测试
5.其他问题
再次重申几个问题
1.下载安装apk需要的权限,sd卡读取和网络请求就不说了,还需要一个
2.解析apk的contentUri需要配置fileprovider,不要写错了
参考:https://blog.csdn.net/lmj623565791/article/details/72859156
3.Retrofit接口如果按我的这个记得传个头信息"upgrade",另外如果OKhttp也是配置缓存的话需要去掉缓存请求
4.Notification中小图标如果是有颜色的会显示白色方块,所以需要美工单独切个没有颜色的图,然后我们自己配置上颜色
总结
以上贴的代码在文首链接那个demo都有,可能有些叙述的不彻底,想参考的朋友请直接去demo中看吧。另外关于强制更新再说一下,一般的都是进入首页获取更新信息,如果需要强制更新,则弹出的这个更新对话框不可关闭,即用户必须点击“立即更新”的按钮,否则不可用,点击之后分两种,一种可以让用户继续使用,直到下载完成后跳转到安装界面;另一种是将更新进度也是dialog显示,并且也是不可关闭的。


