paddlepaddle使用笔记——使用自己的数据训练ocr模型
1、使用环境:
ubuntu18.04,4gpu,nvidia410.78,cuda9.0,cudnn7.3,python3.6
2、使用代码:
官方提供的ocr模型代码
https://github.com/PaddlePaddle/models/tree/develop/PaddleCV/ocr_recognition
3、将代码运行起来
为了方便看到运行的效果,我修改了参数,save_model_period,这样可以更快的保存数据,好知道运行是否有效
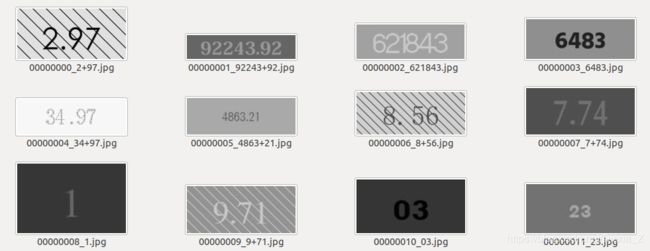
4、生成自己的数据
import random
import cv2
import numpy as np
from PIL import Image
from PIL import ImageDraw
from PIL import ImageFont
import os
from unit import segmentation

path_font='/home/zz/文字'
path_out='/media/zz/testtttt'
if not os.path.exists(path_out):
    os.mkdir(path_out)

dicters='0123456789.'
CHARS='0123456789'
number=100
font_index=0
font_list=os.listdir(path_font)
font_list.sort()
f_ind=0
f_size=0

def get_word(length):
    global font_index, CHARS
    f = ''
    for i in range(length):
        f = f + random.choice(CHARS)
        font_index = font_index + 1
    return f

def get_txt():
    txt=''
    f3=random.randint(0,2) # 2/3的可能会出现.
    len_num=random.randint(1,8)
    num=get_word(len_num)
    txt=txt+num
    if f3>0 and len(num)>=3:
        txt=txt[:-2]+'.'+txt[-2:]
    return txt


def get_txt_test():
    global dicters
    return dicters

def get_bg(color, w,h):
    # w_l=random.randint(1,500)
    # w_r=random.randint(1,500)
    # h_t=random.randint(1,50)
    # h_b=random.randint(1,50)
    w_l=50
    w_r=50
    h_t=20
    h_b=20
    bg=np.zeros((h+h_b+h_t,w+w_l+w_r),dtype='uint8')
    bg=bg+color
    # bg=Image.fromarray(bg)
    return bg,w_l,h_t

def oblique(bg,fc):
    bg=np.array(bg)
    imgh,imgw=bg.shape
    new_bg=np.zeros((imgh,imgw+2*imgh),dtype='uint8')
    new_bg[:,imgh:imgh+imgw]=bg
    step=random.randint(15,25)
    st=random.randint(0,step)

    while st+imgh<=imgw+2*imgh:
        pt1=(st,0)
        pt2=(st+imgh,imgh)
        new_bg=cv2.line(new_bg, pt1, pt2, fc, 1, 4)
        st=st+step
        # cv2.imshow('a',new_bg)
        # cv2.waitKey()
    bg=new_bg[:,imgh:imgh+imgw]
    # cv2.imshow('a',new_bg)
    # cv2.imshow('b',bg)
    # cv2.waitKey()
    bg=Image.fromarray(bg)
    return bg


def interfere(bg,x,y,w,h,bc,fc):
    global f_size
    if f_size>=50 and not random.randint(0,3):
        bg=oblique(bg,fc)
    return bg


def gen_data(co):
    global f_ind,f_size

    # 确定颜色
    f_color=random.randint(0,255)
    bg_color=f_color
    while abs(bg_color-f_color)<30:
        bg_color=random.randint(0,255)

    # 字体
    f_ind = f_ind % len(font_list)
    f_size=random.randint(15,75)

    txt = get_txt()  # 文字内容
    font_text = ImageFont.truetype('{}/{}'.format(path_font, font_list[f_ind]), f_size)
    print('{}---{}'.format(f_ind,font_list[f_ind]))

    background_bg,x1,y1 = get_bg(bg_color, font_text.getsize(txt)[0], font_text.getsize(txt)[1])
    background_bg = Image.fromarray(background_bg, mode="L")
    draw_txt = ImageDraw.Draw(background_bg)  # 确认输出文字的背景图片
    draw_txt.text((x1, y1), txt, fill=(f_color), font=font_text)

    background_bg=interfere(background_bg,x1,y1,font_text.getsize(txt)[0], font_text.getsize(txt)[1],bg_color,f_color)

    txt = txt.replace('.', '+')
    background_bg.save('{}/{:08d}_{}.jpg'.format(path_out, co, txt))
    f_ind = f_ind + 1

    return


if __name__ == '__main__':


    for i in range(number):
        print(i)
        gen_data(i)
生成灰度图片,规则:
1、背景和文字的颜色差大于30
2、字的个数在1-8个
3、左右上下有一个随机的扩大范围
4、如果出现小数点,保留两位小数
5、干扰,斜线
5、预处理
包括,包括裁剪,二值化,统计max size,这里由于之后需要resize,所以统计的是max ration,就是w/h的最大值
二值化使用opencv提供的otsu方法
在处理过程中缩减周围可缩小范围
import numpy as np
import cv2
import os
import time
from unit import segmentation

t1 = 0
t2 = 0
name=''


def linkseg(segx,dis,img):
    nst=0
    nen=0
    nseg=[]

    h=min(img.shape[0]//10,5)
    for i in range(len(segx)):
        st,en=segx[i]
        img_p=img[:,st:en]
        y=np.sum(img_p,axis=1)
        y=y-np.average(y)
        pt=len(np.where(y!=0)[0])
        if pt0.5:
        img=255-img

    # cv2.imshow('binar', img)
    # cv2.waitKey()

    # 裁剪文字,将之裁剪成一个一个字
    h,w=img.shape
    y=np.sum(img,axis=1)
    y=y-min(y)
    segy=segmentation(y,0)

    # 根据横向的空白,将裁剪下来的数据分成多条,认为每一条的纵向上面没有干扰
    # 生成数据,上下没有干扰,所以删除裁剪不正确的数据
    if len(segy)>1:
        cv2.imwrite('{}/{}'.format(path_err,filename),img)
        return

    for st,en in segy:
        img_p=img[st:en,:]
        x=np.sum(img_p,axis=0)
        x=x-min(x)
        segx=segmentation(x,0)
        # link seg
        segx=linkseg(segx,5,img_p)


        # 根据纵向的空白,将裁剪下来的数据分成多块,认为每一块上一个数字
        for st,en in segx:

            img_n=img_p[:,st:en]
            if count>1:
                cv2.imshow('a',img_n)
                cv2.waitKey()
            img_n = 255 - img_n
            cv2.imwrite('{}/{}'.format(path_out, filename), img_n)
            count = count + 1
            # cv2.imshow('c1', img_n)
            # cv2.waitKey()


if __name__ == '__main__':

    # img=cv2.imread('/home/zz/图片/桌面/test/lALPDgQ9qxS5d1jNAwDNBVY_1366_768(第 5 个复件).png')
    # binar(img)

    path='/media/zz/AE1AD9D91AD99F21/book-zz/digit'
    path_out='/media/zz/AE1AD9D91AD99F21/book-zz/digit-cut'
    path_err='/media/zz/AE1AD9D91AD99F21/book-zz/digit-err'
    if not os.path.exists(path_out):
        os.mkdir(path_out)
    if not os.path.exists(path_err):
        os.mkdir(path_err)
    img_list=os.listdir(path)
    img_list.sort()
    for i in range(544,len(img_list)):
        filename=img_list[i]
        name = '{:03d}'.format(i)
        print(filename)
        img=cv2.imread('{}/{}'.format(path,filename))
        binar(img)


    print(t1)
    print(t2)
5、保存label,并resize图片,分别保存到train和test
import os
import cv2
import re

# 文件名称
path_f='/media/cj1/data/digit_pic_lab'
dir_img='digit-cut'
dir_train='train_images'
list_train='train_list'
dir_test='test_images'
list_test='test_list'

# 计数器
count=0

# 字典
dicters='0123456789.-¥'

# 生成数据集
img_list=os.listdir('{}/{}'.format(path_f,dir_img))
img_list.sort()

def get_lab_num(lab):
    s=[]
    for l in lab:
        if l=='+':
            ind=dicters.index('.')
        else:
            ind=dicters.index(l)
        s.append(str(ind))
    return s

fs_train=open('{}/{}'.format(path_f,list_train),'w')
fs_test=open('{}/{}'.format(path_f,list_test),'w')

for filename in img_list:
    print(filename)
    lab=filename.split('.')[0].split('_')[-1] # 取出标签内容
    try:
        num_list=get_lab_num(lab) # 转为数字标签
    except:
        # 转化错误的话,就直接下一个
        continue
    try:
        img=cv2.imread('{}/{}/{}'.format(path_f,dir_img,filename))
        h,w,c=img.shape
        nw=int(w*IMG_H/h)
        img=cv2.resize(img,(nw,IMG_H))
        img=cv2.cvtColor(img,cv2.COLOR_RGB2GRAY)
        img_n[:,:nw]=img
    except:
        # 读取错误,就直接下一个
        continue
    name=re.sub('\D','',lab) # 取一个只有数字的名字
    newfilename='{}_{}.jpg'.format(filename.split('_')[0],name)
    if count%100==0:
        # 每100张训练,保存一张测试
        if not os.path.exists('{}/{}'.format(path_f,dir_test)):
            os.mkdir('{}/{}'.format(path_f,dir_test))
        fs_test.write('{} {} {} {}\n'.format(w,h,newfilename,','.join(num_list)))
        cv2.imwrite('{}/{}/{}'.format(path_f,dir_test,newfilename),img)
    else:
        if not os.path.exists('{}/{}'.format(path_f,dir_train)):
            os.mkdir('{}/{}'.format(path_f,dir_train))
        fs_train.write('{} {} {} {}\n'.format(w, h, newfilename, ','.join(num_list)))
        cv2.imwrite('{}/{}/{}'.format(path_f, dir_train, newfilename),img)
    count=count+1
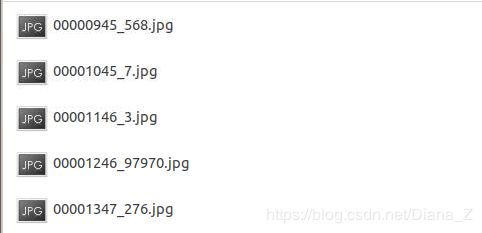
在同一个目录下生成如上四个文件,然后文件夹中保存的是图片,test_list保存的是标签
6、修改模型代码
因为我们把数据格式根模型读取的数据格式生成的一样,所以大部分不用修改,只需要data_reader里面一些内容就可以了
1、分类数和图片大小,根据自己实际需要修改
我的这里:
NUM_CLASSES =10
DATA_SHAPE = [1, 32,300]
2、文件读取路径
![]()
这个直接写成自己的
data_dir='zz/data'
7、错误汇总
--------------------------------------
遇到了一个问题,模型是上面的我的数据的新模型,数据是从生成数据中截留的一点测试数据
但是我train的时候准确率是高达0.99的,所以我用train修改了一个可以输出测试结果的代码
发现,问题出现在这一步indexes = prune(np.array(result[0]).flatten(), 0, 1)
由于我的输出当中全部都是数字,所以生成的结果通过0和1缩短一下以后就不成数据了。
---------------------------------------
Enforce failed. Expected x_mat_dims[1] == y_mat_dims[0], but received x_mat_dims[1]:768 != y_mat_dims[0]:512.
First matrix's width must be equal with second matrix's height. 768, 512 at [/paddle/paddle/fluid/operators/mul_op.cc:61]
错误原因:SHAPE的大小不对
我在的图片是32*300的,但是shape的大小设置成了48*500,然后就会报这个错误


