FFmpeg音视频学习
项目地址:https://github.com/Dovar66/ffmpeg_so
1.编译FFmpeg
环境配置看这里: [windows下编译FFmpeg]
编译到Android则需要额外配置:
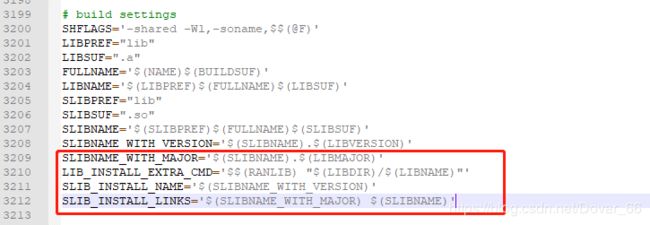
- 1、修改ffmpeg项目根目录下的configure文件
将文件中的如下四行:
SLIBNAME_WITH_MAJOR='$(SLIBNAME).$(LIBMAJOR)'
LIB_INSTALL_EXTRA_CMD='$$(RANLIB)"$(LIBDIR)/$(LIBNAME)"'
SLIB_INSTALL_NAME='$(SLIBNAME_WITH_VERSION)'
SLIB_INSTALL_LINKS='$(SLIBNAME_WITH_MAJOR)$(SLIBNAME)'

替换为:
SLIBNAME_WITH_MAJOR='$(SLIBPREF)$(FULLNAME)-$(LIBMAJOR)$(SLIBSUF)'
LIB_INSTALL_EXTRA_CMD='$$(RANLIB)"$(LIBDIR)/$(LIBNAME)"'
SLIB_INSTALL_NAME='$(SLIBNAME_WITH_MAJOR)'
SLIB_INSTALL_LINKS='$(SLIBNAME)'
- 2、编写build_android.sh脚本
脚本内容中路径相关的参数需要根据实际开发环境进行修改:
#!/bin/bash
NDK=/f/android-ndk-r10e
SYSROOT=$NDK/platforms/android-9/arch-arm/
TOOLCHAIN=$NDK/toolchains/arm-linux-androideabi-4.9/prebuilt/windows-x86_64
function build_one
{
./configure \
--prefix=$PREFIX \
--enable-shared \
--disable-static \
--disable-doc \--enable-cross-compile \
--cross-prefix=$TOOLCHAIN/bin/arm-linux-androideabi- \
--target-os=linux \
--arch=arm \
--sysroot=$SYSROOT \
--extra-cflags="-Os -fpic $ADDI_CFLAGS" \
--extra-ldflags="$ADDI_LDFLAGS" \
$ADDITIONAL_CONFIGURE_FLAG
make clean
make -j8
make install
$TOOLCHAIN/bin/arm-linux-androideabi-ld \
-rpath-link=$PLATFORM/usr/lib \
-L$PLATFORM/usr/lib \
-L$PREFIX/lib \
-soname libffmpeg.so -shared -nostdlib -Bsymbolic --whole-archive --no-undefined -o \
$PREFIX/libffmpeg.so \
libavcodec/libavcodec.a \
libavfilter/libavfilter.a \
libswresample/libswresample.a \
libavformat/libavformat.a \
libavutil/libavutil.a \
libswscale/libswscale.a \
libavdevice/libavdevice.a \
-lc -lm -lz -ldl -llog --dynamic-linker=/system/bin/linker \
$TOOLCHAIN/lib/gcc/arm-linux-androideabi/4.9/libgcc.a
}
CPU=armeabi-v7a
PREFIX=./android/$CPU
ADDI_CFLAGS="-marm"
build_one
- 3、使用MSYS运行编译脚本
命令:./build_android.sh
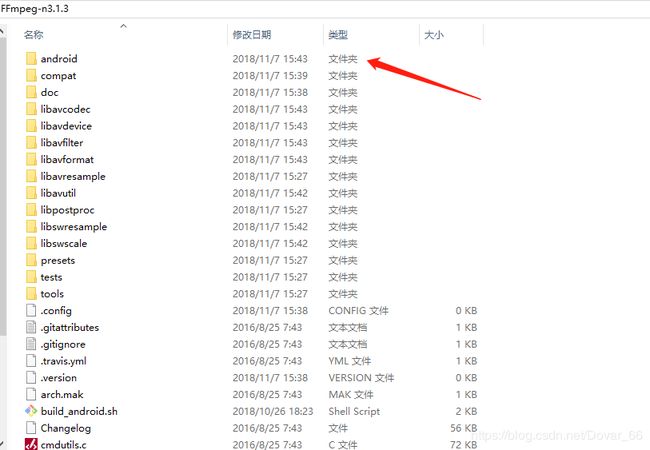
编译后会在当前目录下生成一个命名为android的文件夹,打开就能找到我们想要的so文件了。
2.视频解码并播放
extern "C" JNIEXPORT void JNICALL
Java_com_dovar_ffmpeg_1so_MainActivity_decodeVideo(JNIEnv *env, jobject,
                                                   jstring videoPath, jobject surface) {
    const char *file_name = (*env).GetStringUTFChars(videoPath, JNI_FALSE);

    //注册
    av_register_all();
    //如果是网络流,则需要初始化网络相关
    avformat_network_init();

    AVFormatContext *pFormatCtx = avformat_alloc_context();
    //打开视频文件
    if (avformat_open_input(&pFormatCtx, file_name, NULL, NULL) != 0) {
        LOGD("Could not open file:%s\n", file_name);
        return;
    }

    //检索流信息
    if (avformat_find_stream_info(pFormatCtx, NULL) < 0) {
        LOGD("Could not find stream information.\n");
        return;
    }

    //查找视频流,一个多媒体文件中可能含有音频流、视频流、字幕流等
    int videoStream = -1;
    for (int i = 0; i < pFormatCtx->nb_streams; ++i) {
        if (pFormatCtx->streams[i]->codecpar->codec_type == AVMEDIA_TYPE_VIDEO) {
            videoStream = i;
            break;
        }
    }
    if (videoStream == -1) {
        LOGD("Didn't find a video stream.\n");
        return;
    }

    //获取解码器
    AVCodec *pCodec = avcodec_find_decoder(pFormatCtx->streams[videoStream]->codecpar->codec_id);
    if (pCodec == NULL) {
        LOGD("Codec not found.\n");
        return;
    }
    //初始化解码器上下文
    AVCodecContext *pCodecCtx = avcodec_alloc_context3(pCodec);
    avcodec_parameters_to_context(pCodecCtx, pFormatCtx->streams[videoStream]->codecpar);
    //打开解码器
    if (avcodec_open2(pCodecCtx, pCodec, NULL) < 0) {
        LOGD("Could not open codec.\n");
    }

    //输出视频信息
    LOGD("视频的文件格式:%s", pFormatCtx->iformat->name);
    LOGD("视频时长:%d", static_cast((pFormatCtx->duration) / 1000000));
    LOGD("视频的宽高:%d,%d", pCodecCtx->width, pCodecCtx->height);
    LOGD("解码器的名称:%s", pCodec->name);

    LOGD("开始准备原生绘制工具")
    //获取NativeWindow,用于渲染视频
    ANativeWindow *nativeWindow = ANativeWindow_fromSurface(env, surface);
    ANativeWindow_setBuffersGeometry(nativeWindow, pCodecCtx->width, pCodecCtx->height,
                                     WINDOW_FORMAT_RGBA_8888);
    //定义绘图缓冲区
    ANativeWindow_Buffer windowBuffer;
    LOGD("原生绘制工具准备完成")

    /*** 转码相关BEGIN ***/
    AVFrame *pFrameOut = av_frame_alloc();
    if (pFrameOut == NULL) {
        LOGD("Could not allocate video frame.\n");
        return;
    }
    int num = av_image_get_buffer_size(AV_PIX_FMT_RGBA, pCodecCtx->width, pCodecCtx->height, 1);
    uint8_t *buffer = (uint8_t *) (av_malloc(num * sizeof(uint8_t)));
    av_image_fill_arrays(pFrameOut->data, pFrameOut->linesize, buffer, AV_PIX_FMT_RGBA,
                         pCodecCtx->width, pCodecCtx->height, 1);
    struct SwsContext *sws_ctx = sws_getContext(pCodecCtx->width, pCodecCtx->height,
                                                pCodecCtx->pix_fmt, pCodecCtx->width,
                                                pCodecCtx->height, AV_PIX_FMT_RGBA, SWS_BILINEAR,
                                                NULL, NULL, NULL);
    if (sws_ctx == NULL) {
        LOGD("sws_ctx==null\n");
        return;
    }
    /*** 转码相关END ***/

    AVFrame *pFrame = av_frame_alloc();
    AVPacket packet;
    //读取帧数据
    while (av_read_frame(pFormatCtx, &packet) >= 0) {
        if (packet.stream_index == videoStream) {
            //解码AVPacket->AVFrame
            //发送读取到的压缩数据(每次发送可能包含一帧或多帧数据)
            if (avcodec_send_packet(pCodecCtx, &packet) != 0) {
                continue;
            }

            //读取到一帧视频
            while (avcodec_receive_frame(pCodecCtx, pFrame) == 0) {
                //锁定窗口绘图界面
                ANativeWindow_lock(nativeWindow, &windowBuffer, 0);

                //执行转码
                sws_scale(sws_ctx, (uint8_t const *const *) pFrame->data, pFrame->linesize, 0,
                          pCodecCtx->height, pFrameOut->data, pFrameOut->linesize);

//                LOGD("转码完成,开始渲染数据.\n")
                //获取stride
                uint8_t *dst = (uint8_t *) windowBuffer.bits;
                int dstStride = windowBuffer.stride * 4;
                uint8_t *src = pFrameOut->data[0];
                int srcStride = pFrameOut->linesize[0];
                //由于窗口的stride和帧的stride不同,因此需要逐行复制
                int h;
                for (h = 0; h < pCodecCtx->height; h++) {
                    memcpy(dst + h * dstStride, src + h * srcStride, (size_t) (srcStride));
                }

                //解锁窗口
                ANativeWindow_unlockAndPost(nativeWindow);
                /*  //进行短暂休眠。如果休眠时间太长会导致播放的每帧画面有延迟感,如果短会有加速播放的感觉。
                  //一般一每秒60帧——16毫秒一帧的时间进行休眠
                  usleep(1000 * 20);*/
            }
        }

        //重置packet
        av_packet_unref(&packet);
    }

    //回收资源
    //释放图像帧
    av_frame_free(&pFrame);
    av_frame_free(&pFrameOut);
    av_free(buffer);
    //关闭转码上下文
    sws_freeContext(sws_ctx);
    //关闭解码器
    avcodec_close(pCodecCtx);
    //关闭视频文件
    avformat_close_input(&pFormatCtx);
    //注销网络相关
    avformat_network_deinit();

    avformat_free_context(pFormatCtx);
}
3.音频解码并播放
这里我使用AudioTrack播放音频:
- 在C层调用Java层的createAudioTrack方法,创建AudioTrack对象。
- 然后在C层调用AudioTrack的play、write进行播放。
Java层代码:
C层代码native-lib.cpp:
//音频解码
extern "C" JNIEXPORT void JNICALL
Java_com_dovar_ffmpeg_1so_MainActivity_decodeAudio(JNIEnv *env, jobject obj,
                                                   jstring audioPath) {
    const char *file_name = (*env).GetStringUTFChars(audioPath, JNI_FALSE);
    //1.注册组件
    av_register_all();
    //封装格式上下文
    AVFormatContext *pFormatCtx = avformat_alloc_context();

    //2.打开输入音频文件
    if (avformat_open_input(&pFormatCtx, file_name, NULL, NULL) != 0) {
        LOGD("%s", "打开输入音频文件失败");
        return;
    }
    //3.获取音频信息
    if (avformat_find_stream_info(pFormatCtx, NULL) < 0) {
        LOGD("%s", "获取音频信息失败");
        return;
    }

    //音频解码,需要找到对应的AVStream所在的pFormatCtx->streams的索引位置
    int audio_stream_idx = -1;
    int i = 0;
    for (; i < pFormatCtx->nb_streams; i++) {
        //根据类型判断是否是音频流
        if (pFormatCtx->streams[i]->codecpar->codec_type == AVMEDIA_TYPE_AUDIO) {
            audio_stream_idx = i;
            break;
        }
    }
    //4.获取解码器
    AVCodec *pCodec = avcodec_find_decoder(
            pFormatCtx->streams[audio_stream_idx]->codecpar->codec_id);
    //根据索引拿到对应的流,根据流拿到解码器上下文
    AVCodecContext *pCodeCtx = avcodec_alloc_context3(pCodec);
    avcodec_parameters_to_context(pCodeCtx, pFormatCtx->streams[audio_stream_idx]->codecpar);
    if (pCodec == NULL) {
        LOGD("%s", "无法解码");
        return;
    }
    //5.打开解码器
    if (avcodec_open2(pCodeCtx, pCodec, NULL) < 0) {
        LOGD("%s", "编码器无法打开");
        return;
    }

    //输出视频信息
    LOGD("音频的文件格式:%s", pFormatCtx->iformat->name);
    LOGD("音频时长:%d", static_cast((pFormatCtx->duration) / 1000000));
    LOGD("音频的宽高:%d,%d", pCodeCtx->width, pCodeCtx->height);
    LOGD("解码器的名称:%s", pCodec->name);

    //编码数据
    AVPacket *packet = (AVPacket *) av_malloc(sizeof(AVPacket));
    //解压缩数据
    AVFrame *frame = av_frame_alloc();

    //frame->16bit 44100 PCM 统一音频采样格式与采样率
    SwrContext *swrCtx = swr_alloc();
    //重采样设置选项-----------------------------------------------------------start
    //输入的采样格式
    enum AVSampleFormat in_sample_fmt = pCodeCtx->sample_fmt;
    //输出的采样格式 16bit PCM
    enum AVSampleFormat out_sample_fmt = AV_SAMPLE_FMT_S16;
    //输入的采样率
    int in_sample_rate = pCodeCtx->sample_rate;
    //输出的采样率
    int out_sample_rate = 44100;
    //输入的声道布局
    uint64_t in_ch_layout = pCodeCtx->channel_layout;
    //输出的声道布局
    uint64_t out_ch_layout = AV_CH_LAYOUT_MONO;

    swr_alloc_set_opts(swrCtx, out_ch_layout, out_sample_fmt, out_sample_rate, in_ch_layout,
                       in_sample_fmt,
                       in_sample_rate, 0, NULL);
    swr_init(swrCtx);
    //重采样设置选项-----------------------------------------------------------end
    //获取输出的声道个数
    int out_channel_nb = av_get_channel_layout_nb_channels(out_ch_layout);
    //存储pcm数据
    uint8_t *out_buffer = (uint8_t *) av_malloc(2 * 44100);

    jclass player_class = (env)->GetObjectClass(obj);
    jmethodID audio_track_method = (*env).GetMethodID(player_class, "createAudioTrack",
                                                      "(II)Landroid/media/AudioTrack;");
    if (!audio_track_method) {
        LOGD("audio_track_method not found...")
    }
    jobject audio_track = (env)->CallObjectMethod(obj, audio_track_method, out_sample_rate,
                                                  out_channel_nb);
    //调用play方法
    jclass audio_track_class = (*env).GetObjectClass(audio_track);
    jmethodID audio_track_play_mid = (*env).GetMethodID(audio_track_class, "play", "()V");
    (*env).CallVoidMethod(audio_track, audio_track_play_mid);

    //获取write()方法
    jmethodID audio_track_write_mid = (*env).GetMethodID(audio_track_class, "write", "([BII)I");

    int framecount = 0;
    //6.一帧一帧读取压缩的音频数据AVPacket
    while (av_read_frame(pFormatCtx, packet) >= 0) {
        if (packet->stream_index == audio_stream_idx) {
            //解码AVPacket->AVFrame
            //发送压缩数据
            if (avcodec_send_packet(pCodeCtx, packet) != 0) {
                LOGD("%s", "解码错误");
                continue;
            }

            //读取到一帧音频或者视频
            while (avcodec_receive_frame(pCodeCtx, frame) == 0) {
                LOGD("解码%d帧", framecount++);
                swr_convert(swrCtx, &out_buffer, 2 * 44100,
                            (const uint8_t **) (frame->data), frame->nb_samples);
                //获取sample的size
                int out_buffer_size = av_samples_get_buffer_size(NULL, out_channel_nb,
                                                                 frame->nb_samples,
                                                                 out_sample_fmt, 1);

                jbyteArray audio_sample_array = (*env).NewByteArray(out_buffer_size);
                jbyte *sample_byte_array = (*env).GetByteArrayElements(audio_sample_array, NULL);
                //拷贝缓冲数据
                memcpy(sample_byte_array, out_buffer, (size_t) out_buffer_size);
                //释放数组
                (*env).ReleaseByteArrayElements(audio_sample_array, sample_byte_array, 0);
                //调用AudioTrack的write方法进行播放
                (*env).CallIntMethod(audio_track, audio_track_write_mid,
                                     audio_sample_array, 0, out_buffer_size);
                //释放局部引用
                (*env).DeleteLocalRef(audio_sample_array);
                usleep(1000 * 16);
            }
        }
        av_packet_unref(packet);
    }
    av_frame_free(&frame);
    av_free(out_buffer);
    swr_free(&swrCtx);
    avcodec_close(pCodeCtx);
    avformat_close_input(&pFormatCtx);
}
4.音视频同步
PTS:Presentation Time Stamp。PTS主要用于度量解码后的视频帧什么时候被显示出来。
time_base:时间基。如果把1秒分为25等份,那么每一格表示的就是1/25秒,此时的time_base={1,25}。
某一帧的实际播放时间应该是 duration = pts * time_base.
因为音频的播放速度一般都是正常,视频往往偏快,所以这里暂只贴出将视频同步到音频的实现,这也是初学者最容易快速掌握的方法:
double audioClock;//该值由音频播放线程更新
#define AV_SYNC_THRESHOLD_MIN 0.04
#define AV_NOSYNC_THRESHOLD 10.0
//视频同步到音频
//获取解码的视频帧时间
double timestamp = av_frame_get_best_effort_timestamp(pFrame) *
av_q2d(pFormatCtx->streams[videoStream]->time_base);
if (packet.pts == AV_NOPTS_VALUE) {
timestamp = 0;
}
//计算帧率
double frameRate = av_q2d(pFormatCtx->streams[videoStream]->avg_frame_rate);
frameRate += (*pFrame).repeat_pict * (frameRate * 0.5);
if (timestamp == 0.0) {
//按照默认帧率播放
usleep(static_cast(frameRate * 1000));
} else {
if (fabs(timestamp - audioClock) > AV_SYNC_THRESHOLD_MIN &&
fabs(timestamp - audioClock) < AV_NOSYNC_THRESHOLD) {
if (timestamp > audioClock) {
//如果视频比音频快,延迟差值播放,否则直接播放,这里没有做丢帧处理
usleep(static_cast((timestamp - audioClock) * 1000000));
}
}
} 

