SpringBoot+MyBatis搭建迷你小程序
项目框架
- 从零搭建后端的springboot+mybatis框架
- 实现后端的业务功能
- 实现本地微信小程序的前端开发
- 前端与后端的联调
技术储备要求
基本的java知识
基本的前端开发知识
Spring,Mybatis基础知识
一、框架搭建
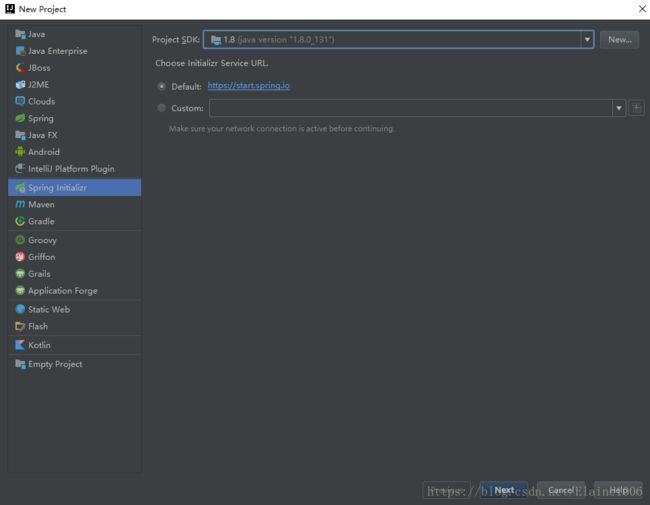
1、SpringBoot的搭建与启动
1.1.新建一个springboot项目
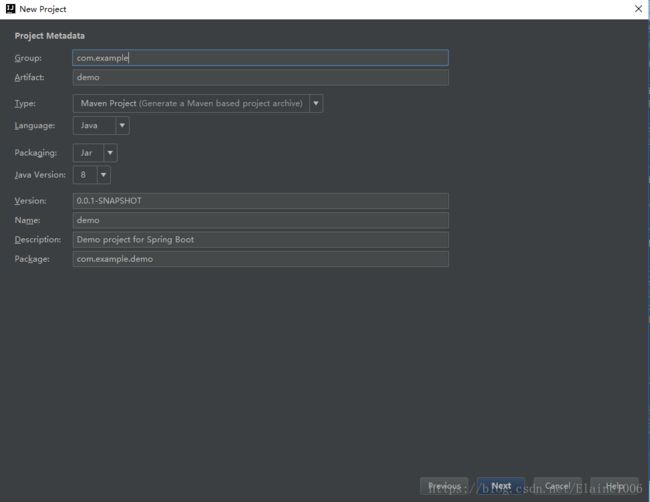
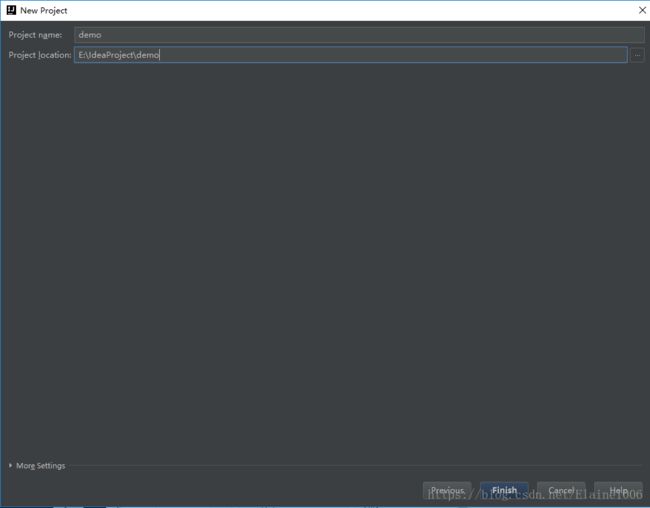
1.2.创建项目的文件结构以及jdk的版本
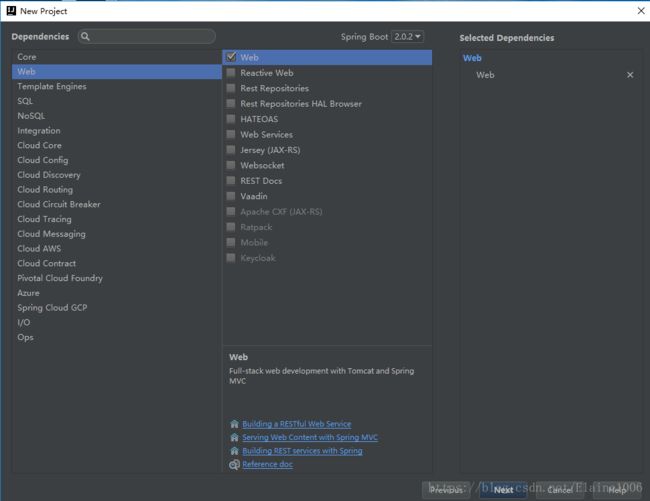
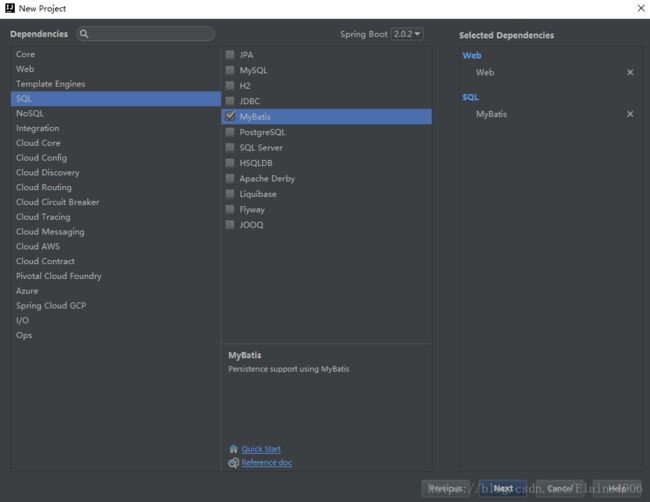
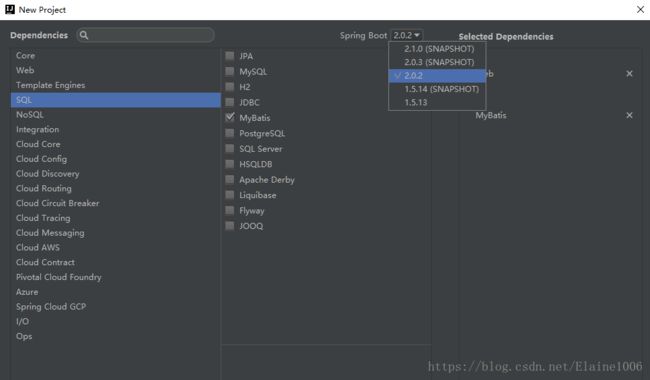
1.3.选择项目所需要的依赖
finish即可
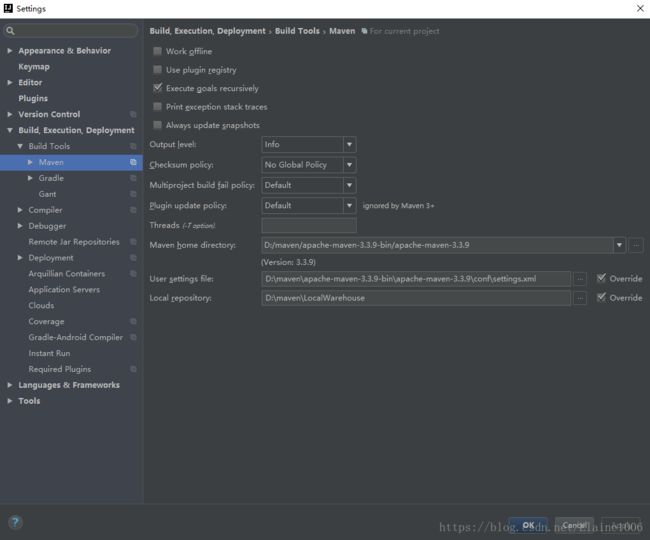
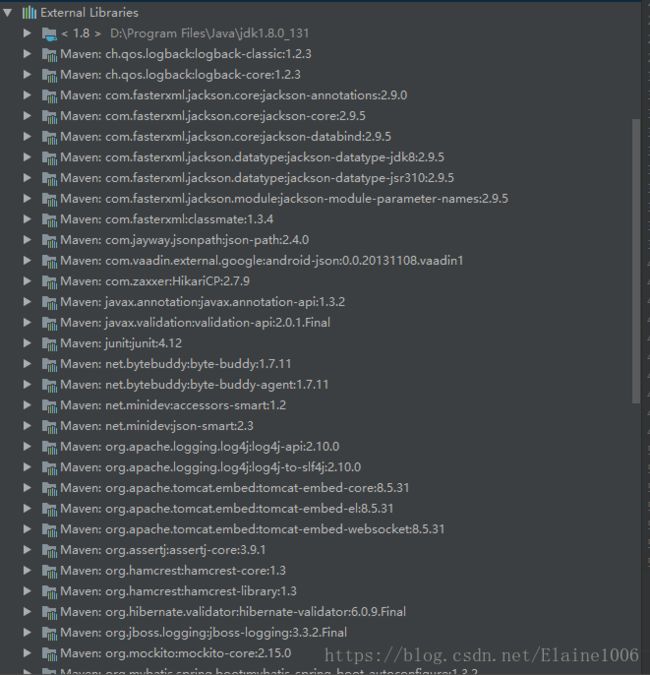
1.4.检查maven
问题1:为什么都报红呢?Inspects a Maven model for resolution problems.
解决方法:找到pom.xml 右击-->Maven--> relmport
就会发现:
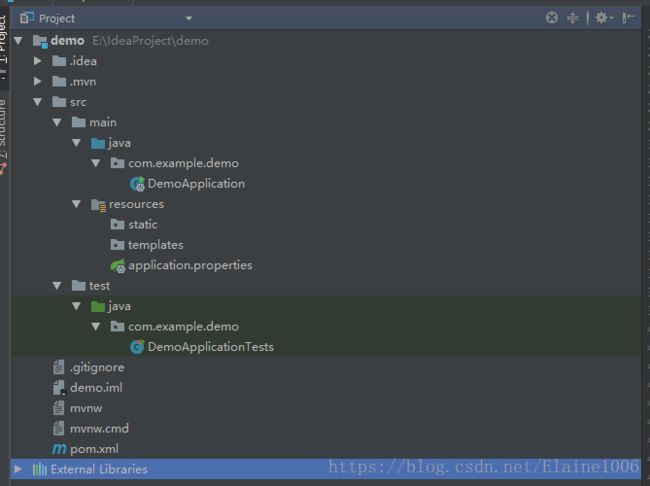
5.文件结构
通过上面的步骤完成了基础项目的创建,如上图所示,springboot的基础结构共3个文件(具体路径和名称根据用户生产项目时填写的有所差异)
src/main/java下的程序入口:DemoApplication
src/main/resources下的配置文件:application.properties
src/test/下的测试入口:DemoApplicationTests
基础结构有三大块
- src/main/java:主程序入口DemoApplication,可以通过直接运行该类来启动springboot应用。
- src/main/resources:里面application.properties文件是配置文件,该文件用来存放应用的一些配置信息,比如应用名、服务端口、数据库配置等。由于我们应用了Web模块,因此产生了static目录和templates目录,前者用于存放静态资源,如图片、CSS、JavaScript等;后者用于存放web页面的模板文件。
- src/test:单元测试目录,生成的DemoApplicationTests通过JUnit4实现,可以直接运用springboot应用的测试
还有其他的一些文件
.gitignore:如果我们需要用Git管理项目时,可以在这里面添加代码,把要忽略的文件名填进去,Git就会自动忽略这些文件
demo.iml:
mvnw:
mvnw.cmd:
pom.xml:很熟悉,maven的配置文件。
在com.example.demo下新建一个class:Hello.
package com.example.demo;

import org.springframework.boot.SpringApplication;
import org.springframework.boot.autoconfigure.SpringBootApplication;

@SpringBootApplication
public class DemoApplication {

	public static void main(String[] args) {
		SpringApplication.run(DemoApplication.class, args);
	}
}
启动项目,即启动DemoApplication。启动完成后我们怎么能访问这个Hello呢?
只需要在浏览器上输入网址:http://localhost:8080/hello回车即可,可看到网页上出现“Hello SpringBoot!”
如果不想在8080端口里面启动,可以在application.properties里进行改动。比如在8082端口
server.port=8082这时我们网址就应该改成http://localhost:8082/hello。
其实应该在网址中加上项目名,是比较规范的。比如http://localhost:8082/demo/hello,这时我们需要在application.properties里加上应用程序的上下文路径。
server.context-path=/demo或者:
server.servlet.context-path=/demo
关于application.properties配置文件的配置项可以详看:
Spring-Boot初学之配置文件application.properties(web性能)
2、表设计与实体类的创建
2.1.表设计
CREATE TABLE `tb_area` (
  `area_id` int(2) NOT NULL AUTO_INCREMENT,
  `area_name` char(200) NOT NULL,
  `priority` int(2) unsigned zerofill NOT NULL DEFAULT '00',
  `creat_time` datetime DEFAULT NULL,
  `last_edit_time` datetime DEFAULT NULL,
  PRIMARY KEY (`area_id`),
  UNIQUE KEY `UK_AREA` (`area_name`)
) ENGINE=InnoDB DEFAULT CHARSET=utf8;
2.2.实体类的创建
package com.example.demo.entity;

import java.util.Date;

/**
 * Created by fuyajie on 2018/5/14.
 */
public class Area {
    //主键ID
    private Integer areaId;
    //名称
    private String areaName;
    //权重,越大越排前显示
    private Integer priority;
    //创建时间
    private Date createTime;
    //更新时间
    private Date lastEditTime;

    public Integer getAreaId() {
        return areaId;
    }

    public void setAreaId(Integer areaId) {
        this.areaId = areaId;
    }

    public String getAreaName() {
        return areaName;
    }

    public void setAreaName(String areaName) {
        this.areaName = areaName;
    }

    public Integer getPriority() {
        return priority;
    }

    public void setPriority(Integer priority) {
        this.priority = priority;
    }

    public Date getCreateTime() {
        return createTime;
    }

    public void setCreateTime(Date createTime) {
        this.createTime = createTime;
    }

    public Date getLastEditTime() {
        return lastEditTime;
    }

    public void setLastEditTime(Date lastEditTime) {
        this.lastEditTime = lastEditTime;
    }
}
二、项目开发
1.pom的配置
	4.0.0

	com.example
	demo
	0.0.1-SNAPSHOT
	jar

	demo
	Demo project for Spring Boot


		org.springframework.boot
		spring-boot-starter-parent
		2.0.2.RELEASE


		UTF-8
		UTF-8
		1.8


			org.springframework.boot
			spring-boot-starter-web


			org.mybatis.spring.boot
			mybatis-spring-boot-starter
			1.3.2


			org.springframework.boot
			spring-boot-starter-test
			test


			mysql
			mysql-connector-java


			com.mchange
			c3p0
			0.9.5.2


				org.springframework.boot
				spring-boot-maven-plugin
2.mybatis-config的配置
在resources目录下面新建一个mybatis-config.xml文件
如果有问题可以参看一下:IDEA创建xml类型或许有答案
3.datasource和sessionfactorybean的配置
在com.example.demo下面新建package:config,再在下面新建package:dao,再在下面新建一个DataSourceConfiguration类,用来连接我们的数据库,为我们的数据库提供服务。
补充一下:datasource这些配置是可以在application.properties里配置,不过这样做是有两个考虑:
1.可以了解一下第三方datasource的配置方法,spring自带的是可以在application.properties里配置的
2.和之前的实战课衔接,因为实战课程既讲了SpringMVC同时讲了SpringBoot,在教大家SpringMVC迁移到SpringBoot的时候,咱们用的是类似的方式将XML转成了Bean,所以为了无缝衔接起来
实战过程中,黑猫白猫,能抓住老鼠的都是好猫。并且大一些的项目数据库连接池用的是自定义而非spring自带的多一些
DataSourceConfiguration:
package com.example.demo.config.dao;

import com.mchange.v2.c3p0.ComboPooledDataSource;
import org.springframework.context.annotation.Bean;

import java.beans.PropertyVetoException;

/**
 * Created by fuyajie on 2018/5/15.
 */
public class DataSourceConfiguration {
    private String jdbcDriver;
    private String jdbcUrl;
    private String jdbcUsername;
    private String jdbcPassword;

    @Bean(name = "dataSource")
    public ComboPooledDataSource createDataSource() throws PropertyVetoException {
        ComboPooledDataSource dataSource = new ComboPooledDataSource();
        dataSource.setDriverClass(jdbcDriver);
        dataSource.setJdbcUrl(jdbcUrl);
        dataSource.setUser(jdbcUsername);
        dataSource.setPassword(jdbcPassword);

        //关闭连接后不自动commit
        dataSource.setAutoCommitOnClose(false);

        return dataSource;
    }
}
然后在application.properties进行赋值。根据自己不同的用户名和密码进行赋值。
server.port=8082
server.servlet.context-path=/demo

jdbc.driver=com.mysql.jdbc.Driver
jdbc.url=jdbc:mysql://localhost:3306/demo?useUnicode=true&characterEncoding=utf8&useSSL=false
jdbc.username=root
jdbc.password=123456答案:@Value("${jdbc.driver}")等。
    @Value("${jdbc.driver}")
    private String jdbcDriver;
    @Value("${jdbc.url}")
    private String jdbcUrl;
    @Value("${jdbc.username}")
    private String jdbcUsername;
    @Value("${jdbc.password}")
    private String jdbcPassword;
注意:
1.在这里我们还需要在DataSourceConfiguration类上加入@Configuration
目的:告诉spring容器,在这个类下面去检索相关的bean,在spring初始化的时候,就会去检索这个类,调用bean方法,注入数据库的连接。
2.同时加上@MapperScan("com.example.demo.dao")配置mybatis mapper的扫描路径
DataSourceConfiguration类完整代码:
package com.example.demo.config.dao;

import com.mchange.v2.c3p0.ComboPooledDataSource;
import org.mybatis.spring.annotation.MapperScan;
import org.springframework.beans.factory.annotation.Value;
import org.springframework.context.annotation.Bean;
import org.springframework.context.annotation.Configuration;

import java.beans.PropertyVetoException;

/**
 * Created by fuyajie on 2018/5/15.
 */
@Configuration
//配置mybatis mapper的扫描路径
@MapperScan("com.example.demo.dao")
public class DataSourceConfiguration {
@Value("${jdbc.driver}")
private String jdbcDriver;
@Value("${jdbc.url}")
private String jdbcUrl;
@Value("${jdbc.username}")
private String jdbcUsername;
@Value("${jdbc.password}")
private String jdbcPassword;
@Bean(name = "dataSource")
public ComboPooledDataSource createDataSource() throws PropertyVetoException {
ComboPooledDataSource dataSource = new ComboPooledDataSource();
dataSource.setDriverClass(jdbcDriver);
dataSource.setJdbcUrl(jdbcUrl);
dataSource.setUser(jdbcUsername);
dataSource.setPassword(jdbcPassword);
//关闭连接后不自动commit
dataSource.setAutoCommitOnClose(false);
return dataSource;
}
}
新建一个SessionFactoryConfiguration类
package com.example.demo.config.dao;

import org.mybatis.spring.SqlSessionFactoryBean;
import org.springframework.beans.factory.annotation.Autowired;
import org.springframework.beans.factory.annotation.Qualifier;
import org.springframework.beans.factory.annotation.Value;
import org.springframework.context.annotation.Bean;
import org.springframework.context.annotation.Configuration;
import org.springframework.core.io.ClassPathResource;
import org.springframework.core.io.support.PathMatchingResourcePatternResolver;

import javax.sql.DataSource;
import java.io.IOException;

/**
 * Created by fuyajie on 2018/5/15.
 */
@Configuration
public class SessionFactoryConfiguration {
    // mybatis-config.xml配置文件的路径
    @Value("${mybatis_config_file}")
    private String mybatisConfigFilePath;

    // mybatis mapper文件所在路径
    @Value("${mapper_path}")
    private String mapperPath;

    // 实体类所在的package
    @Value("${entity_package}")
    private String entityPackage;

    @Autowired
    @Qualifier("dataSource")
    private DataSource dataSource;
    @Bean(name = "sqlSessionFactory")
    public SqlSessionFactoryBean createSqlSessionFactoryBean() throws IOException {
        SqlSessionFactoryBean sqlSessionFactoryBean = new SqlSessionFactoryBean();
        sqlSessionFactoryBean.setConfigLocation(new ClassPathResource(mybatisConfigFilePath));

        PathMatchingResourcePatternResolver resolver = new PathMatchingResourcePatternResolver();
        String packageSearchPath = PathMatchingResourcePatternResolver.CLASSPATH_ALL_URL_PREFIX + mapperPath;
        sqlSessionFactoryBean.setMapperLocations(resolver.getResources(packageSearchPath));
        sqlSessionFactoryBean.setDataSource(dataSource);
        sqlSessionFactoryBean.setTypeAliasesPackage(entityPackage);
        return sqlSessionFactoryBean;

    }
}
同时再在application.properties中添加代码
#Mybatis
mybatis_config_file=mybatis-config.xml
mapper_path=/mapper/**.xml
entity_package=com.example.demo.entity
