IOS系列——UItableview的基础使用
tableview基础方法
1,添加tableiview代理UITableViewDataSource,UITableViewDelegate
2、定义tableview和数据源
@property (nonatomic,retain) NSMutableArray *listdata;
@property (nonatomic,retain) UITableView *tableview;
3、tablview和listdata初始化
tableview = [[UITableView alloc]initWithFrame:CGRectMake(0, 0, self.view.frame.size.width, self.view.frame.size.height) style:UITableViewStyleGrouped];
    listdata = [[NSMutableArray alloc]initWithObjects:@"北京",@"上海",@"深圳",@"武汉",@"枣阳", nil];
//    listdata = [[NSMutableArray arrayWithObjects:@"北京",@"上海",@"深圳",@"武汉",@"枣阳", nil]retain];
    tableview.delegate = self;
    tableview.dataSource = self;
    [self.view addSubview:tableview];
4、实现delegate与dataSource
// 设置tableview有多少行
-(NSInteger)tableView:(UITableView *)tableView numberOfRowsInSection:(NSInteger)section{
    return [listdata count];
}
//设置tableview中cell(单元)的内容
-(UITableViewCell *)tableView:(UITableView *)tableView cellForRowAtIndexPath:(NSIndexPath *)indexPath{
    UITableViewCell *cell = [tableView dequeueReusableCellWithIdentifier:@"cell"];
    if (cell == nil) {
        cell = [[UITableViewCell alloc]initWithStyle:UITableViewCellStyleSubtitle reuseIdentifier:@"cell"];
    }
    int row = [indexPath row];
    cell.textLabel.text = [listdata objectAtIndex:row];
    cell.imageView.image = [UIImage imageNamed:@"small.png"];
    cell.accessoryType = UITableViewCellSelectionStyleGray;
    cell.detailTextLabel.text = @"详细信息";
    return  cell;
}
//cell点击事件
- (void)tableView:(UITableView *)tableView didSelectRowAtIndexPath:(NSIndexPath *)indexPath
{
    switch (indexPath.row) {
        case 0:{
            secondview *second = [[secondview alloc]initWithNibName:@"secondview" bundle:nil];
            [self presentViewController:second animated:NO completion:^{}];
        }
            break;
        case 1:{
            thirdview *third = [[thirdview alloc]initWithNibName:@"thirdview" bundle:nil];
            [self presentViewController:third animated:NO completion:^{}];
        }
            break;

        default:
            break;
    }
}
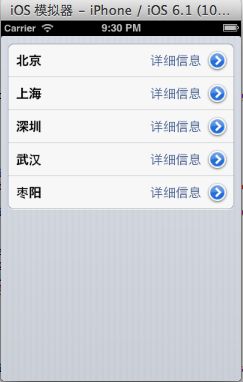
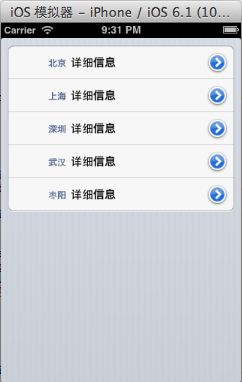
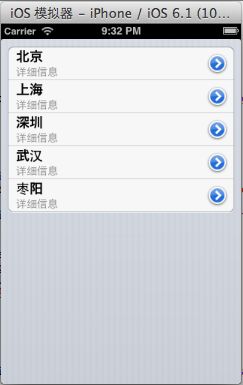
这里面有一个需要用图来解释的是 cell的type
typedef NS_ENUM(NSInteger, UITableViewCellStyle) {
    UITableViewCellStyleDefault,    // Simple cell with text label and optional image view (behavior of UITableViewCell in iPhoneOS 2.x)
    UITableViewCellStyleValue1,     // Left aligned label on left and right aligned label on right with blue text (Used in Settings)
    UITableViewCellStyleValue2,     // Right aligned label on left with blue text and left aligned label on right (Used in Phone/Contacts)
    UITableViewCellStyleSubtitle    // Left aligned label on top and left aligned label on bottom with gray text (Used in iPod).
};             // available in iPhone OS 3.0
tableview 其他设置方法
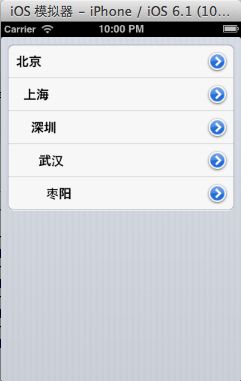
1、设置缩进
- (NSInteger)tableView:(UITableView *)tableView indentationLevelForRowAtIndexPath:(NSIndexPath *)indexPath
{
    return [indexPath row];
}
2、cell背影加重复原的方法
1)、在点击的方法里面实现
-(void)tableView:(UITableView *)tableView didSelectRowAtIndexPath:(NSIndexPath *)indexPath{
    [tableView deselectRowAtIndexPath:indexPath animated:YES];
}
2)、如果点击跳转到其他页面的话 还可以在viewwill里面实现(效果比较好)
-(void)viewWillAppear:(BOOL)animated
{
    [self.tableview deselectRowAtIndexPath:[self.tableview indexPathForSelectedRow] animated:YES];
}
3、设置区头颜色
- (void)tableView:(UITableView *)tableView willDisplayHeaderView:(UIView *)view forSection:(NSInteger)section
{
  UITableViewHeaderFooterView *v = (UITableViewHeaderFooterView *)view;
  v.backgroundView.backgroundColor = [UIColor blackColor];
}
4、delete UItableview headerview黏性
- (void)scrollViewDidScroll:(UIScrollView *)scrollView {
    if (scrollView == self.tableView)
    {
        CGFloat sectionHeaderHeight = 10;
        if (scrollView.contentOffset.y<=sectionHeaderHeight&&scrollView.contentOffset.y>=0) {
            scrollView.contentInset = UIEdgeInsetsMake(-scrollView.contentOffset.y, 0, 0, 0);
        } else if (scrollView.contentOffset.y>=sectionHeaderHeight) {
            scrollView.contentInset = UIEdgeInsetsMake(-sectionHeaderHeight, 0, 0, 0);
        }
    }
    [self.view endEditing:YES];
5、UITableViewCell的选中时的颜色
1)、系统默认颜色
//无色
cell.selectionStyle = UITableViewCellSelectionStyleNone;
//蓝色
cell.selectionStyle = UITableViewCellSelectionStyleBlue;
//灰色
cell.selectionStyle = UITableViewCellSelectionStyleGray;
2)、自定义颜色
cell.selectedBackgroundView = [[UIView alloc] initWithFrame:cell.frame];
cell.selectedBackgroundView.backgroundColor = [UIColor xxxxxx];
3)、自定义背景图
cell.selectedBackgroundView = [[[UIImageView alloc] initWithImage:[UIImage imageNamed:@"cellart.png"]] autorelease];
//还有字体颜色
cell.textLabel.highlightedTextColor = [UIColor xxxcolor];  [cell.textLabel setTextColor:color];
6、tablview 分割线
1)、设置分隔线的颜色
[_tableView setSeparatorColor:[UIColor xxxx ]]; 2)、设置分割线颜色
_tableView.separatorColor = [UIColor redColor];3)、设置分割线偏移
_tableView.separatorInset = UIEdgeInsetsMake(0, 100, 0, 0);4)、解决ios8及以上 分割线有边緣问题
// 解决ios8及以上 分割线有边緣问题
-(void)tableView:(UITableView *)tableView willDisplayCell:(UITableViewCell *)cell forRowAtIndexPath:(NSIndexPath *)indexPath{
    if ([cell respondsToSelector:@selector(setSeparatorInset:)]) {
        [cell setSeparatorInset:UIEdgeInsetsZero];
    }
    if ([cell respondsToSelector:@selector(setLayoutMargins:)]) {
        [cell setLayoutMargins:UIEdgeInsetsZero];
    }
}
// 解决ios8及以上 分割线有边緣问题
-(void)viewDidLayoutSubviews{
    if ([self.tableView respondsToSelector:@selector(setSeparatorInset:)]) {
        [self.tableView setSeparatorInset:UIEdgeInsetsZero];
    }
    if ([self.tableView respondsToSelector:@selector(setLayoutMargins:)]) {
        [self.tableView setLayoutMargins:UIEdgeInsetsZero];
    }
}
7、tableview 刷新
1)、刷新某一个section
NSRange range = NSMakeRange(indexPath.section, 1);
NSIndexSet *sectionToReload = [NSIndexSet indexSetWithIndexesInRange:range];
/*
NSMutableIndexSet是一个可变的集合,其使用方法如:
NSMutableIndexSet *idxSet = [[NSMutableIndexSet alloc] init];

//指定刷新哪些section
    [idxSet addIndex:5];
    [idxSet addIndex:2];
    [idxSet addIndex:8];
    [idxSet addIndex:12];
   //  添加 4到13的索引值(从第4个开始后面的10个)
    [idxSet addIndexesInRange:NSMakeRange(4, 10)];
*/

[_tableview reloadSections:sectionToReload withRowAnimation:UITableViewRowAnimationBottom];
8、空白的cell 去掉多余的分割线
-(UIView *)tableView:(UITableView *)tableView viewForFooterInSection:(NSInteger)section{
    UIView *view=[[UIView alloc] init];
    [view setBackgroundColor:[UIColor clearColor]];
    return view;
}
或者
-(UIView*)tableView:(UITableView*)tableView viewForFooterInSection:(NSInteger)section
{
    if([self numberOfSectionsInTableView:tableView]==(section+1)){
        return [UIView new];
    }
    return nil;
}
//索引数据填充
-(NSString *)tableView:(UITableView *)tableView titleForHeaderInSection:(NSInteger)section
{
return [sectionTitles objectAtIndex:section];
}
// 索引目录
-(NSArray *)sectionIndexTitlesForTableView:(UITableView *)tableView
{
return sectionTitles;
}
//可不用写,默认有实现
-(NSInteger)tableView:(UITableView *)tableView sectionForSectionIndexTitle:(NSString *)title atIndex:(NSInteger)index
{
// 获取所点目录对应的indexPath值
NSIndexPath *selectIndexPath = [NSIndexPath indexPathForRow:0 inSection:index];
// 让table滚动到对应的indexPath位置
[tableView scrollToRowAtIndexPath:selectIndexPath atScrollPosition:UITableViewScrollPositionBottom animated:YES];
return index;
}
索引的设置
_tableview.sectionIndexBackgroundColor = MAINCOLOR;    //索引的背景颜色
    _tableview.sectionIndexTrackingBackgroundColor = [UIColor blackColor];  //当索引条被点击的时候 出现的颜色
    _tableview.sectionIndexMinimumDisplayRowCount = 20;// tablview 最低有多少行才会显示索引栏
    _tableview.sectionIndexColor = [UIColor whiteColor];//索引上文字的颜色
tableview cell删除
1)、单行删除
//当cell 从删除状态 变为 正常状态
-(void)tableView:(UITableView *)tableView didEndEditingRowAtIndexPath:(NSIndexPath *)indexPath{
    [editButton setTitle:@"编辑" forState:0];
}

//当cell 从正常状态 变为 删除状态
-(void)tableView:(UITableView *)tableView willBeginEditingRowAtIndexPath:(NSIndexPath *)indexPath{
    [editButton setTitle:@"完成" forState:0];
}

//设置 出现的按钮的文字
-(NSString *)tableView:(UITableView *)tableView titleForDeleteConfirmationButtonForRowAtIndexPath:(NSIndexPath *)indexPath{
    return @"删除";
}

//设置 cell是否可编辑
-(BOOL)tableView:(UITableView *)tableView canEditRowAtIndexPath:(NSIndexPath *)indexPath{
    return YES;
}

//设置 cell出现删除按钮的  按钮事件
-(void)tableView:(UITableView *)tableView commitEditingStyle:(UITableViewCellEditingStyle)editingStyle forRowAtIndexPath:(NSIndexPath *)indexPath{

    if (editingStyle == UITableViewCellEditingStyleDelete) {

    }
}
-(void)editTableview{
if (!_tableView.editingg)
{
[editButton setTitle:@"完成" forState:0];
[_tableview setEditing:YES animated:YES];
}
else
{
[editButton setTitle:@"编辑" forState:0];
[_tableview setEditing:NO animated:YES];
}
} 2)、多行删除
多行删除 爱实现上面的方法 之外 还需要一个特定的方法 在这里说2种实现多行删除的方法
推荐使用第一种
[_tableview setAllowsMultipleSelectionDuringEditing:YES]; 这个方法 有好处是 比如点击编辑按钮的时候 ,cell会出现多行删除的 按钮 同时 对于单行删除没有影响,也就是说 cell左滑 出现delege 按钮还是可以的 单行删除和多行删除 i可以共存的
- (UITableViewCellEditingStyle)tableView:( UITableView *)tableView editingStyleForRowAtIndexPath:( NSIndexPath *)indexPath
{
    return    UITableViewCellEditingStyleDelete | UITableViewCellEditingStyleInsert;
}
这个方法弊端就是 当实现了这个方法 单行删除无效了


