Jetty的安装、配置和使用
Jetty 是一个开源的servlet容器,它为基于Java的web内容,例如JSP和servlet提供运行环境。Jetty是使用Java语言编写的,它的API以一组JAR包的形式发布。开发人员可以将Jetty容器实例化成一个对象,可以迅速为一些独立运行(stand-alone)的Java应用提供网络和web连接。(Jetty是一个开源的软件,可以作为HTTP服务,javax.servlet的容器。)
配置jetty server的步骤:
创建server
配置connector
配置handler
配置servlet
启动server
1. 安装maven
Maven是基于项目对象模型(POM),可以通过一小段描述信息来管理项目的构建,报告和文档的软件项目管理工具.
如果你已经有十次输入同样的Ant targets来编译你的代码、jar或者war、生成javadocs,你一定会自问,是否有一个重复性更少却能同样完成该工作的方法。Maven便提供了这样一种选择,将你的注意力从作业层转移到项目管理层。Maven项目已经能够知道如何构建和捆绑代码,运行测试,生成文档并宿主项目网页.
(1)下载将jdk加压后放到/usr/local目录下:
[root@master ~]#chmod 755 jdk-6u5-Linux-x64.bin
[root@master ~]# ./jdk-6u5-linux-x64.bin
[root@master ~]#mv jdk1.6.0_05 /usr/local
建立/usr/local/下的jdk软连接方便以后版本升级 :
[root@master ~]# ln -s /usr/local/jdk1.6.0_05/ /usr/local/jdk
(2)安装apache-maven,并设置环境变量
[root@master zy]# tar -zxvf apache-maven-2.2.1-bin.tar.gz
[root@master zy]# mv apache-maven-2.2.1 /usr/local/maven
[root@master zy]#vim /etc/profile
添加以下内容:
JAVA_HOME=/usr/local/jdk1.6.0_05
JAVA_BIN=/usr/local/jdk1.6.0_05/bin
PATH=$PATH:$JAVA_BIN:/usr/local/maven/bin
CLASSPATH=$JAVA_HOME/lib/dt.jar:$JAVA_HOME/lib/tools.jar
JETTY_HOME=/usr/local/jetty
export JAVA_HOME JAVA_BIN PATH CLASSPATH JETTY_HOME
[root@master zy]# source /etc/profile
[root@master zy]# mvn --version
Apache Maven 2.2.1 (r801777; 2009-08-07 03:16:01+0800)
Java version: 1.6.0_05
Java home: /usr/local/jdk1.6.0_05/jre
Default locale: en_US, platform encoding: UTF-8
OS name: "linux" version: "2.6.18-238.el5" arch: "amd64" Family: "unix"
2. 安装启动jetty
[root@master zy]# unzip jetty-distribution-7.3.0.v20110203.zip
[root@master zy]# mv jetty-distribution-7.3.0.v20110203 /usr/local/jetty/
[root@master zy]# cd /usr/local/jetty/
[root@master jetty]# java -jar start.jar【或者进去到bin目录,然后执行./jetty.sh start 】
[root@master bin]# ./jetty.sh start
Starting Jetty: STARTED Jetty Mon Jul 11 11:54:03 CST 2011
[root@master bin]# 2011-07-11 11:54:04.014:INFO::Redirecting stderr/stdout to /usr/local/jetty/logs/2011_07_11.stderrout.log
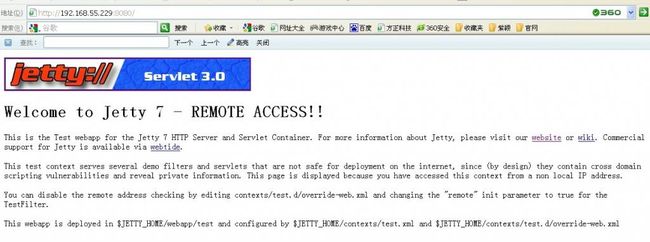
在浏览器中输入 http://192.168.55.229:8080/remote.html(这里加上remote.html的原因是避免和tomcat冲突,实际上http://192.168.55.229:8080也能够访问到,但是前提是必须把tomcat给禁掉。或者在jetty.xml中将端口改成8081,此时我们就可以直接访问http://192.168.55.229:8081)
jetty目录结构如下:
* contexts 热部署目录
* etc jetty配置文件目录
* examples jetty示例
* extras jetty可选扩展
* lib 包含jetty所需的jar文件
* LICENSES 就是LICENSES
* modules 子模块
* patches 补丁patches
* pom.xml is jetty的maven2构建文件
* project-website jetty7网站
* README.txt readme.txt
* start.jar is jetty7主程序
* VERSION.txt
* webapps应用路径,发布的引用基本都放这里
3.简单部署一个应用
[root@master ~]# cd /usr/local/jetty/webapps/
[root@master webapps]# ls
test.war
[root@master webapps]# mkdir test1
[root@master webapps]# cd test1
[root@master test1]# vi hello.jsp
simple test
<%--echo hello world--%>
<%@page language="java"%>
<%="Hello World"%>
[root@master test1]# cd /usr/local/jetty/
[root@localhost jetty]#java -jar start.jar
2011-07-11 13:34:16.175:INFO::Deployable added: /usr/local/jetty/webapps/test1
2011-07-1113:34:16.411:INFO::started.e.j.w.WebAppContext{/test1,file:/usr/local/jetty/webapps/test1/},/usr/local/jetty/webapps/test1
【或者进去bin目录执行命令./jetty.sh start】
[root@master bin]# ./jetty.sh start
Starting Jetty: STARTED Jetty Mon Jul 11 13:38:55 CST 2011
[root@master bin]# 2011-07-11 13:38:56.122:INFO::Redirecting stderr/stdout to /usr/local/jetty/logs/2011_07_11.stderrout.log
在浏览器中输入:http://192.168.55.229:8080/test1/hello.jsp
之前都用tomcat的童鞋是不是觉得tomcat很方便啊?但是还有个更方便的web服务器叫jetty,而且它的体积很小,只有几百KB,所以在项目中使用是很方便的。
下面来介绍下jetty所必需的一些东西:请注意看他的包结构
这些包都是必需的。你可以去网上下个jetty-7.2版本的类似于tomecat的东西。
其实运用jetty的方法比较多。我们一一来分析。
方法1:
看到jetty.xml和webdefault.xml这2玩意了吗?
webdefault.xml官方的解释是 The default descriptor is a web.xml format file that is applied to the context before the standard WEB-INF/web.xml 你可以理解为在web.xml加载之前先加载的jetty所需的一个容器的配置文件。
你可以去你下载的jetty里面拿出来 比如说你的路径D:\jetty-hightide-7.2.1.v20101111\etc 去这里拽个出来放在你项目里面。内容基本上不要改。
然后我们来看下jetty.xml 这是一个负责告诉jetty容器要运行的你的工程是什么。
咱们可以先看下它的内容:
- xml version="1.0"?>
- >
- <Configure id="Server" class="org.mortbay.jetty.Server">
- <Set name="ThreadPool">
- <New class="org.mortbay.thread.QueuedThreadPool">
- <Set name="minThreads">10Set>
- <Set name="maxThreads">200Set>
- <Set name="lowThreads">20Set>
- <Set name="SpawnOrShrinkAt">2Set>
- New>
- Set>
- <Call name="addConnector">
- <Arg>
- <New class="org.mortbay.jetty.nio.SelectChannelConnector">
- <Set name="host"><SystemProperty name="jetty.host" default="localhost"/>Set>
- <Set name="port"><SystemProperty name="jetty.port" default="9090"/>Set>
- <Set name="maxIdleTime">30000Set>
- <Set name="Acceptors">2Set>
- <Set name="statsOn">falseSet>
- <Set name="confidentialPort">8443Set>
- <Set name="lowResourcesConnections">5000Set>
- <Set name="lowResourcesMaxIdleTime">5000Set>
- New>
- Arg>
- Call>
- <Set name="handler">
- <New id="Handlers" class="org.mortbay.jetty.handler.HandlerCollection">
- <Set name="handlers">
- <Array type="org.mortbay.jetty.Handler">
- <Item>
- <New id="RequestLog" class="org.mortbay.jetty.handler.RequestLogHandler"/>
- Item>
- <Item>
- <New class="org.mortbay.jetty.webapp.WebAppContext">
- <Set name="contextPath">/jettytestSet>
- <Set name="war">./WebRootSet>
- New>
- Item>
- Array>
- Set>
- New>
- Set>
- <Ref id="RequestLog">
- <Set name="requestLog">
- <New id="RequestLogImpl" class="org.mortbay.jetty.NCSARequestLog">
- <Set name="filename"><SystemProperty name="jetty.logs" default="./WebRoot/logs"
- />/yyyy_mm_dd.request.logSet>
- <Set name="filenameDateFormat">yyyy_MM_ddSet>
- <Set name="retainDays">90Set>
- <Set name="append">trueSet>
- <Set name="extended">trueSet>
- <Set name="logCookies">falseSet>
- <Set name="LogTimeZone">GMTSet>
- New>
- Set>
- Ref>
- <Set name="stopAtShutdown">trueSet>
- <Set name="sendServerVersion">trueSet>
- <Set name="sendDateHeader">trueSet>
- <Set name="gracefulShutdown">1000Set>
- Configure>
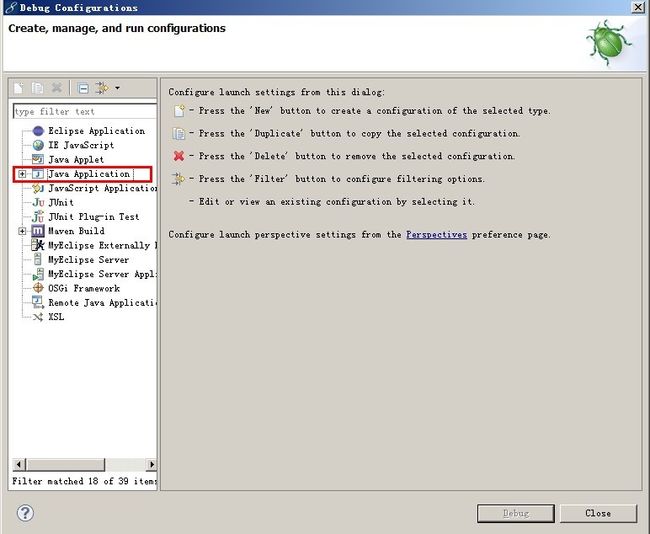
字面就很好理解吧?看完了上面的你啥类都可以先不写,可以进入debug配置里面 如下图
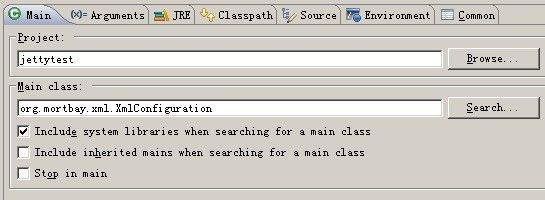
右击new 一个如下图来配置
到这里方法1就基本完成了,保存配置 run debug!http://localhost:9090/jettytest 直接去访问吧。
方法2和方法3 都是用java代码来call jetty。
方法2先来:
- public static void startJettyMethodO() {
- String jetty_home = "jettytest";//这个就是你的项目发布时候的名字
- try {
- Server server = new Server();
- Connector connector = new SelectChannelConnector();
- connector.setPort(9999);
- server.setConnectors(new Connector[] { connector });
- WebAppContext webapp = new WebAppContext();
- webapp.setContextPath("/"+jetty_home);//上下文路径 比如说/jettytest
- webapp.setResourceBase("./WebRoot");//你的资源文件所在的路径 一般都在这下面
- webapp.setDefaultsDescriptor("./WebRoot/etc/webdefault.xml");
- server.setHandler(webapp);
- server.start();
- server.join();
- } catch (Exception e) {
- e.printStackTrace();
- }
- }
方法3:
- FileNotFoundException, Exception {
- Server server = new Server();
- XmlConfiguration configuration = new XmlConfiguration(
- new FileInputStream(
- "D:\\teamwork\\jettytest\\WebRoot\\etc\\jetty.xml")); //指定自定义的jetty.xml路径
- configuration.configure(server);
- server.start();
附:官方apihttp://jetty.codehaus.org/jetty/jetty-6/apidocs/index.html
其他我也没啥好说的了。如果还有其他方法的话我会更新的。多谢支持~!
本文作为jetty的初体验体会,着重于怎样移植webapp到jetty,以及如何快速在jetty上部署webapp,也尝试了嵌入方式启动webapp,这些工作在找到方法后很轻松(实际上我可找了很久)。主要是完成你的webapp对jetty的配置,然后start!
本文并没有重点讨论jetty.xml的配置,这部分内容可以根据官方文档和看jetty自带的examples来学习,以后有时间看了再说。
注意:
jetty6是基于servlet2.5和jsp2.1设计的,
几个核心包是jetty-6.1.11.jar、jetty-util-6.1.11.jar、servlet-api-2.5-6.1.11.jar;
如果以嵌入式启动,需要引用jsp2.1包,我一开始引用的是jsp2.0包,结果造成了一些方法调用对不上参数的问题,明显是class版本有差别,换用jsp2.1就可以了。
另外对于嵌入式,/lib/naming和/lib/plus下的包最好也全部引入。
有时候jetty配置文件中会有如下引用jetty.home等变量
需要在启动程序配置中加上vm参数,如果是jetty.home,则加上
-Djetty.home=D:/devworkspace/jetty-6.1.11


