初学框架,idea2018用maven搭建Spring+SpringMVC+MyBatis项目开发环境
上个月开始学习框架的知识,感受颇深,花了大约半个月的时间将三大框架的知识都过了一遍,这里特别推荐网易云学堂,因为我的框架学习基本上是在它上面看视频学习的,话不多说,开始整合SSM框架。
第一步:肯定是建一个web项目啦。我用的是IDE工具是IDEA。这一步我就不多说了,因为接下来我想要做一个登陆验证之类的东西,我项目名就叫LoginValidate了。
第二步,既然是做框架,那么我们就要先引jar包,具体需要哪些jar包呢?如下:
1.Spring相关:spring-tx.jar、spring-context.jar、spring-expression.jar、spring-core.jar、spring-beans.jar、spring-aop.jar 、spring-web.jar、 commons-logging.jar、spring-context-support.jar
2.MyBatis相关:mybatis.jar
3.数据库相关: commons-dbcp.jar、ojdbc.jar 、commons-pool.jar、spring-jdbc.jar
4.Spring整合MyBatis相关:mybatis-spring.jar
因为我的项目比较简单,第一个SSM项目,所以用到的功能很少,暂时只需要这么多jar包,虽然也不少了,哈哈。因为我是用的maven创建项目所以只需要添加这些jar包的依赖就行了,如图:
        UTF-8
        1.7
        1.7
        4.3.9.RELEASE


            junit
            junit
            4.11
            test


            org.springframework
            spring-context
            ${spring.version}


            commons-logging
            commons-logging
            1.2


            org.mybatis
            mybatis-spring
            1.3.2


            org.springframework
            spring-tx
            ${spring.version}


            org.springframework
            spring-jdbc
            ${spring.version}


            org.springframework
            spring-context-support
            ${spring.version}


            org.springframework
            spring-web
            ${spring.version}


            commons-dbcp
            commons-dbcp
            1.4


            org.mybatis
            mybatis
            3.4.6


            com.oracle
            ojdbc7
            12.1.0.2


            log4j
            log4j
            1.2.17


            org.springframework
            spring-webmvc
            ${spring.version}
pom文件内添加这些jar包依赖。
第三步写配置文件:(idea在这里帮我们很大的忙,他可以直接自动跟我们生成配置文件,并将它配置到web.xml中)
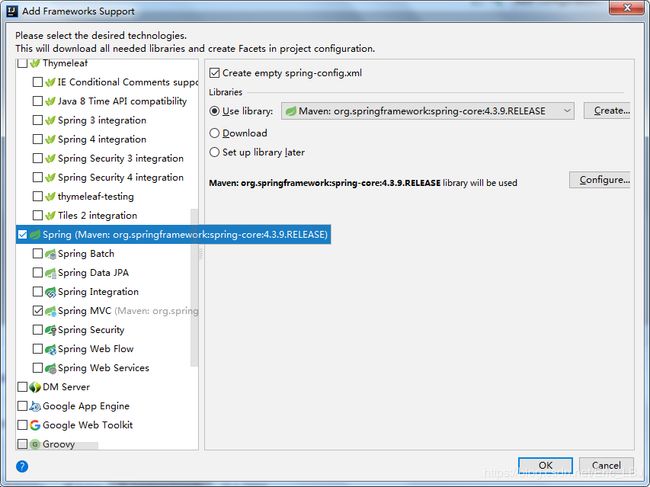
在项目上点击鼠标右键选择Add Frameworks Support,找到Spring和SpringMVC并勾选,如果找不到请参考:https://blog.csdn.net/mj_yang/article/details/80141846

一定要勾选Spring里面的Create empty spring-config.xml,这样才会生成配置文件。同时有几个点要注意,第一:自动生成的配置文件会自动配置到web.xml中,但是有1处地方需要修改
`
	    dispatcher
        org.springframework.web.servlet.DispatcherServlet
        1


        dispatcher
        /
    `
第二:因为我们使用的IDE工具是IDEA所以如果项目后期需要在jsp中用到EL表达式,我们就需要在web.xml中添加这一句话
web.xml中已经配置完毕,下面看Spring的配置文件(applicationContext.xml文件):
为了方便修改我自己在resources目录下建了一个db.properties文件用来存放数据库的dirverClassName等属性值。文件内容为:
driverClassName=oracle.jdbc.driver.OracleDriver
url=jdbc:oracle:thin:@localhost:1521:orcl
username=scott
password=123`
然后将db.properties文件加载到Spring配置文件中,只需在Spring配置文件中添加标签:
classpath:db.properties
首先添加访问数据库的信息:
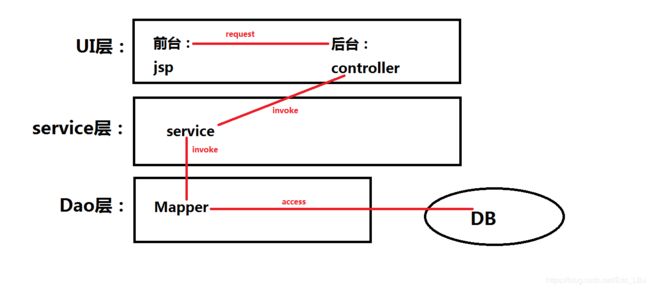
前期工作做好了,下面我们来看一下简单的三层是怎么做的,画图示意:

一个简单的三层模型,我们按照这个思路来做,用代码来实现它。
我们做一个查找学生的工作,首先得有一个学生表和一个学生类。
建表:

创建student类:
package com.lv.entity;

public class Student {
    private int stuNo;
    private String stuName;
    private int stuAge;
    public int getStuNo() {
        return stuNo;
    }
    public void setStuNo(int stuNo) {
        this.stuNo = stuNo;
    }
    public String getStuName() {
        return stuName;
    }
    public void setStuName(String stuName) {
        this.stuName = stuName;
    }
    public int getStuAge() {
        return stuAge;
    }
    public void setStuAge(int stuAge) {
        this.stuAge = stuAge;
    }
}
注意这里的表的字段与类的属性要一一对应,否则后面会很麻烦,这应该算是MyBatis的一个约定吧。
有了表和类,我们开始做dao层,将student类和student表建立映射关系,在MyBatis中dao层主要分为两部分:第一是写Mapper.xml映射文件,第二是写Mapper接口,至于实现类可以通过Spring的配置来做,非常的简单,那么第一步写映射文件:
这里注意我们的映射文件的额namespace一定要写对,这个namespace的值就是下面写的Mapper接口的全类名,下面开始写接口:
package com.ssm.mapper;

import com.ssm.entity.Student;
public interface StudentMapper {
    Student selectStudentByStuNo(int stuNo);
}
在MyBatis中Mapper接口内的方法要与映射文件的SQL标签一致,方法名就是标签的id值,参数类型就是标签的parameterType,返回值类型就是标签的resultType。
然后我们将Mapper接口生成Mapper对象,在Spring配置文件中配置:我们知道要生成Mapper对象必须先得有SqlSessionFactory,所以先要在配置文件中配置生成SqlSessionFactory对象:
然后批量生成Mapper实现类:
对的,就是这么简单,就可以把所有的Mapper接口都自动生成实现类,不需要再手动写了,这就是框架的好处,注意:批量产生Mapper对在SpringIOC中的 id值 默认就是 首字母小写接口名 (首字母小写的接口名=id值);basePackage为Mapper接口所在包的位置,若有多个用逗号隔开。
根据三层结构,service层调用dao层,下面开始写service层,由于项目都是基于接口开发,那么我们先写接口:
package com.ssm.service;
import com.ssm.entity.Student;
public interface StudentService {
    Student selectStudentByStuNo(int stuNo);
}
不要太简单。。。
接口实现类:
package com.ssm.service.impl;
import com.ssm.entity.Student;
import com.ssm.mapper.StudentMapper;
import com.ssm.service.StudentService;
import org.springframework.beans.factory.annotation.Autowired;
import org.springframework.beans.factory.annotation.Qualifier;
import org.springframework.stereotype.Service;
@Service("studentService")
public class StudentServiceImpl implements StudentService {
    @Autowired
    @Qualifier("studentMapper")
    StudentMapper studentMapper;
    public void setStudentMapper(StudentMapper studentMapper) {
        this.studentMapper = studentMapper;
    }
    @Override
    public Student selectStudentByStuNo(int stuNo) {
        return studentMapper.selectStudentByStuNo(stuNo);
    }
}
这里我们用的注解形式将service实现类加入到SpringIOC容器中,因为是service层所以注解当然用@Service,然后service调用dao层所以这个类需要一个Mapper对象,同样用注解形式@Autowired是根据类型注入值,我这里加了一个@Qualifier(“studentMapper”)注解是表示根据id值为StudentMapper注入值得,前面我们说过通过配置批量生成的Mapper对象id值为首字母小写的对象名在这里可以看出来。这里的依赖注入是通过set方式注入的,所以一定要加上studentMapper的set方法,切记!!!
这里我们用注解所以必须在Spring配置文件中加入扫描器:
在做框架整合的时候我们需要反反复复的写配置文件,所以一定得耐得烦。
后台controller调用service,所以做完Service层做Contorller控制层,控制层也就是SpringMVC中MVC的C,
先写控制器:
package com.ssm.controller;
import com.ssm.entity.Student;
import com.ssm.service.StudentService;
import org.springframework.beans.factory.annotation.Autowired;
import org.springframework.beans.factory.annotation.Qualifier;
import org.springframework.stereotype.Controller;
import org.springframework.web.bind.annotation.PathVariable;
import org.springframework.web.bind.annotation.RequestMapping;
import java.util.Map;
@Controller
@RequestMapping("studentController")
public class StudentController {
    @Autowired
    @Qualifier("studentService")
    StudentService studentService;

    public void setStudentService(StudentService studentService) {
        this.studentService = studentService;
    }

    @RequestMapping(value = "selectStudentByStuNo/{stuNo}")
    public String selectStudentByStuNo(@PathVariable("stuNo") int stuNo, Map map) {
        Student student = studentService.selectStudentByStuNo(stuNo);
        map.put("student", student);
        return "result";
    }
}
将控制器加入SpringIOC容器,controller层注解形式用@Controller,它调用service层,所以写上studentService属性,并赋值,与之前的Mapper一模一样,同样注意写set方法。写完控制器就写SpringMVC的配置文件(dispatcher-servlet.xml):
用了注解就写扫描器,视图解析器将控制器的返回值解析成一个视图页面,基础配置我们现在其实用不到,但是一般都会写上,为了防止冲突。
到这里所有的三层代码基本已经写完了,直接进入前台,写个测试页就行,对了还要写一个结果页面(result.jsp),并在webapp下建一个views目录,将result.jsp放到文件夹内,要问为什么?自己看视图解析器的配置。
index.jsp:
select student
偷懒写个超链接。
结果页result.jsp
${requestScope.student.stuName}
你看这里我们就要用到EL表达式,之前在web.xml中的那句话千万要记得写,不然这里就用不了罗。
好了,直接部署到tomcat服务器上,运行就能得到结果了!简单的查学生操作就做完了,Spring+SpringMVC+MyBatis框架开发,的确比原生态的java代码简单很多,不用写什么servlet啊什么的!简单易行。。。
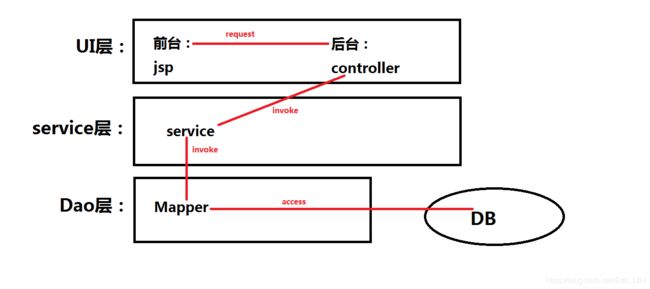
小结:整合Spring+SpringMVC+MyBatis,最主要的工作就是将MyBatis交给Spring管理,核心其实就是将MyBatis的SqlSessionFactory 交给Spring,整合SpringMVC就是将SpringMVC加入项目即可。MyBatis负责三层结构的Dao层,spring其实是负责service层,也就是业务处理层,SpringMVC就负责UI层罗。下面我再把三层结构放一下,理解了三层结构,开发就会很快。。。