微服务学习笔记--使用Spring Cloud Config 统一管理微服务配置
目录
- 前言
- 编写Config Server
- 创建Git仓库
- 编写Config Server
- 编写Config Client
- 添加依赖
- 修改配置
- 测试
前言
微服务架构中为了方便管理与更新各微服务的配置,在Spring Cloud中可以使用 Spring Cloud Config 来统一管理系统内各微服务的配置文件。使用Config统一管理后,可实现git分布式版本控制,不同环境不同配置,动态调整自动更新配置等功能。
Spring Cloud Config 包括Config Server 和 Config Client 两部分,Config Server用于管理配置,Config Client 则与各微服务集成负责向Config Server请求获取配置并进行缓存以提高性能。
Config Server默认使用Git存储配置内容,当然也可以使用SVN,本地文件系统或Vault存储配置。
下面把Config Server 、 Config Client 和 Eureka配合使用记录下来。
编写Config Server
在编写Config Server 前,我们需要使用Git作为后端存储。
创建Git仓库
可以在github.com上创建一个仓库。先前面用到了电影与用户微服务的配置文件直接放到仓库中。配置文件命名使用规范:服务名+环境 。这里我创建的仓库如下图:

每个微服务的配置我这里按开发与生产环境分别部署两份。配置文件内容与前面做的demo配置一样,但开发与生产配置的端口号不同。
另外,方便测试版本控制,我给仓库新建了一个 config-label-v2.0 分支,将端口号进行修改以便区分。
编写Config Server
新建一个Spring Boot项目,
1、引入依赖
<dependencies>
        <dependency>
            <groupId>org.springframework.cloudgroupId>
            <artifactId>spring-cloud-config-serverartifactId>
        dependency>
        <dependency>
            <groupId>org.springframework.bootgroupId>
            <artifactId>spring-boot-starter-actuatorartifactId>
        dependency>
        <dependency>
            <groupId>org.springframework.cloudgroupId>
            <artifactId>spring-cloud-starter-netflix-eureka-clientartifactId>
        dependency>
        <dependency>
            <groupId>org.springframework.bootgroupId>
            <artifactId>spring-boot-starter-testartifactId>
            <scope>testscope>
        dependency>
    dependencies>

    <dependencyManagement>
        <dependencies>
            <dependency>
                <groupId>org.springframework.cloudgroupId>
                <artifactId>spring-cloud-dependenciesartifactId>
                <version>Edgware.RELEASEversion>
                <type>pomtype>
                <scope>importscope>
            dependency>
        dependencies>
    dependencyManagement>
2、添加注解
在启动类上添加 @EnableConfigServer 声明这是一个Config Server
@EnableDiscoveryClient
@EnableConfigServer
@SpringBootApplication
public class MicroserviceConfigServerApplication {

    public static void main(String[] args) {
        SpringApplication.run(MicroserviceConfigServerApplication.class, args);
    }
}
因为我们是配合Eureka使用,因此启动类上也需要添加
@EnableDiscoveryClient注解
3、编写配置
编写application.yml ,并添加以下配置:
server:
  port: 8082
spring:
  application:
    name:  microservice-config-server
  cloud:
    config:
      server:
        git:
          uri: https://github.com/hjwzyy/spring-cloud-edgware-configServer-demo
          username: ******@*******.com
          password: *******
eureka:
  client:
    service-url:
      defaultZone: http://user:admin@localhost:8761/eureka/
至此 一个简单的Config Server就完成了。
下面我们来启动Config Server进行测试。
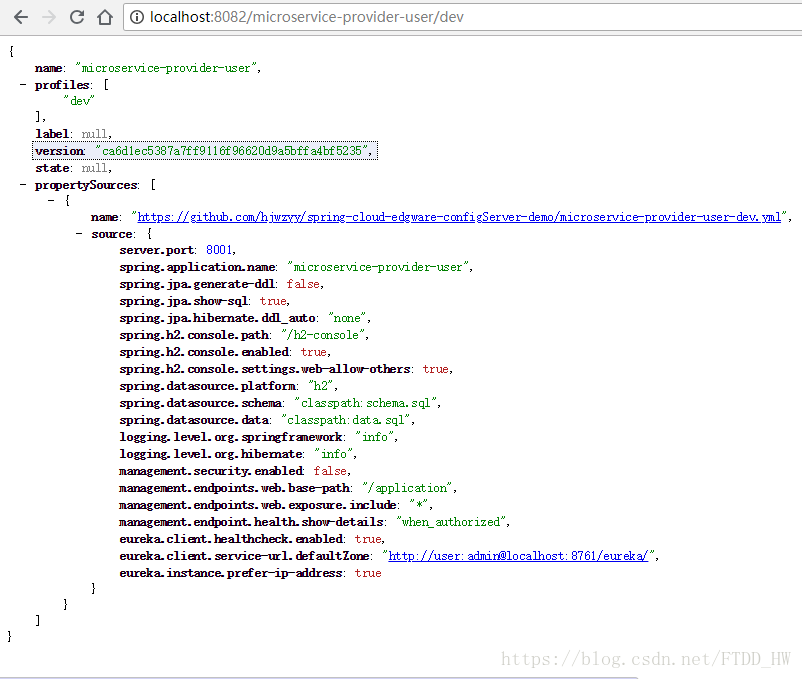
访问如下地址:http://localhost:8082/microservice-provider-user/dev 如下图:

这里显示的是我们放在Git仓库里的用户微服务的开发环境配置文件,说明Config Server正常。
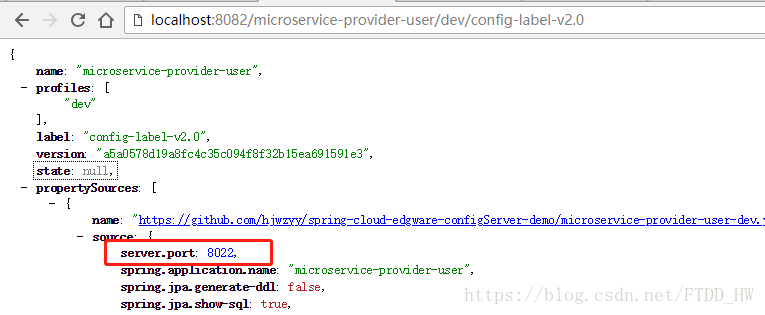
测试版本控制,访问如下地址:http://localhost:8082/microservice-provider-user/dev/config-label-v2.0

可以看到访问地址加上指定分支后显示的是指定分支下的配置文件。
关于Config Server 获取git上的资源信息遵循如下规则:
/{application}/{profile}[/{label}]
/{application}-{profile}.yml
/{label}/{application}-{profile}.yml
/{application}-{profile}.properties
/{label}/{application}-{profile}.properties
我们可以按以上规则去访问git上的配置文件
编写Config Client
前面我们写过,Config Client与微服务集成,因此在微服务中添加Config的依赖,稍微配置一下就可以了。
下面我将前面的用户微服务与电影微服务添加Config Client,整个用户与电影微服务的编写,服务注册这里不再贅述,可参考前文:
微服务简单实例–电影购票
微服务学习笔记 –使用Spring Cloud Eureka实现服务注册与发现
添加依赖
向用户微服务添加以下依赖:
<dependency>
    <groupId>org.springframework.cloudgroupId>
    <artifactId>spring-cloud-starter-configartifactId>
dependency>
电影微服务同上添加依赖。
修改配置
因为用户微服务的配置已经放在了git上,所以项目的中的application.yml文件只需要配置一个端口即可,其它配置清除:
server:
  port: 8005
git上的配置文件也可以配置端口,并且会以git上的配置文件为准
添加bootstrap.yml配置文件
Spring Cloud 有一个“引导上下文”的概念,这里主应用程序的父上下文。引导上下文负责从配置服务器加载配置属性,以及解密外部配置文件中的属性。和主应用程序加载application.*(yml或priperties)中的属性不同,引导上下文加载bootstarap.*中的属性。配置在bootstrap.*中的属性有更高的优先级,因此默认情况下它们不能被本地配置覆盖。
spring:
  application:
    name: microservice-provider-user
  cloud:
    config:
      profile: prod
      label: master
      discovery:
        enabled: true
        serviceId: microservice-config-server
eureka:
  client:
    service-url:
      defaultZone: http://user:admin@localhost:8761/eureka/
配置文件中加上服务注册配置,因为我们是与Eureka配合使用,Config Client需要先从Eureka中找到Config Server,再从Config Server中获取到对应的配置。而获取对应配置是依靠
spring.application.name与spring.cloud.config.profile来找到对应配置文件的。还记得前面我们在Git仓库中建立的配置文件命名吗?都是以服务名+环境进行命名的。
spring.cloud.config.label 则是指定分支为主分支 master
spring.cloud.config.discovery.enabled 表示使用服务发现组件中的Config Server,而不是自己指定的Config Serverr uri,默认为false
spring.cloud.config.discovery.serviceId指定Config Server在服务发现中的serviceId,默认是configserver ,因此这里写的是前面编写的Config Server 的spring.application.name
电影微服务的配置同上
至此,Config Client已经配置完成。
测试
分别启动Eureka,Config Server,用户微服务与电影微服务。
在Eureka界面可以看到有三个注册的服务:

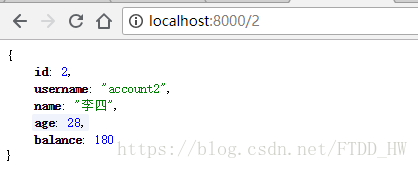
用户微服务与电影微服务启动的端口是git配置文件中设置的端口,访问各各微服务通过正常获取数据:

说明配置文件已经实现了通过Spring cloud Config 统一管理与获取。