Material Design——控件大汇总(二)
我尽量不打错别字,用词准确,不造成阅读障碍。
本篇继续对常用MD控件及效果进行汇总,如果没有看到你想要了解的控件使用方法,请阅读我的另一篇文章Material Design——控件大汇总(一)
本篇文章涉及:NavigationView、SwipeRefreshLayout、ToolBar、AppBarLayout、CollapsingToolbarLayout、Bottom Sheet
NavigationView:
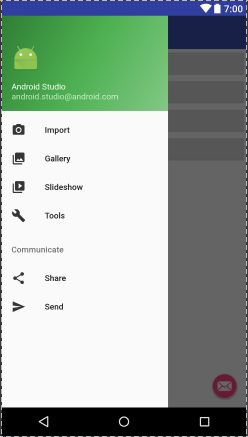
继承自FrameLayout,感觉NavigationView配合DrawerLayout作为侧滑菜单的情况比较多,所以以此举例:
代码部分:
- headerLayout:表示头部布局,布局方式与普通布局一致
- menu:表示底部选项列表布局
- itemIconColor:表示设置选项列表图片的颜色,因为选项的图片是画出来的,也可以放图片
- itemTextColor:表示设置选型列表文字的颜色
- itemBackground:表示设置选项列表区域的背景色
创建项目时可以选择布局样式,这里给出默认选项布局样式:
<menu xmlns:android="http://schemas.android.com/apk/res/android">
    <group android:checkableBehavior="single">
        <item android:id="@+id/nav_camera" android:icon="@drawable/ic_menu_camera"
            android:title="Import" />
        <item android:id="@+id/nav_gallery" android:icon="@drawable/ic_menu_gallery"
            android:title="Gallery" />
        <item android:id="@+id/nav_slideshow" android:icon="@drawable/ic_menu_slideshow"
            android:title="Slideshow" />
        <item android:id="@+id/nav_manage" android:icon="@drawable/ic_menu_manage"
            android:title="Tools" />
    group>
    <item android:title="Communicate">
        <menu>
            <item android:id="@+id/nav_share" android:icon="@drawable/ic_menu_share"
                android:title="Share" />
            <item android:id="@+id/nav_send" android:icon="@drawable/ic_menu_send"
                android:title="Send" />
        menu>
    item>
menu>
代码处理item点击:
NavigationView navigationView = (NavigationView) findViewById(R.id.nav_view);
navigationView.setNavigationItemSelectedListener(this);
//实现NavigationView.OnNavigationItemSelectedListener接口
@SuppressWarnings("StatementWithEmptyBody")
    @Override
    public boolean onNavigationItemSelected(MenuItem item) {
        // Handle navigation view item clicks here.
        int id = item.getItemId();
        if (id == R.id.nav_camera) {
            // Handle the camera action
        } else if (id == R.id.nav_gallery) {

        } else if (id == R.id.nav_slideshow) {

        } else if (id == R.id.nav_manage) {

        } else if (id == R.id.nav_share) {

        } else if (id == R.id.nav_send) {

        }
        DrawerLayout drawer = (DrawerLayout) findViewById(R.id.drawer_layout);
        drawer.closeDrawer(GravityCompat.START);
        return true;
    }
SwipeRefreshLayout
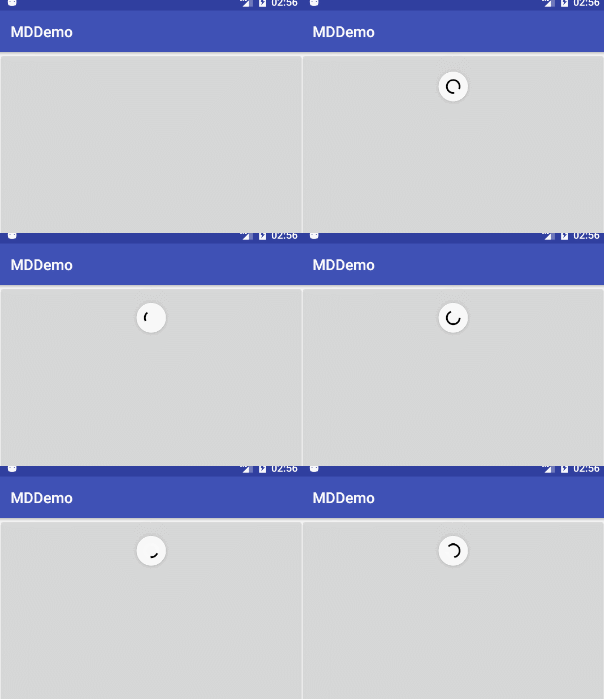
继承自ViewGroup,下拉刷新的控件,挺喜欢的,主要是简单易用,样式美观,可惜没有配套的上拉加载控件。
代码设置属性:
//更改刷新的内部圆圈颜色
swiperefreshlayout.setColorSchemeColors(ContextCompat.getColor(this,R.color.colorPrimaryDark));
//监听刷新
swiperefreshlayout.setOnRefreshListener(new SwipeRefreshLayout.OnRefreshListener() {
            @Override
            public void onRefresh() {
                //刷新数据具体操作
            }
        });
//根据数据刷新结果更改控件显示状态
if (swiperefreshlayout.isRefreshing()) {
    swiperefreshlayout.setRefreshing(false);
}
将SwipeRefreshLayout包裹住想要触发刷新的内容布局,一般只有一个子布局,类似RecyclerView等。
ToolBar
ToolBar是可以顶替ActionBar的一个顶部导航栏;

toolbar = (Toolbar) findViewById(R.id.bt_tool_bar);
setSupportActionBar(toolbar);
toolbar.setTitle("toolbar");//设置title
toolbar.setNavigationOnClickListener(new View.OnClickListener() { //返回按钮的点击事件
    @Override
    public void onClick(View v) {
        finish();
    }
 });
 getSupportActionBar().setDisplayHomeAsUpEnabled(true);//显示返回按钮
}

 @Override
 public boolean onCreateOptionsMenu(Menu menu) {
   // Inflate the menu; this adds items to the action bar if it is present.
   getMenuInflater().inflate(R.menu.main, menu);
   return true;
 }

 //处理菜单的点击事件
 @Override
 public boolean onOptionsItemSelected(MenuItem menuItem) {
     return super.onOptionsItemSelected(menuItem);
 }
menu文件夹下文件main,没有请创建:
<menu xmlns:android="http://schemas.android.com/apk/res/android"
    xmlns:app="http://schemas.android.com/apk/res-auto">
    <item android:id="@+id/action_settings" android:orderInCategory="100"
        android:title="Settings" app:showAsAction="never" />
menu>
AppBarLayout
讲到Toolbar就必须要讲AppBarLayout,有个很常见的效果是靠它实现的:
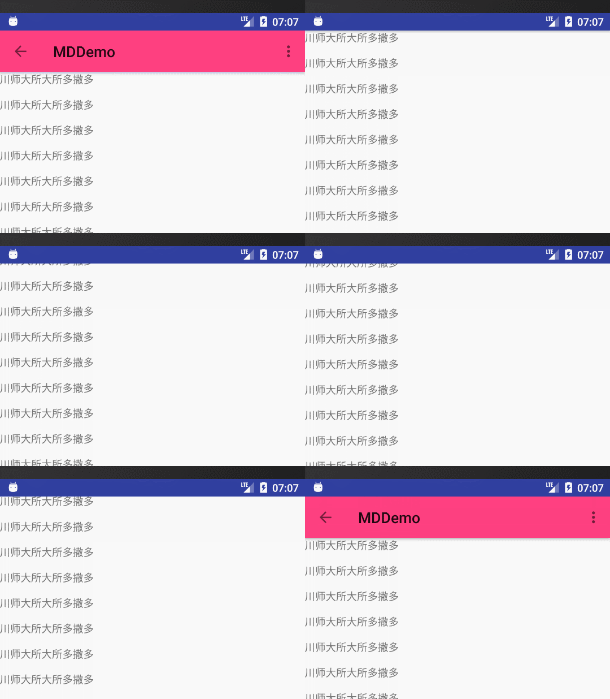
AppBarLayout继承自LinearLayout,默认垂直方向,这点可以在开发时使用上,在ToolBar下面放一个不会随着ToolBar一起滚动消失的View,在ToolBar滚动消失后可以继续留在屏幕上。
这个效果的实现有几个必要条件:
- 内容可以滚动
- 外部包裹CoordinatorLayout。
代码如下:
<android.support.design.widget.CoordinatorLayout xmlns:android="http://schemas.android.com/apk/res/android"
    xmlns:app="http://schemas.android.com/apk/res-auto"
    xmlns:tools="http://schemas.android.com/tools"
    android:layout_width="match_parent"
    android:layout_height="match_parent"
    android:orientation="vertical"
    tools:context="com.clone.surpassli.mddemo.ToolBarActivity">

    <android.support.design.widget.AppBarLayout
        android:layout_width="match_parent"
        android:layout_height="wrap_content">


        <android.support.v7.widget.Toolbar
            android:id="@+id/bt_tool_bar"
            android:layout_width="match_parent"
            android:layout_height="?attr/actionBarSize"
            android:background="@color/colorAccent"
            app:layout_scrollFlags="scroll" />

    android.support.design.widget.AppBarLayout>


    <android.support.v4.widget.NestedScrollView
        android:layout_width="match_parent"
        android:layout_height="match_parent"
        app:layout_behavior="@string/appbar_scrolling_view_behavior">

        <LinearLayout
            android:layout_width="match_parent"
            android:layout_height="wrap_content"
            android:orientation="vertical">

            <TextView
                android:layout_width="match_parent"
                android:layout_height="wrap_content"
                android:layout_marginBottom="15dp"
                android:text="这里面的文字应该特别长,引起屏幕滚动" />
        LinearLayout>

    android.support.v4.widget.NestedScrollView>
android.support.design.widget.CoordinatorLayout>
NestedScrollView其中有一个layout_behavior属性,这里为了效果选择appbar_scrolling_view_behavior,这是系统自带的。
layout_scrollFlags的值有以下几个:
- scroll:是让ToolBar随着屏幕滚动而滚动,如上图。
- enterAlways:只要滚动内容开始向下滚动ToolBar就开始向下滚动,而不是等内容滚动到顶部才开始滚动,单独设置无效,需与scroll一起设置,如:scroll|enterAlways。
- enterAlwaysCollapsed:当ToolBar的高度比较高的时候使用,结合CollapsingToolbarLayout,下面讲。
- enterUntilCollapsed:当ToolBar的高度比较高的时候使用,结合CollapsingToolbarLayout,下面讲。
CollapsingToolbarLayout
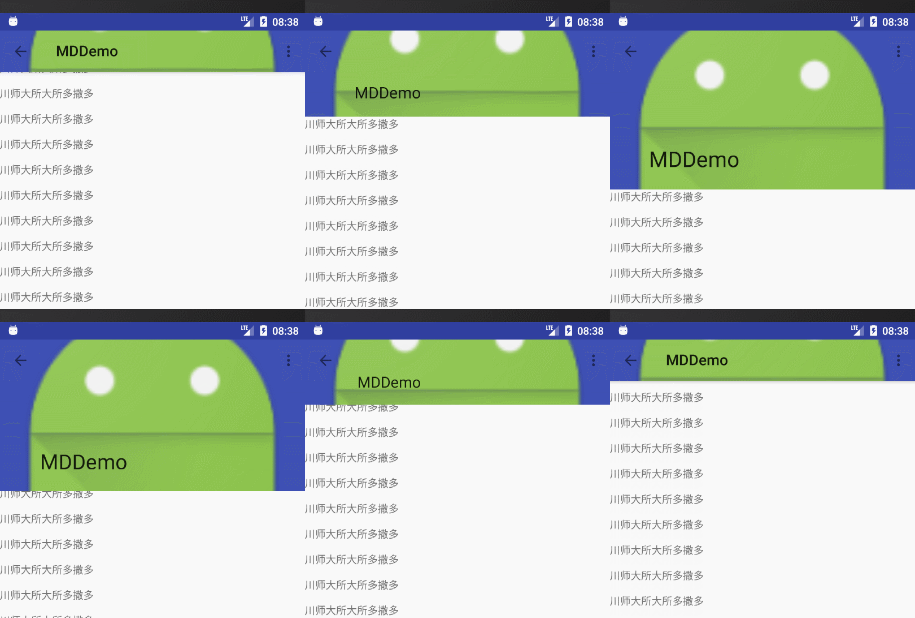
继承自FrameLayout,是ToolBar的再一层封装,主要用于实现顶部伸缩效果,看图吧:
代码:
<android.support.design.widget.CoordinatorLayout xmlns:android="http://schemas.android.com/apk/res/android"
    xmlns:app="http://schemas.android.com/apk/res-auto"
    xmlns:tools="http://schemas.android.com/tools"
    android:layout_width="match_parent"
    android:layout_height="match_parent"
    tools:context="com.clone.surpassli.mddemo.ToolBarActivity">

    <android.support.design.widget.AppBarLayout
        android:layout_width="match_parent"
        android:layout_height="wrap_content">

        <android.support.design.widget.CollapsingToolbarLayout
            android:layout_width="match_parent"
            android:layout_height="wrap_content"
            app:expandedTitleMarginEnd="64dp"
            app:expandedTitleMarginStart="48dp"
            app:layout_scrollFlags="scroll|exitUntilCollapsed">

            <ImageView
                android:id="@+id/main.backdrop"
                android:layout_width="match_parent"
                android:layout_height="250dp"
                android:scaleType="centerCrop"
                android:src="@mipmap/ic_launcher"
                app:layout_collapseMode="parallax" />

            <android.support.v7.widget.Toolbar
                android:id="@+id/bt_tool_bar"
                android:layout_width="match_parent"
                android:layout_height="?attr/actionBarSize"
                app:layout_collapseMode="pin" />

        android.support.design.widget.CollapsingToolbarLayout>
    android.support.design.widget.AppBarLayout>

    <android.support.v4.widget.NestedScrollView
        android:layout_width="match_parent"
        android:layout_height="match_parent"
        app:layout_behavior="@string/appbar_scrolling_view_behavior">

        <LinearLayout
            android:layout_width="match_parent"
            android:layout_height="wrap_content"
            android:orientation="vertical">

            <TextView
                android:layout_width="match_parent"
                android:layout_height="wrap_content"
                android:layout_marginBottom="15dp"
                android:text="川师大所大所多撒多" />

           ......

        LinearLayout>
    android.support.v4.widget.NestedScrollView>
android.support.design.widget.CoordinatorLayout>
比较眼熟的效果,exitUntilCollapsed是指优先获取滑动权,滑动完了才是ScrollView的滑动,layout_collapseMode:仔细看,你会发现图片的回收速度比CollapsingToolbarLayout要慢一些,可能我这个gif太慢了看不出来,这是设置了layout_collapseMode为parallax,如果设置为pin,就是相同速度了,只是感官不好看。
enterAlwaysCollapsed:一般和enterAlways,scroll合用,“scroll|enterAlways|enterAlwaysCollapsed”,当ToolBar已经显示到最小高度时,暂时随着手指向下滚动,直到scrollView滑动到顶部时才继续滑动,看图,中间有放慢的地方:

Bottom Sheet
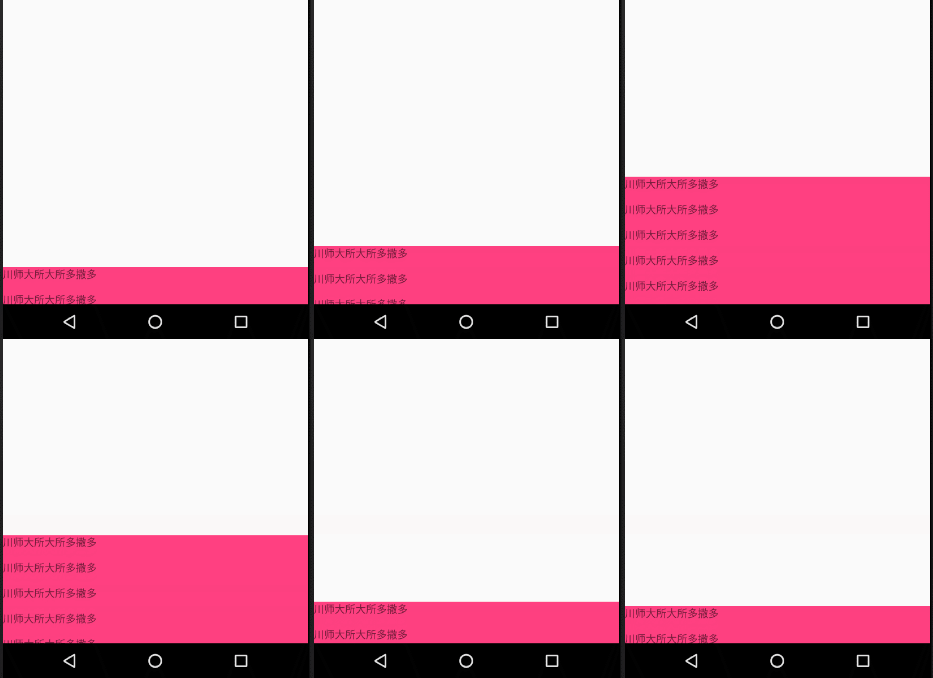
bottom sheet 谈不上控件什么的,就是一种提供选项给用户的方式,底部弹出选项栏:
代码:
    <TextView
        android:layout_width="match_parent"
        android:layout_height="300dp"
        android:gravity="center"
        android:text="正常页面" />

    <android.support.v4.widget.NestedScrollView
        android:id="@+id/asv_bottom_sheet"
        android:layout_width="match_parent"
        android:layout_height="wrap_content"
        android:background="@color/colorAccent"
        app:behavior_hideable="false"
        app:behavior_peekHeight="50dp"
        app:layout_behavior="@string/bottom_sheet_behavior">


    android.support.v4.widget.NestedScrollView>
android.support.design.widget.CoordinatorLayout>
NestedScrollView bottomSheet = (NestedScrollView) findViewById(R.id.asv_bottom_sheet);
final BottomSheetBehavior behavior = BottomSheetBehavior.from(bottomSheet);
behavior.setBottomSheetCallback(new BottomSheetBehavior.BottomSheetCallback() {
     @Override
     public void onStateChanged(@NonNull View bottomSheet, int newState) {
          //这里是bottomSheet 状态的改变,根据slideOffset可以做一些动画
          Toast.makeText(ToolBarActivity.this, "onStateChanged", Toast.LENGTH_SHORT).show();
     }

      @Override
      public void onSlide(@NonNull View bottomSheet, float slideOffset) {
          //这里是拖拽中的回调,根据slideOffset可以做一些动画
          Toast.makeText(ToolBarActivity.this, "onSlide", Toast.LENGTH_SHORT).show();
      }
});
behavior_hideable:表示当下拉时bottom_sheet是否全部可见。
behavior_peekHeight:表示默认情况下bottom_sheet的显示高度。
主要涉及分享、细节选择等地方,代码上没什么难度,但是设计上有些要求:
- 底部不可过高留白。
- 高度不宜遮挡ToolBar。
先到这里。请移步下一遍文章:
Material Design——控件大汇总(三)
参考文章(感谢):
http://www.cnblogs.com/syjhsgcc/p/4771931.html
https://blog.csdn.net/johnny901114/article/details/51918436