Windows下安装Cygwin配置Hadoop集群
Hadoop集群一般是配置到Linux系统之上,如果电脑用的是Windows系统,那么可以通过虚拟机安装Linux系统或者在Windows上安装Cygwin来模拟Linux环境,从而搭建Hadoop集群,用于开发和测试也是可以的。
本文讲的是在Windows下安装Cygwin模拟Linux环境,从而配置Hadoop集群的方法。
一、下载Cygwin,点击前往下载
二、在Windows上安装Cygwin
安装
1.双击setup.exe

2.按照安装提示“下一步”
3.选择从“互联网”安装:

4.选择安装的路径,一般是C:\Cygwin(也可以安装在别的路径下),选择本地临时目录,用于存放下载的软件;选择您连接互联网的方式,一般选“直接连接”就可以了。
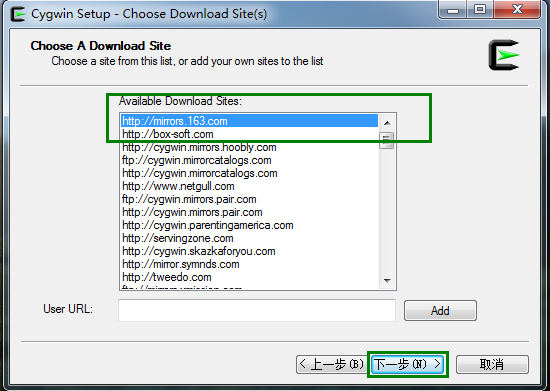
5.选择下载源:(课选择中国的镜像,下载更快些)
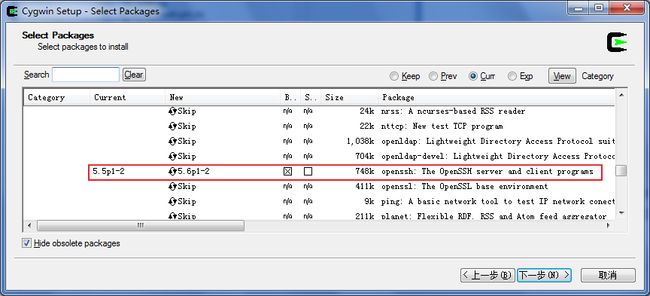
6.根据安装提示,选择需要安装的软件包,完成安装。
这里要勾选(带叉号的方框表示被勾选,空的方框
表示未被勾选)的软件包有:
vim/vi
ssh(openssh) 【Net Category下】
ssl(openssl) 【Net Category下】
apt-cyg
sed (若需要Eclipse,必须sed)【BaseCategory下】
subversion 【Devel Category下】,还有其他将来开发需要用到的组件,展开该组件,点击前面的keep,使其变成版本号
Base组件的全部,点击Base后面的Default,使其变为Install
System组件下的util-linux组件,用于使用一些常用的more等功能进行调试
点击【下一步】继续安装。
双击桌面的Cygwin图标,即可启动Cygwin里的Bash。
或者,你可将C:/Cygwin/bin加到%PATH%当中,您就可以直接在cmd.exe里面使用Linux命令了,比如less, cat, wc , wget
如果有一个Bash脚本,可以直接用C:/Cygwin/bin/bash.exe X:/scripts/Monitor.sh的形式调用。
三、Cygwin安装完毕,下面配置Hadoop集群
1、在Windows上安装Java JDK环境,并配置环境变量。(若Windows下已经安装了Java环境并配置好,则这一步略过)不用在Cygwin里安装Java JDK,Cygwin用Windows上的Java JDK,并且不需要在Cygwin下的/etc/profile文件中设置Java路径,在Hadoop/conf/hadoop-env.sh中也不需要设置Java环境。
2、可以在Cygwin中设置/etc/hosts和/etc/hostname,我这里没有设置。
3、在Cygwin中配置SSH(重要!!)
_____________________
$ ssh-host-config
*** Query: Overwrite existing /etc/ssh_config file? (yes/no)yes
*** Info: Creating default /etc/ssh_config file
*** Query: Overwrite existing /etc/sshd_config file? (yes/no)yes
*** Info: Creating default /etc/sshd_config file
*** Info: Privilege separation is set to yes by default since OpenSSH 3.3.
*** Info: However, this requires a non-privileged account called 'sshd'.
*** Info: For more info on privilege separation read /usr/share/doc/openssh/README.privsep.
*** Query: Should privilege separation be used? (yes/no)yes
*** Info: Updating /etc/sshd_config file
*** Warning: The following functions require administrator privileges!
*** Query: Do you want to install sshd as a service?
*** Query: (Say"no"if it is already installed as a service) (yes/no)yes
*** Query: Enter the value of CYGWIN for the daemon: []ntsec tty
*** Info: On Windows Server 2003, Windows Vista, and above, the
*** Info: SYSTEM account cannot setuid to other users -- a capability
*** Info: sshd requires. You need to have or to create a privileged
*** Info: account. This script will help you do so.
*** Info: You appear to be running Windows XP 64bit, Windows 2003 Server,
*** Info: or later. On these systems, it's not possible to use the LocalSystem
*** Info: account for services that can change the user id without an
*** Info: explicit password (such as passwordless logins [e.g. public key
*** Info: authentication] via sshd).
*** Info: If you want to enable that functionality, it's required to create
*** Info: a new account with special privileges (unless a similar account
*** Info: already exists). This account is then used to run these special
*** Info: servers.
*** Info: Note that creating a new user requires that the current account
*** Info: No privileged account could be found.
*** Info: This script plans to use 'cyg_server'.
*** Info: 'cyg_server' will only be used by registered services.
*** Query: Do you want to use a different name? (yes/no)yes 【no也可以】
*** Query: Enter the new user name:dev
*** Query: Reenter:dev
*** Query: Create new privileged user account 'dev'? (yes/no)yes
*** Info: Please enter a password for new user dev. Please be sure
*** Info: that this password matches the password rules given on your system.
*** Info: Entering no password will exit the configuration.
*** Query: Please enter the password:
*** Query: Reenter:
*** Info: User 'dev' has been created with password 'passw0rd'.
*** Info: If you change the password, please remember also to change the
*** Info: password for the installed services which use (or will soon use)
*** Info: the 'dev' account.
*** Info: Also keep in mind that the user 'dev' needs read permissions
*** Info: on all users' relevant files for the services running as 'dev'.
*** Info: In particular, for the sshd server all users' .ssh/authorized_keys
*** Info: files must have appropriate permissions to allow public key
*** Info: authentication. (Re-)running ssh-user-config for each user will set
*** Info: these permissions corrently. [Similary restrictions apply, for
*** Info: instance, for .rhosts files if the rshd server is running, etc].
*** Info: The sshd service has been installed under the 'dev'
*** Info: account. To start the service now, call `net start sshd' or
*** Info: `cygrunsrv -S sshd'. Otherwise, it will start automatically
*** Info: after the next reboot.
*** Info: Host configuration finished. Have fun!
_____________________
4、Windows下-【运行】-【services.msc】,找到【CYGWIN sshd】服务,并开启该服务,可以设置为自动开启。
5、在Cygwin命令行中输入ssh-keygen -t rsa生成密钥,并复制到authorized_keys中,执行相应的一系列操作,具体参见Hadoop集群搭建。
6、在Cygwin下安装并配置Hadoop文件,具体参见Hadoop集群搭建。
7、运行WordCount实例,确认CygWin下Hadoop集群配置成功,具体参见Hadoop集群搭建。
8、开启Hadoop进程,在Windows中打开浏览器中输入localhost:50030和localhost:50070查看信息。
9、在Windows中配置Eclipse开发环境,在Cygwin开启Hadoop的情况下,在Windows下用eclipse开发MapReduce程序。参见Eclipse安装Hadoop插件配置Hadoop开发环境和Hadoop+eclipse运行MapReduce程序。
参考:
[1]Cygwin的安装