OpenCV02_矩阵的掩膜操作
矩阵的掩膜操作
- 获取图像像素指针
- CV_Assert(myImage.depth()==CV_8U);
- Mat.ptr(int i = 0)获取像素矩阵的指针,索引i表示第几行,从0开始计行数.
- ptr(point)指针,unchar一个字节
- 获取的是地址,而不是一个具体的值
- 获得当前行指针const uchar* current = myImage.ptr(row);
- 获取当前像素点P(row,col)的像素值p(row,col) = current[col]
- 像素范围处理saturate_cast
* 在0~255返回正常值,小于0返回0,大于255返回255
- 这个函数的功能是确保RGB值的范围在0~255之间
- saturate_cast(-100),返回0.
- saturate_cast(288),返回255
- saturate_cast(100),返回100
- 这个函数的功能是确保RGB值的范围在0~255之间
- 掩膜(mask)操作
- 如3*3,即邻域操作
- I(i,j)=5*I(i,j)-[I(i-1,j)+I(i+1,j)+I(i,j-1)+I(i,j+1)]
- 通过掩膜操作重新计算每个像素值,提高图像的对比度
    //获取图像的高度跟宽度
    int cols = (src.cols-1)*src.channels();             //实际的col值为图像col*图像的通道数
    int offsetx = src.channels();                       //开始的像素
    int rows = src.rows;                                //图像宽度
    //不能在原图像上输出
    dst = Mat::zeros(src.size(), src.type());           //目标图像初始化,把图像全都变成0
                                                        //zeros(),生成的图像跟输入图像的类型跟大小一致,颜色为黑色
    //掩膜遍历
    for (int row = 1; row < rows - 1; row++) {          //row从1开始,把最左上角排除
        //获取每一个通道对应的指针
        const uchar* previous = src.ptr<uchar>(row - 1);//上一行
        const uchar* current = src.ptr<uchar>(row);     //当前行
        const uchar* next = src.ptr<uchar>(row + 1);    //下一行
        uchar* output = dst.ptr<uchar>(row);
        for (int col = offsetx; col < cols; col++) {
            //掩膜计算,对output进行赋值
            //左右漂移多少是由通道数目offsetx决定的,上下漂移为1,这里用预先定义好的previous和next
            //掩膜I(i,j)=5*I(i,j)-[I(i-1,j)+I(i+1,j)+I(i,j-1)+I(i,j+1)]
            output[col] = saturate_cast<uchar>(5 * current[col] - (current[col - offsetx] + current[col + offsetx]
                + previous[col] + next[col]));
        }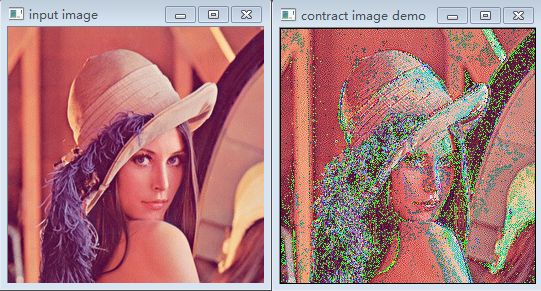
}图像像素需要控制在0~255之间,否则会发生截取现象,使图像出现斑点,因此需要加上前面提到的saturate_cast来控制像素的范围
以下是不加saturate_cast的原图和对比度变换后的图像
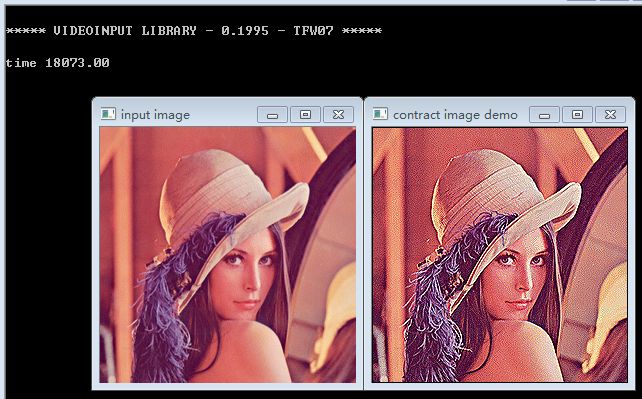
加上saturate_cast后的原图和对比度变换后的图像

OpenCV中调用函数filter2D来实现图像的掩膜操作
    * `filter2D(src,dst,src.depth(),kernel)`;
        * src.depth表示位图的深度,有32位,24位,8位等
        * 此值不知道的话传-1就行,暗示跟输入图像的位图深度一致
    * 定义掩膜:
        * Mat kernel = (Mat_(3,3)<<0,-1,0,-1,5,-1,0,-1,0);
    Mat kernel = (Mat_<char>(3, 3) << 0, -1, 0, -1, 5, -1, 0, -1, 0); //定义掩膜
    filter2D(src, dst, src.depth(), kernel);        //filter2D给啥掩膜就会执行什么操作
    * getTickCount(),获取执行时间
        * 通过此可以计算算法的执行效率
    double t = getTickCount();                      //获取执行时间
    Mat kernel = (Mat_<char>(3, 3) << 0, -1, 0, -1, 5, -1, 0, -1, 0); //定义掩膜
    filter2D(src, dst, src.depth(), kernel);        //filter2D给啥掩膜就会执行什么操作
    //t = getTickCount() - t;                       //当前的执行时间=总共的执行时间-前面的执行时间
    double timeconsume = (getTickCount() - t) / getTickCount();//时间消费
    printf("time consume %.2f" ,timeconsume);
掩膜算法所用的时间:
OpenCV_API方法所用的时间:

从时间性能来说,OpenCV中的算法比经典的掩膜算法用的时间少,(从肉眼的感官来讲OpenCV里的算法…好吧,我看花眼了,一开始看着opencv的要好点,然后又变的一样了)由此可见OpenCV里面的算法还是具有很强的应用性的