下载最新版的FFmpeg,具体编译步骤参考文章:FFmpeg的Android平台移植—编译篇。
对于FFmpeg不太了解的可以先阅读雷霄骅的FFmpeg博客专栏。
Windows 10
Android Studio 1.4
android-ndk-r10d
FFmpeg 3.0
具体的环境配置这里不细讲,可参考Android Studio + NDK的环境配置。
本文章仅介绍视频播放部分,不包含音频播放,音频播放参见Android+FFmpeg+OpenSL ES音频解码播放。
本文采用直接从SD卡中读取视频文件进行播放,因此在AndroidManifest.xml文件中添加权限:
<uses-permission android:name="android.permission.READ_EXTERNAL_STORAGE" />
Android的java API中的GLSurfaceView和VideoView都是继承于SurfaceView的,因此本例中仅在content_main.xml中添加了一个SurfaceView控件:
<SurfaceView
android:id="@+id/surface_view"
android:layout_width="match_parent"
android:layout_height="match_parent" />
紧接着在MainActivity.java中获取并操作该控件:
SurfaceHolder surfaceHolder;
@Override
protected void onCreate(Bundle savedInstanceState) {
super.onCreate(savedInstanceState);
setContentView(R.layout.activity_main);
... ...
SurfaceView surfaceView = (SurfaceView) findViewById(R.id.surface_view);
surfaceHolder = surfaceView.getHolder();
surfaceHolder.addCallback(this);
}
下面将实现SurfaceHolder.Callback接口:
@Override
public void surfaceCreated(SurfaceHolder holder) {
new Thread(new Runnable() {
@Override
public void run() {
VideoPlayer.play(surfaceHolder.getSurface());
}
}).start();
}
@Override
public void surfaceChanged(SurfaceHolder holder, int format, int width, int height) {
}
@Override
public void surfaceDestroyed(SurfaceHolder holder) {
}
视频播放为耗时操作,为了不阻塞UI线程,需要新建线程播放视频。VideoPlayer类的具体实现为:
public class VideoPlayer {
static {
System.loadLibrary("VideoPlayer");
}
public static native int play(Object surface);
}
在VideoPlayer类中需要加载动态库,并将play方法声明为本地方法。由于本例仅仅是一个简单的视频解码播放的例子,因此并未添加过多的方法。在play方法的参数中不能使用Surface类,因为这个类不是java类库中的,使用javah命令无法生成相应的头文件,因此需要使用Object基类。现在可以使用javah命令生成头文件:jonesx_videoplayer_VideoPlayer.h。
首先按照文章FFmpeg的Android平台移植—编译篇中的步骤:
新建jni目录,并将编译好的FFmpeg目录中的include和prebuilt文件夹拷贝到jni目录下。
在VideoPlayer.c文件中实现视频的解码播放:
#include "jonesx_videoplayer_VideoPlayer.h"
#include "libavcodec/avcodec.h"
#include "libavformat/avformat.h"
#include "libswscale/swscale.h"
#include
#include
#include "log.h"
JNIEXPORT jint JNICALL Java_jonesx_videoplayer_VideoPlayer_play
(JNIEnv * env, jclass clazz, jobject surface)
{
LOGD("play");
// sd卡中的视频文件地址,可自行修改或者通过jni传入
char * file_name = "/sdcard/Video/00.flv";
av_register_all();
AVFormatContext * pFormatCtx = avformat_alloc_context();
// Open video file
if(avformat_open_input(&pFormatCtx, file_name, NULL, NULL)!=0) {
LOGE("Couldn't open file:%s\n", file_name);
return -1; // Couldn't open file
}
// Retrieve stream information
if(avformat_find_stream_info(pFormatCtx, NULL)<0) {
LOGE("Couldn't find stream information.");
return -1;
}
// Find the first video stream
int videoStream = -1, i;
for (i = 0; i < pFormatCtx->nb_streams; i++) {
if (pFormatCtx->streams[i]->codec->codec_type == AVMEDIA_TYPE_VIDEO
&& videoStream < 0) {
videoStream = i;
}
}
if(videoStream==-1) {
LOGE("Didn't find a video stream.");
return -1; // Didn't find a video stream
}
// Get a pointer to the codec context for the video stream
AVCodecContext * pCodecCtx = pFormatCtx->streams[videoStream]->codec;
// Find the decoder for the video stream
AVCodec * pCodec = avcodec_find_decoder(pCodecCtx->codec_id);
if(pCodec==NULL) {
LOGE("Codec not found.");
return -1; // Codec not found
}
if(avcodec_open2(pCodecCtx, pCodec, NULL) < 0) {
LOGE("Could not open codec.");
return -1; // Could not open codec
}
// 获取native window
ANativeWindow* nativeWindow = ANativeWindow_fromSurface(env, surface);
// 获取视频宽高
int videoWidth = pCodecCtx->width;
int videoHeight = pCodecCtx->height;
// 设置native window的buffer大小,可自动拉伸
ANativeWindow_setBuffersGeometry(nativeWindow, videoWidth, videoHeight, WINDOW_FORMAT_RGBA_8888);
ANativeWindow_Buffer windowBuffer;
if(avcodec_open2(pCodecCtx, pCodec, NULL)<0) {
LOGE("Could not open codec.");
return -1; // Could not open codec
}
// Allocate video frame
AVFrame * pFrame = av_frame_alloc();
// 用于渲染
AVFrame * pFrameRGBA = av_frame_alloc();
if(pFrameRGBA == NULL || pFrame == NULL) {
LOGE("Could not allocate video frame.");
return -1;
}
// Determine required buffer size and allocate buffer
int numBytes=av_image_get_buffer_size(AV_PIX_FMT_RGBA, pCodecCtx->width, pCodecCtx->height, 1);
uint8_t * buffer=(uint8_t *)av_malloc(numBytes*sizeof(uint8_t));
av_image_fill_arrays(pFrameRGBA->data, pFrameRGBA->linesize, buffer, AV_PIX_FMT_RGBA,
pCodecCtx->width, pCodecCtx->height, 1);
// 由于解码出来的帧格式不是RGBA的,在渲染之前需要进行格式转换
struct SwsContext *sws_ctx = sws_getContext(pCodecCtx->width,
pCodecCtx->height,
pCodecCtx->pix_fmt,
pCodecCtx->width,
pCodecCtx->height,
AV_PIX_FMT_RGBA,
SWS_BILINEAR,
NULL,
NULL,
NULL);
int frameFinished;
AVPacket packet;
while(av_read_frame(pFormatCtx, &packet)>=0) {
// Is this a packet from the video stream?
if(packet.stream_index==videoStream) {
// Decode video frame
avcodec_decode_video2(pCodecCtx, pFrame, &frameFinished, &packet);
// 并不是decode一次就可解码出一帧
if (frameFinished) {
// lock native window buffer
ANativeWindow_lock(nativeWindow, &windowBuffer, 0);
// 格式转换
sws_scale(sws_ctx, (uint8_t const * const *)pFrame->data,
pFrame->linesize, 0, pCodecCtx->height,
pFrameRGBA->data, pFrameRGBA->linesize);
// 获取stride
uint8_t * dst = windowBuffer.bits;
int dstStride = windowBuffer.stride * 4;
uint8_t * src = (uint8_t*) (pFrameRGBA->data[0]);
int srcStride = pFrameRGBA->linesize[0];
// 由于window的stride和帧的stride不同,因此需要逐行复制
int h;
for (h = 0; h < videoHeight; h++) {
memcpy(dst + h * dstStride, src + h * srcStride, srcStride);
}
ANativeWindow_unlockAndPost(nativeWindow);
}
}
av_packet_unref(&packet);
}
av_free(buffer);
av_free(pFrameRGBA);
// Free the YUV frame
av_free(pFrame);
// Close the codecs
avcodec_close(pCodecCtx);
// Close the video file
avformat_close_input(&pFormatCtx);
return 0;
}
至于stride的问题可以参见android ffmpeg bad video output。
现在需要编写Android.mk文件:
LOCAL_PATH := $(call my-dir)
include $(CLEAR_VARS)
LOCAL_MODULE := avcodec
LOCAL_SRC_FILES := prebuilt/libavcodec-57.so
include $(PREBUILT_SHARED_LIBRARY)
include $(CLEAR_VARS)
LOCAL_MODULE := avformat
LOCAL_SRC_FILES := prebuilt/libavformat-57.so
include $(PREBUILT_SHARED_LIBRARY)
include $(CLEAR_VARS)
LOCAL_MODULE := avutil
LOCAL_SRC_FILES := prebuilt/libavutil-55.so
include $(PREBUILT_SHARED_LIBRARY)
include $(CLEAR_VARS)
LOCAL_MODULE := swresample
LOCAL_SRC_FILES := prebuilt/libswresample-2.so
include $(PREBUILT_SHARED_LIBRARY)
include $(CLEAR_VARS)
LOCAL_MODULE := swscale
LOCAL_SRC_FILES := prebuilt/libswscale-4.so
include $(PREBUILT_SHARED_LIBRARY)
include $(CLEAR_VARS)
LOCAL_SRC_FILES := VideoPlayer.c
LOCAL_LDLIBS += -llog -lz -landroid
LOCAL_MODULE := VideoPlayer
LOCAL_C_INCLUDES += $(LOCAL_PATH)/include
LOCAL_SHARED_LIBRARIES:= avcodec avformat avutil swresample swscale
include $(BUILD_SHARED_LIBRARY)
由于没有用到device和filter库中的方法,因此并未连接这两个动态库。
Application.mk文件如下:
APP_ABI := armeabi
APP_PLATFORM := android-9
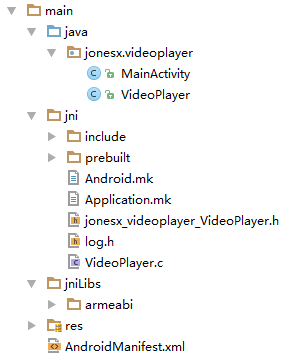
经过ndk-build之后,整个工程的主要目录结构如下图所示:
为了使工程能够运行,还需要在build.gradle文件中添加一行代码:
android {
... ...
sourceSets.main.jni.srcDirs = []
... ...
}
本例使用的Android设备是Google nexus 7,最终的测试结果如下图所示:
注意本例并不是一个真正的视频播放器,因为并没有添加音频播放,以及播放控制操作;也没有对视频的播放速度进行控制,每解码一帧就直接渲染到SurfaceView上。