python matplotlib:figure,add_subplot,subplot,subplots讲解实现
最近又用到了matplotlib 中画图的函数。总结几个常用的函数的作用于区别。
from matplotlib import pyplot as plt1.figure()
函数定义matplotlib.pyplot.figure(num=None, figsize=None, dpi=None, facecolor=None, edgecolor=None, frameon=True, FigureClass=
plt.figure()创建一个画布。
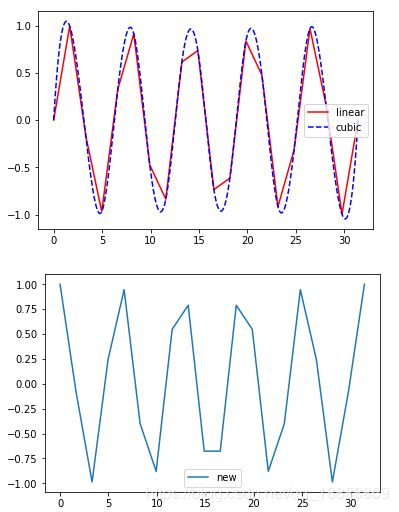
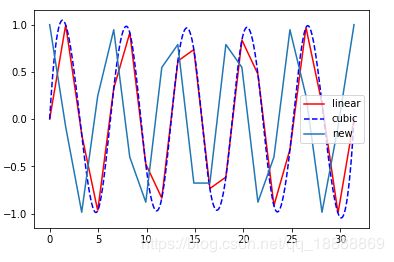
主要讲一个参数num:相当于给画布定义一个id,如果给出了num,之前没有使用,则创建一个新的画布;如果之前使用了这个num,那么返回那个画布的引用,在之前的画布上继续作图。如果没有给出num, 则每次创建一块新的画布。
import numpy as np
from matplotlib import pyplot as plt
from scipy.interpolate import interp1d

x=np.linspace(0,10*np.pi,num=20)
y=np.sin(x)
yn=np.cos(x)
f1=interp1d(x,y,kind='linear')#线性插值
f2=interp1d(x,y,kind='cubic')#三次样条插值
x_pred=np.linspace(0,10*np.pi,num=1000)
y1=f1(x_pred)
y2=f2(x_pred)
plt.figure(1)
plt.plot(x_pred,y1,'r',label='linear')
plt.plot(x_pred,y2,'b--',label='cubic')
plt.legend()
# plt.show()
plt.figure(2)
plt.plot(x,yn,label='new')
plt.legend()
plt.show()
-
plt.show()
import numpy as np
from matplotlib import pyplot as plt
from scipy.interpolate import interp1d

x=np.linspace(0,10*np.pi,num=20)
y=np.sin(x)
yn=np.cos(x)
f1=interp1d(x,y,kind='linear')#线性插值
f2=interp1d(x,y,kind='cubic')#三次样条插值
x_pred=np.linspace(0,10*np.pi,num=1000)
y1=f1(x_pred)
y2=f2(x_pred)
plt.figure(1)
plt.plot(x_pred,y1,'r',label='linear')
plt.plot(x_pred,y2,'b--',label='cubic')
plt.legend()
# plt.show()
plt.figure(1)
plt.plot(x,yn,label='new')
plt.legend()
plt.show()
2 add_subplot()
add_subplot(*args, **kwargs)
向图中加入子图的轴。返回子图的坐标轴axes
import numpy as np
from matplotlib import pyplot as plt
from scipy.interpolate import interp1d

x=np.linspace(0,10*np.pi,num=20)
y=np.sin(x)
yn=np.cos(x)
f1=interp1d(x,y,kind='linear')#线性插值
f2=interp1d(x,y,kind='cubic')#三次样条插值
x_pred=np.linspace(0,10*np.pi,num=1000)
y1=f1(x_pred)
y2=f2(x_pred)
fig = plt.figure()
fig.add_subplot(221)
plt.plot(x_pred,y1,'r',label='linear')
fig.add_subplot(222)
plt.plot(x_pred,y2,'b--',label='cubic')

plt.show()
通过ax设置各种图的参数。
import matplotlib.pyplot as plt

fig = plt.figure()
fig.suptitle('bold figure suptitle', fontsize=14, fontweight='bold')
ax = fig.add_subplot(111)
fig.subplots_adjust(top=0.85)
ax.set_title('axes title')
ax.set_xlabel('xlabel')
ax.set_ylabel('ylabel')
ax.text(3, 8, 'boxed italics text in data coords', style='italic',
        bbox={'facecolor':'red', 'alpha':0.5, 'pad':10})
ax.text(2, 6, r'an equation: $E=mc^2$', fontsize=15)
# ax.text(3, 2, unicode('unicode: Institut f\374r Festk\366rperphysik', 'latin-1'))
ax.text(0.95, 0.01, 'colored text in axes coords',
        verticalalignment='bottom', horizontalalignment='right',
        transform=ax.transAxes,
        color='green', fontsize=15)
ax.plot([2,3,4], [1,2,5], 'o')
ax.annotate('annotate', xy=(2, 1), xytext=(3, 4),
            arrowprops=dict(facecolor='black', shrink=0.05))
ax.axis([0, 10, 0, 11])
plt.show()
3.subplot()
matplotlib.pyplot.subplot(*args, **kwargs):当前图中加子图
plt.subplot(221)

# equivalent but more general
ax1=plt.subplot(2, 2, 1)
import numpy as np
import matplotlib.pyplot as plt

# Fixing random state for reproducibility
np.random.seed(19680801)


x = np.random.rand(10)
y = np.random.rand(10)
z = np.sqrt(x**2 + y**2)

plt.subplot(321)
plt.scatter(x, y, s=80, c=z, marker=">")

plt.subplot(322)
plt.scatter(x, y, s=80, c=z, marker=(5, 0))

verts = np.array([[-1, -1], [1, -1], [1, 1], [-1, -1]])
plt.subplot(323)
plt.scatter(x, y, s=80, c=z, marker=verts)

plt.subplot(324)
plt.scatter(x, y, s=80, c=z, marker=(5, 1))

plt.subplot(325)
plt.scatter(x, y, s=80, c=z, marker='+')

plt.subplot(326)
plt.scatter(x, y, s=80, c=z, marker=(5, 2))

plt.show()
4. subplots()
matplotlib.pyplot.subplots(nrows=1, ncols=1, sharex=False, sharey=False, squeeze=True, subplot_kw=None, gridspec_kw=None, **fig_kw) :创建一个图形和一组子图。
nrows, ncols : int, optional, default: 1 子图网络的行列数。.
examples:
#First create some toy data:
x = np.linspace(0, 2*np.pi, 400)
y = np.sin(x**2)

#Creates just a figure and only one subplot
fig, ax = plt.subplots()
ax.plot(x, y)
ax.set_title('Simple plot')

#Creates two subplots and unpacks the output array immediately
f, (ax1, ax2) = plt.subplots(1, 2, sharey=True)
ax1.plot(x, y)
ax1.set_title('Sharing Y axis')
ax2.scatter(x, y)

#Creates four polar axes, and accesses them through the returned array
fig, axes = plt.subplots(2, 2, subplot_kw=dict(polar=True))
axes[0, 0].plot(x, y)
axes[1, 1].scatter(x, y
返回: fig, ax
import matplotlib.pyplot as plt

data = {'apples': 10, 'oranges': 15, 'lemons': 5, 'limes': 20}
names = list(data.keys())
values = list(data.values())

fig, axs = plt.subplots(1, 3, figsize=(9, 3), sharey=True)
axs[0].bar(names, values)
axs[1].scatter(names, values)
axs[2].plot(names, values)
fig.suptitle('Categorical Plotting')
个人喜好用1画一个图,4画多个图。
class matplotlib.axes.Axes(fig, rect, facecolor=None, frameon=True, sharex=None, sharey=None, label='', xscale=None, yscale=None, **kwargs):
The Axes contains most of the figure elements: Axis, Tick, Line2D, Text, Polygon, etc., and sets the coordinate system.
本文转自:Rookiekk 的博客https://blog.csdn.net/qq_18888869/article/details/84874743


