Redis的数据结构—1.简单介绍,序集合SortedSet的实现,跳表的实现
Redis有哪些数据结构?
字符串String、字典Hash、列表List、集合Set、有序集合SortedSet。
如果你是Redis中高级用户,还需要加上下面几种数据结构HyperLogLog、Geo、Pub/Sub。
如果你说还玩过Redis Module,像BloomFilter,RedisSearch,Redis-ML,面试官得眼睛就开始发亮了。
有序集SortedSet算是redis中一个很有特色的数据结构,通过这篇文章来总结一下这块知识点。
一、有序集SortedSet命令简介
redis中的有序集,允许用户使用指定值对放进去的元素进行排序,并且基于该已排序的集合提供了一系列丰富的操作集合的API。
举例如下:
//添加元素,table1为有序集的名字,100为用于排序字段(redis把它叫做score),a为我们要存储的元素
127.0.0.1:6379> zadd table1 100 a
(integer) 1
127.0.0.1:6379> zadd table1 200 b
(integer) 1
127.0.0.1:6379> zadd table1 300 c
(integer) 1
//按照元素索引返回有序集中的元素,索引从0开始
127.0.0.1:6379> zrange table1 0 1
1) "a"
2) "b"
//按照元素排序范围返回有序集中的元素,这里用于排序的字段在redis中叫做score
127.0.0.1:6379> zrangebyscore table1 150 400
1) "b"
2) "c"
//删除元素
127.0.0.1:6379> zrem table1 b
(integer) 1
在有序集中,用于排序的值叫做score,实际存储的值叫做member。
其实在redis sorted sets里面当items内容大于64的时候同时使用了hash和skiplist两种设计实现。这也会为了排序和查找性能做的优化。所以如上可知:
添加和删除都需要修改skiplist,所以复杂度为O(log(n))。
但是如果仅仅是查找元素的话可以直接使用hash,其复杂度为O(1)
其他的range操作复杂度一般为O(log(n))
当然如果是小于64的时候,因为是采用了ziplist的设计,其时间复杂度为O(n)
二、跳表(skip List)
数据结构跳表(Skip List),跳表与AVL、红黑树...等相比,数据结构简单,算法易懂,但查询的时间复杂度与平衡二叉树/红黑树相当,跳表的基本结构如下图所示
上图中整个跳表结构存放了4个元素5->10->20->30,图中的红色线表示查找元素30时,走的查找路线,从Head指针数组里最顶层的指针所指的20开始比较,与普通的链表查找相比,跳表的查询可以跳跃元素,上图中查询30,发现30比20大,则查找就是20开始,而普通链表的查询必须一个元素一个元素的比较,时间复杂度为O(n)
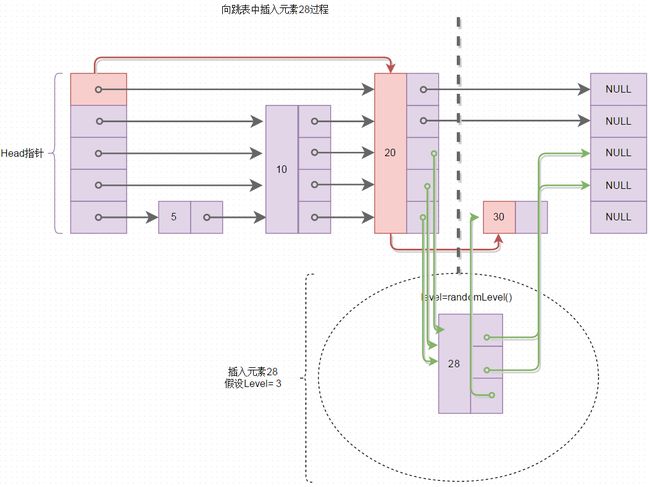
有了上图所示的跳表基本结构,再看看如何向跳表中插入元素,向跳表中插入元素,由于元素所在层级的随机性,平均起来也是O(logn),说白了,就是查找元素应该插入在什么位置,然后就是普通的移动指针问题,再想想往有序单链表的插入操作吧,时间复杂度是不是也是O(n),下图所示是往跳表中插入元素28的过程,图中红色线表示查找插入位置的过程,绿色线表示进行指针的移动,将该元素插入
有了跳表的查找及插入那么就看看在跳表中如何删除元素吧,跳表中删除元素的个程,查找要删除的元素,找到后,进行指针的移动,过程如下图所示,删除元素30
有了上面的跳表基本结构图及原理,自已设计及实现跳表吧,这样当看到Redis里面的跳表结构时我们会更加熟悉,更容易理解些,【下面是对Redis中的跳表数据结构及相关代码进行精减后形成的可运行代码】,首先定义跳表的基本数据结构如下所示
|
1
2
3
4
5
6
7
8
9
10
11
12
13
14
15
16
17
18
19
20
21
|
#include
#include
#define ZSKIPLIST_MAXLEVEL 32
#define ZSKIPLIST_P 0.25
#include
//跳表节点
typedef
struct
zskiplistNode {
int
key;
int
value;
struct
zskiplistLevel {
struct
zskiplistNode *forward;
} level[1];
} zskiplistNode;
//跳表
typedef
struct
zskiplist {
struct
zskiplistNode *header;
int
level;
} zskiplist;
|
在代码中我们定义了跳表结构中保存的数据为Key->Value这种形式的键值对,注意的是skiplistNode里面内含了一个结构体,代表的是层级,并且定义了跳表的最大层级为32级,下面的代码是创建空跳表,以及层级的获取方式
|
1
2
3
4
5
6
7
8
9
10
11
12
13
14
15
16
17
18
19
20
21
22
23
24
25
26
27
28
|
//创建跳表的节点
zskiplistNode *zslCreateNode(
int
level,
int
key,
int
value) {
zskiplistNode *zn = (zskiplistNode *)
malloc
(
sizeof
(*zn)+level*
sizeof
(zn->level));
zn->key = key;
zn->value = value;
return
zn;
}
//初始化跳表
zskiplist *zslCreate(
void
) {
int
j;
zskiplist *zsl;
zsl = (zskiplist *)
malloc
(
sizeof
(*zsl));
zsl->level = 1;
//将层级设置为1
zsl->header = zslCreateNode(ZSKIPLIST_MAXLEVEL,NULL,NULL);
for
(j = 0; j < ZSKIPLIST_MAXLEVEL; j++) {
zsl->header->level[j].forward = NULL;
}
return
zsl;
}
//向跳表中插入元素时,随机一个层级,表示插入在哪一层
int
zslRandomLevel(
void
) {
int
level = 1;
while
((
rand
()&0xFFFF) < (ZSKIPLIST_P * 0xFFFF))
level += 1;
return
(level}
|
在这段代码中,使用了随机函数获取过元素所在的层级,下面就是重点,向跳表中插入元素,插入元素之前先查找插入的位置,代码如下所示,代码中注意update[i]
|
1
2
3
4
5
6
7
8
9
10
11
12
13
14
15
16
17
18
19
20
21
22
23
24
25
26
27
28
29
30
31
|
//向跳表中插入元素
zskiplistNode *zslInsert(zskiplist *zsl,
int
key,
int
value) {
zskiplistNode *update[ZSKIPLIST_MAXLEVEL], *x;
int
i, level;
x = zsl->header;
//在跳表中寻找合适的位置并插入元素
for
(i = zsl->level-1; i >= 0; i--) {
while
(x->level[i].forward &&
(x->level[i].forward->key < key ||
(x->level[i].forward->key == key &&
x->level[i].forward->value < value))) {
x = x->level[i].forward;
}
update[i] = x;
}
//获取元素所在的随机层数
level = zslRandomLevel();
if
(level > zsl->level) {
for
(i = zsl->level; i < level; i++) {
update[i] = zsl->header;
}
zsl->level = level;
}
//为新创建的元素创建数据节点
x = zslCreateNode(level,key,value);
for
(i = 0; i < level; i++) {
x->level[i].forward = update[i]->level[i].forward;
update[i]->level[i].forward = x;
}
return
x;
}
|
下面是代码中删除节点的操作,和插入节点类似
|
1
2
3
4
5
6
7
8
9
10
11
12
13
14
15
16
17
18
19
20
21
22
23
24
25
26
27
28
29
30
31
32
33
34
35
36
37
38
39
40
|
//跳表中删除节点的操作
void
zslDeleteNode(zskiplist *zsl, zskiplistNode *x, zskiplistNode **update) {
int
i;
for
(i = 0; i < zsl->level; i++) {
if
(update[i]->level[i].forward == x) {
update[i]->level[i].forward = x->level[i].forward;
}
}
//如果层数变了,相应的将层数进行减1操作
while
(zsl->level > 1 && zsl->header->level[zsl->level-1].forward == NULL)
zsl->level--;
}
//从跳表中删除元素
int
zslDelete(zskiplist *zsl,
int
key,
int
value) {
zskiplistNode *update[ZSKIPLIST_MAXLEVEL], *x;
int
i;
x = zsl->header;
//寻找待删除元素
for
(i = zsl->level-1; i >= 0; i--) {
while
(x->level[i].forward &&
(x->level[i].forward->key < key ||
(x->level[i].forward->key == key &&
x->level[i].forward->value < value))) {
x = x->level[i].forward;
}
update[i] = x;
}
x = x->level[0].forward;
if
(x && key == x->key && x->value == value) {
zslDeleteNode(zsl, x, update);
//别忘了释放节点所占用的存储空间
free
(x);
return
1;
}
else
{
//未找到相应的元素
return
0;
}
return
0;
}
|
最后,附上一个不优雅的测试样例
|
1
2
3
4
5
6
7
8
9
10
11
12
13
14
15
16
17
18
19
20
21
22
23
24
25
26
|
//将链表中的元素打印出来
void
printZslList(zskiplist *zsl) {
zskiplistNode *x;
x = zsl->header;
for
(
int
i = zsl->level-1; i >= 0; i--) {
zskiplistNode *p = x->level[i].forward;
while
(p) {
printf
(
" %d|%d "
,p->key,p->value);
p = p->level[i].forward;
}
printf
(
"\n"
);
}
}
int
main() {
zskiplist *list = zslCreate();
zslInsert(list,1,2);
zslInsert(list,4,5);
zslInsert(list,2,2);
zslInsert(list,7,2);
zslInsert(list,7,3);
zslInsert(list,7,3);
printZslList(list);
//zslDelete(list,7,2);
printZslList(list);
}
|
有了上面的跳表理论基础,理解Redis中跳表的实现就不是那么难了,先分析到这,下回续写,【代码以Redis 2.9为例】~


