数据结构——表(2)
注:本文为根据《数据结构与算法分析》一书所做笔记与理解
上一节《数据结构——表(1)》介绍了简单链表的相关代码实现。这一节再说说双链表和循环链表。
1 双链表
双链表的好处:简化了倒序扫描链表的操作,简化了findPrevious的操作;简化了删除的操作,因为不用使用一个指向前驱元的指针来访问。
双链表的缺点:附加了一个链,增加了空间的需求,也使得插入和删除的开销增加了一倍。

1.1 双链表的节点类
对于节点类(DoublyNode)来说,只需要新增加一个指向前面节点的指针:
class DoublyNode{
public:
	int element;
	DoublyNode* next , pre;

	//构造函数
	DoublyNode(){
		next = NULL;
		pre = NULL;
	}
	DoublyNode(int x){
		element = x;
		next = NULL;
		pre = NULL;
	}
	DoublyNode(int x , DoublyNode* n , DoublyNode* p){
		element = x;
		next = n;
		pre = p;
	}
};
1.2 移位操作
和单链表相比,基本上没有什么不一样的。有差别的就是往前移动一位的操作(toPre)、插入操作(insert)和删除(delete)操作
//往前移动一位
void toPre(){
	if(cur->pre != NULL)
		cur = cur->pre;
}
1.3 插入节点
对于插入操作,以下图为例,在节点2和节点4之间插入节点3.

先移动cur指针,使其指向要插入位置的前一个节点(节点2),然后new一个新的节点,新节点的element值为3,next指针指向插入位置的下一个节点(节点4),pre指针指向插入位置的上一个节点(节点2)。
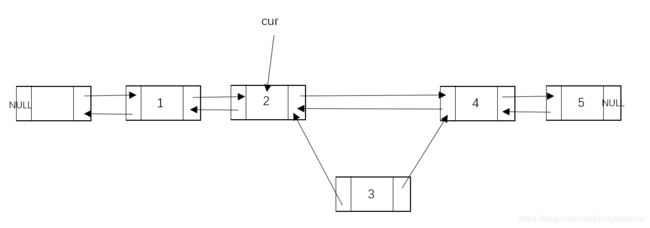
接下来就是修改前后两个节点的相应指针——插入位置的后一个节点(节点4),它的pre指针改为指向新节点(节点3);插入位置的前一个节点(节点2),它的next指针改为指向新节点(节点3)。

这里有一个特例,就是当插入位置为链表末尾时,不必修改插入位置的下一个节点。因为这个时候,插入位置没有下一个节点,会报出空指针的错误。所以在插入时,加上一个判断语句就好了。相应代码放上来:
//在当前位置插入值为k的元素
void insert(int k){
	DoublyNode* temp = new DoublyNode(k , cur->next , cur);
	if(!isLast()){
		cur->next->pre = temp;
	}
	cur->next = temp;
}
1.4 删除元素
前面提过,在双链表中,要删除元素,就不需要找到其前驱元,也就是说不需要findPrevious这个函数了。先用find函数找到要删除的这个节点,令cur指针指向它。
以下图为例,删去节点3.

我们要做的只是修改要删除的这个节点的前后两个节点的相应指针——对于前一个节点(节点2),将其next指针指向后一个节点(节点4);对于后一个节点(节点4),将其pre指针指向前一个节点(节点2)。

同样,需要判断删除的节点是否是表头或者表尾。但是在我的设计中,加上了一个不存储数据的表头,所有不存在删除表头的情况,只需判断表尾。代码如下:
//删除值为k的元素
void deleteNode(int k){
	int f = find(k);
	if(f != -1){
		if(isLast()){
			cur->pre->next = NULL;
		}else{
				cur->pre->next = cur->next;
			cur->next->pre = cur->pre;
		}
	}
}
1.5 完整代码
其他部分的操作其实都一样了,这里也放上完整的DoublyList的代码
class DoublyList{
private:
	DoublyNode* head;
	DoublyNode* cur;

public:
	//构造函数
	DoublyList(){
		head = new DoublyNode();
		cur = head;
	}
	DoublyList(DoublyNode* node){
		head = new DoublyNode(0 , node , NULL);
		cur = head;
	}


	//清空链表
	void makeEmpty(){
		head->next = NULL;
		cur = head;
	}

	//判断是否为空
	bool isEmpty(){
		if(head->next == NULL)
			return true;
		else
			return false;
	}

	//判断当前是否为链表结尾
	bool isLast(){
		return cur->next == NULL;
	}

	//移动到表头
	void toHead(){
		cur = head;
	}

	//往后移动一位
	void toNext(){
		if(!isLast())
			cur = cur->next;
	}

	//往前移动一位
	void toPre(){
		if(cur->pre != NULL)
			cur = cur->pre;
	}

	//打印链表
	void print(){
		DoublyNode* t = cur;
		cur = head;
		while(!isLast()){
			cout << cur->next->element << "  ";
			toNext();
		}
		cout << endl;
		cur = t;
	}

	//查找元素,返回位置,没有找到返回-1
	int find(int k){
		int pos = 0;
		toHead();
		while(!isLast()){
			toNext();
			++pos;
			if(cur->element == k){
				return pos;
			}
		}
		return -1;
	}

	//删除值为k的元素
	void deleteNode(int k){
		int f = find(k);
		if(f != -1){
			if(isLast()){
				cur->pre->next = NULL;
			}else{
					cur->pre->next = cur->next;
				cur->next->pre = cur->pre;
			}
		}

	}


	//在当前位置插入值为k的元素
	void insert(int k){
		DoublyNode* temp = new DoublyNode(k , cur->next , cur);
		if(!isLast()){
			cur->next->pre = temp;
		}
		cur->next = temp;

	}

};
2 循环链表
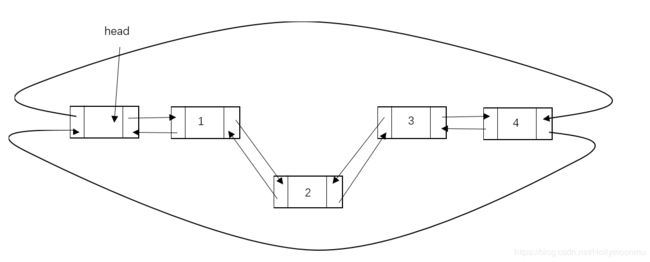
对于循环链表来说,可以有表头,也可以没有表头。可以是单向的,也可以是双向的。这里我就以一个双向有表头的循环链表来举例。
由于是一个双向的循环链表,因此,节点类可以沿用双向链表中定义的DoublyNode.
2.1 构造函数
对于循环链表,初始化链表时,需要进行的操作和前面有所不同。因为是循环链表,所以每个节点的next指针和pre指针都不可能为空,表头的pre指针需要指向最后一个节点,而表尾的next指针需要指向表头。
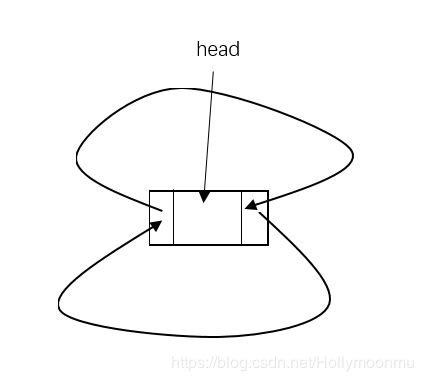
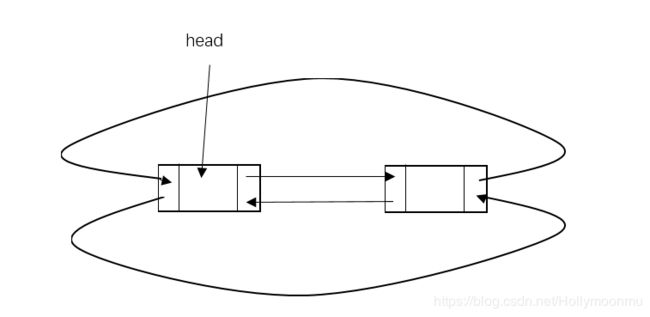
相应的构造函数的代码如下:
CircleList(){
	head = new DoublyNode();
	head->next = head;
	head->pre = head;
	cur = head;
}
CircleList(DoublyNode* node){
	head = new DoublyNode(0 , node , node);
	node->next = head;
	node->pre = head;
	cur = head;
}
类似的,对于清空链表,判断是否为空,判断是否为表尾等一些辅助成员函数,也不能用空指针来判断
//清空链表
void makeEmpty(){
	head->next = head;
	head->pre = head;
	cur = head;
}

//判断是否为空
bool isEmpty(){
	if(head->next == head)
		return true;
	else
		return false;
}

//判断当前是否为链表结尾
bool isLast(){
	return cur->next == head;
}
2.2 删除节点
在双向循环链表中,删除节点就比较简单了。对表尾的操作并没有什么特殊。以下图为例,假设要删除节点2.
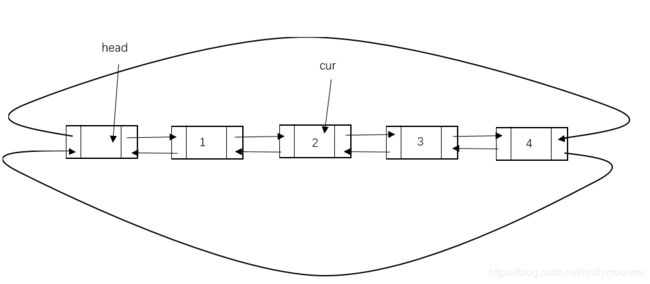
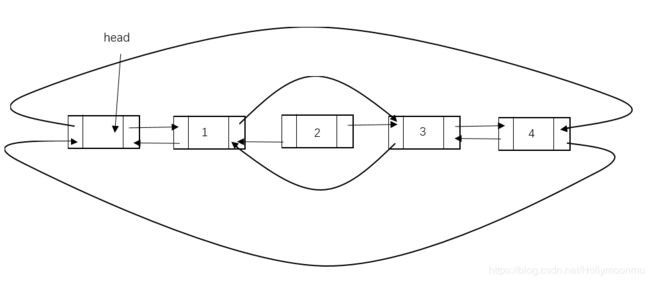
和双向链表中非表尾节点的操作相同。把节点3的pre指针指向节点1,节点1的next指针指向节点3.
//删除值为k的元素
void deleteNode(int k){
	int f = find(k);
	if(f != -1){
		cur->next->pre = cur->pre;
		cur->pre->next = cur->next;
	}
}
2.4 插入元素
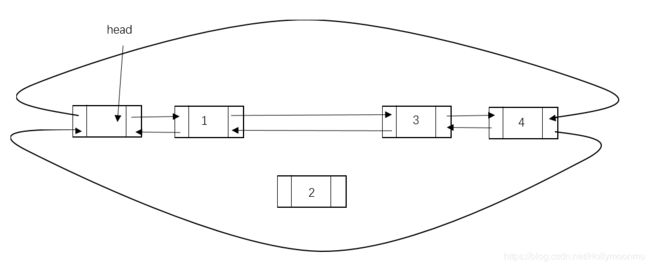
同前面介绍的都差不多,就不做过多介绍了。以插入节点2为例,放图:
//在当前位置插入值为k的元素
void insert(int k){
	DoublyNode* temp = new DoublyNode(k , cur->next , cur);
	cur->next->pre = temp;
	cur->next = temp;
}
2.5完整代码
class CircleList{
	private:
	DoublyNode* head;
	DoublyNode* cur;

public:
	//构造函数
	CircleList(){
		head = new DoublyNode();
		head->next = head;
		head->pre = head;
		cur = head;
	}
	CircleList(DoublyNode* node){
		head = new DoublyNode(0 , node , node);
		node->next = head;
		node->pre = head;
		cur = head;
	}

	//清空链表
	void makeEmpty(){
		head->next = head;
		head->pre = head;
		cur = head;
	}

	//判断是否为空
	bool isEmpty(){
		if(head->next == head)
			return true;
		else
			return false;
	}

	//判断当前是否为链表结尾
	bool isLast(){
		return cur->next == head;
	}
	//移动到表头
	void toHead(){
		cur = head;
	}
	//往后移动一位
	void toNext(){
		cur = cur->next;
	}
	//往前移动一位
	void toPre(){
		cur = cur->pre;
	}
	//打印链表
	void print(){
		DoublyNode* t = cur;
		cur = head;
		while(!isLast()){
			cout << cur->next->element << "  ";
			toNext();
		}
		cout << endl;
		cur = t;
	}

	//查找元素,返回位置,没有找到返回-1
	int find(int k){
		int pos = 0;
		toHead();
		while(!isLast()){
			toNext();
			++pos;
			if(cur->element == k){
				return pos;
			}
		}
		return -1;
	}

	//删除值为k的元素
	void deleteNode(int k){
		int f = find(k);
		if(f != -1){
			cur->next->pre = cur->pre;
			cur->pre->next = cur->next;
		}

	}

	//在当前位置插入值为k的元素
	void insert(int k){
		DoublyNode* temp = new DoublyNode(k , cur->next , cur);
		cur->next->pre = temp;
		cur->next = temp;
	}
};
