excle+pytest+jenkins+allure接口自动化测试框架
一、概述
框架采用excle+pytest+jenkins+allure的结构,使用数据驱动方式进行开发测试。能够达到单个接口的多种测试数据的组合测试,以及基于业务流程的接口组合测试。考虑到测试人员编写测试用例的方便性,采用数据驱动的设计方式,将数据分层出来,与业务逻辑剥离。这样测试人员就可以通过数据文件专注的写测试用例,不用关注代码编写,提高了效率。通过与jenkins的集成,使用allure生成测试报告,能够一目了然的看到测试的执行情况。若开发也采用的jenkins集成环境,甚至可以达到与开发集成,自动编译、部署、测试的高度自动化流程。
本框架适用于基于HTTP的接口自动化测试。
二、结构说明
FreeTestGo #项目名称
├─test_cass #用于存放测试用例的脚本
│ └─init.py
│ └─test_cass_01.py #测试用例1
│ └─test_cass_02.py #测试用例2
├─test_data #用于存放测试数据
│ └─test_data_1.xlsx #测试数据1
│ └─test_data_2.xlsx #测试数据2
├─test_get_data #用于存放读取测试数据的方法
│ └─init.py
│ └─get_test_data_01.py #方法1
│ └─get_test_data_02.py #方法2
├─test_log #用于存放测试日志
│ └─test_log.txt
├─test_report #用于存放allure生成测试报告依赖的文件
│ └─test_report.xml
├─test_suite #用于存放测试流程的脚本
│ └─init.py
│ └─test_suite_01.py #测试用例1
│ └─test_suite_02.py #测试用例2
├─test_tools #用于存放封装的各种公共方法
│ └─init.py
│ └─test_tools.py
├─pytest.ini #配置文件,可配置运行的参数以及选择需要运行的用例等
└─runtests.py #执行入口
三、环境搭建
本框架脚本基于python3进行编写,使用jenkins进行集成,所以只需要安装python3和jenkins即可。
python3和jenkins的安装方法网上很多,就不再累述。
然后选择个人习惯的IDE编写脚本即可。
四、第三方库介绍
第三方库介绍
Requests
python中有许多针对http的库,例如自带的urllib2,但是自带的urllib2编写起来实在是太费精力,所以采用号称”HTTP forHumans”的requests库。
json
python中对json数据标准化的库
xlrd
xlrd使得python可以方便的对excel文件进行读写操作,此次通过xlrd读取excel文件中的测试数据。
PyMySQL
Python操作mysql数据库的库
pytest
单元测试框架
pytest-allure-adaptor
pytest与allure集成所依赖的库
xlutils
写入excle所依赖的库
xlwt
写入excle所依赖的库
第三方库安装
Python拥有很多强大好用的第三方库,能够提供给开发人员直接调用。但是由于是第三方的,所以需要自己安装。
Python3自带了pip包管理工具,可以让用户方便简单的对第三方的库进行安装管理。只需要在命令行输入pip install 【名字】 就可以安装了。
安装django库的示范:
        C:\Jin\workpase\FreeTestGo>pip install Django
        Collecting Django
        Downloading Django-1.11-py2.py3-none-any.whl (6.9MB)
        100% |████████████████████████████████| 6.9MB 219kB/s
        Collecting pytz (from Django)
        Downloading pytz-2017.2-py2.py3-none-any.whl (484kB)
        100% |████████████████████████████████| 491kB 1.9MB/s
        Installing collected packages: pytz, Django
        Successfully installed Django-1.11 pytz-2017.2
输入pip list ,查看已安装的第三方库:
        C:\Jin\workpase\FreeTestGo>pip list
        beautifulsoup4 (4.5.3)
        bs4 (0.0.1)
        colorama (0.3.7)
        Django (1.11)
        lxml (3.7.3)
        namedlist (1.7)
        pip (9.0.1)
五、编写脚本
环境大家已经搭建起来了,那么我们就可以着手开始编码了。
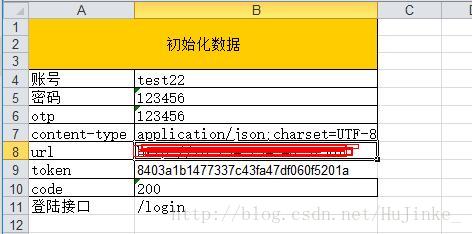
准备测试数据
先准备好最基础的测试数据,比如初始化的数据。
如图:
读取测试数据
测试数据我们提前设计好,需要的字段什么的。
然后写一个方法去读取excle,方便其他脚本调用,所以把读取脚本的方法作为一个公共方法来编写。
代码如下:
# -*- coding:utf-8 -*-

'''
文件名:get_excle_data.py
Created on 2017年4月20日
@author: 浪晋
'''
import xlrd
#定义一个变量用于存放测试数据的路径
file_home = "C:/Jin/workpase/FreeTestGo/test_data/"
#公共数据
Testdata_p = xlrd.open_workbook(file_home+'test_data_p.xls')#读取公共测试数据
table_p = Testdata_p.sheets()[0]#选择sheet
hurl = table_p.cell(7,1).value#读取URL
content_type =table_p.cell(6,1).value#读取content-type
htoken = table_p.cell(8,1).value#读取token
#测试流程的数据
Testdata_s = xlrd.open_workbook(file_home+'test_data_s.xlsx')#读取测试流程的数据
#测试模块的数据
Testdata_m = xlrd.open_workbook(file_home+'test_data_m.xlsx')#读取测试模块的数据
获取token
当然你所在的项目可能没有token,那么完全可以跳过这一步,不需要看。
如果有token,cookies之类的东西,那你就用的上了。
原理都是类似的。
获取到了token为了方便别的接口调用,我们再把获取到的token反着写到excle表里去。
因为token是用在所有的脚本里的,所以我们作为一个公共方法来编写。
代码如下:
# -*- coding:utf-8 -*-
'''
Created on 2017年4月20日
文件名:get_token.py
@author: 浪晋
'''
import json
import requests
import xlrd
from xlutils.copy import copy
from test_tools import get_excle_data

Testdata = get_excle_data.Testdata_p#获取公共表的数据
file_home = get_excle_data.file_home
table = Testdata.sheets()[0]#选择sheet
hurl = table.cell(7,1).value#读取URL
def get_token_to_data():
    '''登陆'''
    turl = hurl+table.cell(10,1).value
    hdata = {
        "username":table.cell(3,1).value,
        "password":table.cell(4,1).value,
        "otp":table.cell(5,1).value}
    headers = {'content-type': table.cell(6,1).value
       }
    r = requests.post(turl, data=json.dumps(hdata), headers=headers)
    hjson = json.loads(r.text)#获取并处理返回的json数据
    herror ="error"
    if herror in hjson:
        print("登陆失败,退出程序!")
        exit()
    else:
        hcode = str(hjson['code'])
        print('请求返回状态为:'+hcode)
        if hcode == table.cell(9,1).value:
            token = hjson['data']['token']#获取token
            print('当前token为:'+token)
            #将获取的token保存到testdata中
            oldWb = xlrd.open_workbook(file_home+'test_data_p.xls',formatting_info=True)
            newWb = copy(oldWb)
            newWs = newWb.get_sheet(0)
            newWs.write(8, 1, token)
            print ("Token写入成功")
            newWb.save(file_home+'test_data_p.xls')
            print ("test_data_p保存成功")
        else:
            print('登陆失败,程序退出')
            exit()

#get_token_to_data()
这样我们就成功的把刚刚获取到的Token写道上面的截图的表里了。
我们看看运行的情况。
    请求返回状态为:200
    当前token为:8403a1b1477337c43fa47df060f5201a
    Token写入成功
    test_data_p保存成功
二次封装requests
我们调用requests可以获取到返回值,但是我们每一个接口都要去获取返回值,再判断。
那么我们是不是可以把这一块的代码拿出来,单独的封装成一个工具呢?
# -*- coding:utf-8 -*-
'''
文件名:get_request_data.py
Created on 2017年4月20日
@author: 浪晋
'''
import json
import requests
def PostRequest(turl,hdata,headers,hcodehope):
    hr  = requests.post(turl,data=json.dumps(hdata), headers=headers)
    hjson = json.loads(hr.text)#获取并处理返回的json数据
    print('测试数据:'+str(hdata))
    print('返回的内容为:'+str(hjson))
    assert "error" not in hjson
    print('获取到的状态是:'+str(hjson['code'])+',预期的状态是:'+hcodehope)
    assert str(hjson['code']) == hcodehope
    print('返回值对比通过')
代码中,我们传入的参数分别是接口所需的url,data,headers,以及我们自己定义的期望值codehope。
通过调用request的post方法,来实现接口的功能。
然后把测试数据作为参数传进去。
使用python自带的assert作为判断方法。
其他的请求方式,get,del之类的,和post同理。
如果需要做数据库的对比判断的话,也可以用这样的思路对获取数据和判断方式进行二次封装,然后再用例脚本中直接调用。
调用数据库代码如下:
# -*- coding:utf-8 -*-

'''
Created on 2017年4月20日

@author: Jin
'''
import pymysql

def getmysqldata(hsql,hval,hdatahope):
    connect = pymysql.Connect(
        host='*.*.*.*',
        port=8066,
        user='*****',
        passwd='******$',
        db='****',
        charset='utf8'
    )#这个地址这些填自己的数据库地址哟。
    # 获取游标
    cursor = connect.cursor()
    # 查询数据
    cursor.execute(hsql ) #执行sql
    print('共查找出', cursor.rowcount, '条数据')
    if cursor.rowcount ==0:
        print("数据库中没有找到你要的值")
        print("测试不通过")
        assert 1 ==2
    else:
        hrow = cursor.fetchone()
        print(hrow)#打印出数据库查询的数据
        hdata = hrow[hval]#提取出需要进行比对的值
        print('数据库的值:'+str(hdata))
        assert str(hdata) ==hdatahope#与预期值做对比
        print("添加或查询的结果与数据库一致!")
    cursor.close()
    connect.close()
读取测试数据
把方法封装好了后,我们去读取测试数据,并放到一个数组中,方便直接传给测试用例。
方法很简单,和上面获取token读excle的方式差不多的。
不过我们加入了一个for循环去读取。
因为测试数据有多种组合,我们要考虑到边界值呀,是否必填呀,等价类呀等等场景,力求覆盖到更多的场景。
excle表结构如图:
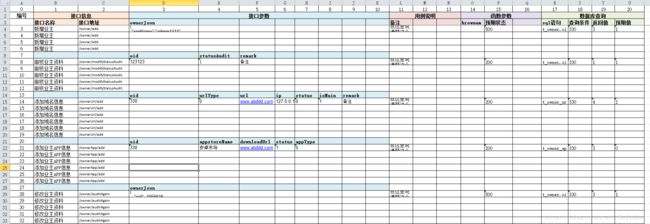
测试数据我只填了一条,大家看看,意会下就好。我设计的表结构大概就这个样子,大家自己设计最适合自己的表结构。
代码如下:
# -*- coding:utf-8 -*-

'''
Created on 2017年4月20日
文件名:get_01owner_data.py
@author: 浪晋
'''
from test_tools import get_excle_data
hurl =get_excle_data.hurl
hcontent_type =get_excle_data.content_type
htoken = get_excle_data.htoken
Testdata = get_excle_data.Testdata_m
def reviewowner_data():
    table = Testdata.sheets()[0]#选择excle表中的sheet
    htestdata = []#定义的数组,用来装测试数据
    for i in range(8,9):
        hdata = {
            "oid": table.cell(i,3).value,
            "statusAudit": table.cell(i,4).value,
            "remark": table.cell(i,5).value
        }
        headers = {
            "content-type":hcontent_type,
            'token': htoken
            }

        hremark= table.cell(i,11).value
        turl = hurl+table.cell(i,2).value
        hcodehope = table.cell(i,15).value
        hsql= table.cell(i,17).value+table.cell(i,18).value#这个是数据库的方法需要的
        hval= int(table.cell(i,19).value)   #这个是数据库的方法需要的
        hdatahope= table.cell(i,20).value   #这个是数据库的方法需要的
        valuedatas = (hremark,turl,hdata,headers,hcodehope,hsql, hval, hdatahope)
        htestdata.append(valuedatas)#添加到数组
    return htestdata
编写测试用例脚本
写了上面那么多,终于到编写测试用例了。
直接上代码:
# -*- coding:utf-8 -*-

'''
Created on 2017年4月20日
文件名:test_cass_01.py
@author: Jin
'''
import pytest
import allure
from test_get_data import get_01owner_data
from test_tools import get_request_data
from test_tools import get_mysql_data
#测试用例是按照pytest的相关要求进行编写的。
@pytest.mark.ownertest
@allure.feature('新增业主模块')
@allure.story('用例2:审核业主资料')
@pytest.mark.parametrize("hremark,turl,hdata,headers,hcodehope,hsql, hval, hdatahope",get_01owner_data.reviewowner_data())
def test_02review_owner(hremark,turl,hdata,headers,hcodehope,hsql, hval, hdatahope):
    allure.attach('用例说明', hremark)
    #调用request的二次封装的方法
    get_request_data.PostRequest(turl, hdata, headers, hcodehope)
    #调用数据库的二次封装的方法
    get_mysql_data.getmysqldata(hsql, hval, hdatahope)
    print("测试通过")
通过之前我们对各个方法的封装,让我们的用例每一个都只需要几行代码就搞定了,而且看起来也很漂亮。
而且把相关的方法进行单独的封装,也比较方便我们进行维护。
就这样,我们搞定了测试用例的编写。
最重要的事情就搞定了。
对于测试流程,也就是test_suite里的东西的编写,和用例这里差不多的。
暂时先不写。
有空再改一改。
执行脚本
在根目录新建一个runtests.py
# -*- coding:utf-8 -*-
'''
Created on 2017年4月20日
@author: Jin
'''
import pytest
import sys
origin = sys.stdout
hlog = open('C:\\Jin\\workpase\\FreeTestGo\\test_log\\log.txt', 'w')
sys.stdout = hlog
if __name__ == '__main__':
    args = ['-q','-s']
    pytest.main(args)
    sys.stdout = origin
    hlog.close()
    print("测试结束!")
就这样子,就可以直接运行我们的所有的测试用例了。
如果想要自由的配置哪些用例需要执行,不需要执行,就去pytest.ini文件中配置。
如下:
[pytest]
#no run test_cass dir
norecursedirs = test_cass
定义不运行的测试用例的路径。
是不是很简单。
详细的设置等我下次有空了再加上去。
六、集成jenkins
jenkins的教程也比较多了,我这里暂时不细讲,下次再补上。
就说下思路。
安装好jenkins后,再安装allure的插件。
配置好相关的东西后,新建一个job,把python再弄进去。
然后就可以直接在jenkins中构建了。
并生成漂亮的allure报告。
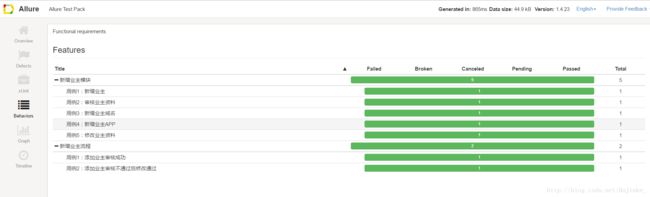
给个图,大家简单的欣赏下,详细的教程,我下次有空再写。
七、下次有空把今天没写的再补上。
大家有兴趣的话,又遇到了问题可以联系我。
QQ:719822330